
Operation Manual


42
Oven Use
Use of the electronic timer
Caution
The electronic clock features Touch-Control
technology. To operate, simply touch the glass
control symbols with your fingertip.
The touch control sensitivity continuously
adapts to changing conditions. Ensure that
the glass front of the control panel is clean
and free of any obstacles when turning on the
oven.
If the clock does not respond correctly when
you touch the glass, you will need to turn off
the oven for a few seconds and then turn it
back on. By doing this, the sensors adjust
automatically and will react once more to
fingertip control.
Setting the Electronic Clock
When turning your oven on, you will see the
clock flashing 12:00 . Set the clock by
touching the or symbols on the glass.
You will hear 2 beeps confirming the time has
been set.
If you want to change the time, touch the clock
sensor
(2) until the indicator flashes (1).
Change the time by touching the or
––
sensors. The two beeps you hear after that
will confirm the new time has been set.
Manual Operation
After setting the clock, the oven is ready for
use:
1 Press the On sensor .
2 Press on the desired cooking function sym-
bol.
3 The temperature display will show the
preset temperature for that cooking
function. Press on the temperature sensor
(5) to change it. Select the desired
temperature by pressing on the
+ or –
sensors.
4 The top oven cavity will start to heat up.
Functions
6), (7), (8), ( and), will start
the fast preheating function for a few
minutes. The oven will beep when it reach-
es the selected temperature.
Caution: this preheating function turns on the
turbo motor at the back of the top oven cavity.
5 During oven heating, the
o
display will flash
to show that the food is being heated.
6 Press on the Off sensor to stop cooking.
Caution
When cooking has finished, you will notice that
oven cooling feature will work until the tempera-
ture inside the oven has been suitably lowered.
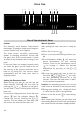
1 2 3 4 5 6 7 8 9
1112 10