Mode d'emploi Gebruiksaanwijzing Gebrauchsanweisung Instructions for use Hoja de Características Istruzioni d'uso 2917 v 1.
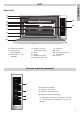
FRANÇAIS 2917 Modèle 2917 1 2 + - 3 4 5 6 11 12 7 8 9 HI 900 4056-01 10 1 Fixation au Meuble 2 Sortie de l’air de Réfrigération 3 Résistance du Gril Abattable 4 Support Chromé/ Guide Télescopique 5 Grille 6 Turbine 7 Plateau pour Rôtis 8 Plateau à patisserie 9 Charnière 10 Porte 11 Panneau Frontal de Commande 12 Lampe Panneau avant de commande + - 1 1 Horloge électronique. 2 Sélecteur de fonctions. 2 3 Sélecteur de températures. 4 Voyant lumineux de chauffage*.
Fonctions du four Arrêt du four Traditionnel Utiliser pour les gâteaux et les tartes qui doivent recevoir une chaleur uniforme et pour obtenir une texture moelleuse. Traditionnel pulsé Recommandé pour les rôtis et la pâtisserie. Le ventilateur répartit la chaleur de façon uniforme à l'intérieur du four. Gril et résistance inférieure Spécial pour les rôtis. Peut être utilisé pour toutes sortes de morceaux, indépendamment de leur volume. Gril Pour gratiner et rôtir superficiellement.
Réglage de l’heure sur l’horloge électronique Lors de la mise en marche du four, vous verrez le mot AUTO et l’indication 00:00 clignoter sur l’afficheur de l’horloge. Appuyez simultanément et de façon prolongée sur les symboles + et –, vous entendrez alors un bip et vous verrez un point lumineux clignotant entre les chiffres de l’horloge. Ensuite, réglez l’heure de l’horloge en appuyant sur les symboles + ou –. Vous entendrez ensuite un bip pour confirmer l’heure sélectionnée. Le symbole restera allumé.
2 Sélectionnez la durée de cuisson en appuyant sur + ou –. 3 Après quoi, un bip retentit, l’heure apparaît et le symbole « AUTO » reste allumé, indiquant l’extinction automatique du four. 4 Sélectionnez une fonction et une température de cuisson. 5 Une fois la durée de cuisson écoulée, le four s'éteint et un signal sonore retentit. 6 Appuyez sur n’importe quel symbole pour arrêter le signal sonore. Le four reste éteint et le symbole « AUTO » continue de clignoter.
10 Une fois arrivé à l’heure de fin de cuisson programmée, le four s’éteint et un signal sonore se retentit. Attention En cas de coupure de courant, toute la programmation de l’horloge électronique sera annulée et l’indication 00:00 clignotera sur l’afficheur de l’horloge. Il vous faudra alors remettre l’horloge à l’heure et procéder à une nouvelle programmation. 11 Appuyez sur n’importe quel symbole pour arrêter le signal sonore. Le four reste éteint et le symbole « AUTO » continue de clignoter.
2917 Model 2917 1 2 + - 3 4 5 6 12 7 8 9 HI 900 4056-01 10 1 Inbouw bevestiging 2 Luchtuitlaat 3 Inklapbare grillweerstand 4 Verchroomde houder / Telescoopgeleider 5 Rooster 6 Ventilator 7 Diepe bakplaat 8 9 10 11 12 Bakplaat Scharnier Ovendeur Bedieningspaneel Lamp Bedieningspaneel + - 1 1 Elektronische klok. 2 Draaiknop ovenfuncties. 2 3 Draaiknop temperatuur. 4 Verwarmingslampje*.
Ovenfuncties Traditioneel Wordt gebruikt voor cakes en taarten waarbij de warmte gelijkmatig verdeeld moet worden om een luchtige textuur te verkrijgen. Traditioneel met ventilator Geschikt voor braadgerechten en gebak. De ventilator verdeelt de warmte gelijkmatig in de oven waardoor de baktijd en –temperatuur wordt verlaagd. Grill en onderwarmte Speciaal voor gebraad. Kan gebruikt worden voor elk stuk vlees of vis, ongeacht de grootte. Grill Om oppervlakkig gebraden gerechten te bereiden.
Gebruik van de oven De elektronische klok instellen De alarmtoon veranderen Wanneer u de oven aanzet, zult u zien dat het woord AUTO op het scherm gaat knipperen met 00:00. Druk samen op de + en – symbolen totdat u een geluidssignaal hoort en een punt tussen de getallen ziet knipperen. Selecteer de gewenste tijd door op de + en – symbolen te drukken. U zult een pieptoon horen, waarmee wordt aangegeven dat de tijd is ingesteld. Het symbool blijft branden. 1 Druk + en – tegelijk in.
5 Na afloop van de ingestelde baktijd gaat de oven uit en gaat er een alarm af. 6 Druk op een willekeurig symbool om het alarm uit te schakelen. De oven blijft uit en AUTO blijft knipperen. Baktijd en eindtijd van het bakproces programmeren 1 Blijf drukken op MODE totdat u een pieptoon hoort. Als u nogmaals op MODE drukt, verschijnt het woord "dur" op het klokscherm. 7 Houd MODE ingedrukt totdat u een pieptoon hoort die aangeeft dat de functie nu is uitgeschakeld.
Als u de timerinstelling wilt wijzigen, moet u de functie annuleren door + en – tegelijk in te drukken. Programmeer de oven opnieuw door de gegeven aanwijzingen op te volgen. Opmerking Bij een stroomonderbreking worden uw instellingen van de elektronische klok gewist en gaat 00:00 op het klokscherm knipperen. Reset de klok en programmeer de oven opnieuw.
2917 Modell 2917 1 2 + - 3 4 5 6 11 12 7 8 9 HI 900 4056-01 1 Befestigung am Küchenmöbel 2 Kühlluftaustritt 3 Schwenkbaren Grill 4 Verchromte Halterung/ Ausziehbare Führungen 5 Rost 6 Lüfter 7 Fettpfane 8 9 10 11 12 DEUTSCH 10 Fettpfanne Scharnier Tür Bedienfeld Beleuchtung Bedienfeld + - 1 1 Elektronische Schaltuhr. 2 Funktionswahl. 2 3 Temperaturregler. 4 Kontrolleuchte Heizen*. 3 4 * Das Lämpchen leuchtet während des Aufheizens.
Funktionen des Herds Ausschalten des Herds Normal Verwendung für Kuchen und Tortenböden, bei denen die Wärmeeinwirkung gleichmäßig sein muß, damit diese gut aufgehen. Normal mit Umluft Geeignet für Braten und für Gebäck. Der Lüfter verteilt die Wärme gleichmäßig im Herd. Grill und Unterhitze Besonders geeignet für Braten. Kann für Stücke mit beliebiger Größe eingesetzt werden. Grill Gratinieren und Anbräunen. Gestattet das Anbräunen der Außenschicht, ohne das Innere der Nahrungsmittel zu beeinflussen.
Bedienung des Backofens Einstellen der Uhrzeit der Elektronikuhr Ändern des Wecker-Tons Wenn Sie den Backofen an das Netz anschließen, blinken auf der Uhr das Wort AUTO und die Anzeige 00:00. Drücken Sie gleichzeitig und länger die Symbole + und –, dann hören Sie einen Piepton und sehen einen blinkenden Leuchtpunkt zwischen den Ziffern der Uhr; danach drücken Sie zur Zeiteinstellung die Symbole + oder –. Schließlich hören Sie einen Piepton zur Bestätigung der gewählten Uhrzeit.
3 Danach ertönt ein Piep, die aktuelle Uhrzeit wird angezeigt und das Symbol "AUTO" leuchtet permanent und zeigt damit an, dass der Backofen sich automatisch abschalten wird. 7 Drücken Sie so lange das Symbol MODE, bis ein Piep ertönt, um die Funktion zu beenden. Danach drehen Sie den Knopf auf Position , um den Backofen abzuschalten. 4 Wählen Sie eine Funktion und eine GarTemperatur. Sie können diese Funktion einstellen, auch wenn der Backofen schon in Betrieb ist.
10 Wird das eingestellte Garzeit-Ende erreicht, schaltet sich der Backofen ab. Es ertönt ein Signal. 11 Berühren Sie irgendein Symbol, um das Signal abzustellen. Der Backofen bleibt ausgeschaltet; das Symbol "AUTO" blinkt. Achtung Im Fall eines Stromausfalls wird die gesamte Programmierung der Elektronikuhr gelöscht, und es erscheint die blinkende Anzeige 00:00 auf der Uhr. Sie müssen die Uhr wieder einstellen und erneut programmieren.
2917 Model 2917 1 2 + - 3 4 5 6 12 7 8 9 HI 900 4056-01 10 1 2 3 4 Fixing to Unit Air Outlet Fold-down Grill element Chromed Support/ Telescopic Guide 5 6 7 8 Grid Fan Roasting Tray Cake tray 9 10 11 12 Hinge Door Control Panel Light Control Panel + - 1 1 Electronic clock. 2 Function selector. 2 3 Temperature selector. 4 Heating indicator light*. 3 4 HI 900 4056-01 18 11 * Indicates that the oven is heating, and it goes out when the set temperature is reached.
Oven Functions Conventional It is used for sponges and cakes where the heat received must be uniform to achieve a spongy texture. Conventional with fan Appropriate for roasts and cakes. The fan spreads the heat uniformly inside the oven. Grill and Lower element Special for roasts. It can be used for any piece, whatever its size. Grill For preparing dishes with superficial roasting. It allows the outer layer to be browned without affecting the inside of the food.
Using the Oven Setting the Electronic Clock When you switch on the oven, you will notice that the word AUTO will flash on the display with 00:00. Press the + and – symbols together until you hear a beep and see a dot flashing between the digits of the clock. Then set the clock time by pressing on the + or – symbols. You will hear a beep to confirm that the time has been set. The symbol will remain lit. Should you wish to change the time, follow these instructions again.
7 Keep pressing on MODE until you hear a beep to show the function is now off. Then set the controls to to switch off the oven. You can see how much time is left and change the remaining cooking time. Follow the previous instructions. To cancel this function, just press + and – at the same time. Programming the Cooking Stop Time 1 Press MODE until you hear a beep. Then press MODE until the word “End” appears on the clock display. 2 Select the cooking stop time by pressing + or –.
Caution In the event of power failure, your electronic clock timer settings will be erased and 00:00 will flash on the display. Reset the clock and programme again.
2917 Modelo 2917 1 2 + - 3 4 5 6 11 12 7 8 9 HI 900 4056-01 10 1 Fijación al mueble 2 Salida de aire de refrigeración 3 Resistencia de Grill Doble Abatible 4 Soportes Bandejas/ Guías Telescópicas 5 Parrilla 6 Turbina 7 Bandeja de Asados 8 9 10 11 12 Bandeja pastelera Bisagra Puerta Frontal de mandos Lámparas ESPAÑOL Frontal de Mandos + - 1 1 Reloj electrónico. 2 Selector de funciones. 2 3 4 3 Selector de temperaturas. 4 Piloto de calentamiento.
Funciones del Horno Desconexión del horno Convencional Se usa en bizcochos y tartas en los que el calor recibido debe ser uniforme y para que consigan una textura esponjosa. Convencional con Turbina Adecuado para asados y pastelería. El ventilador reparte de forma uniforme el calor en el interior del horno, reduciendo el tiempo y la temperatura de cocinado. Grill y Solera Especial para asados. Puede usarse para cualquier pieza, independiente de su tamaño. Grill Gratinado y asado superficial.
Manejo del Horno Al conectar su horno, observará que en la pantalla del reloj aparece parpadeando la palabra AUTO y la indicación 00:00. Toque a la vez y de forma prolongada los símbolos + y –, entonces oirá un beep y verá un punto luminoso parpadeando entre los dígitos del reloj; a continuación tocando en los símbolos + ó – pondrá el reloj en hora. Finalmente oirá un beep como confirmación de la hora seleccionada. El símbolo quedará iluminado.
2 Seleccione la duración del cocinado, tocando en los símbolos + ó –. 3 Posteriormente sonará 1 beep, se mostrará la hora actual y el símbolo “AUTO” permanecerá iluminado, indicando que su horno se apagará de forma automática. 4 Seleccione una función y una temperatura de cocinado. 5 Transcurrida la duración del cocinado, el horno se desconectará y sonará una señal acústica. 6 Toque en cualquier símbolo para detener la señal acústica. El horno permanecerá apagado y con el símbolo “AUTO” parpadeando.
18 El horno permanecerá desconectado, con el símbolo AUTO en la pantalla del reloj. Su horno está programado. 19 Cuando se alcance la hora de comienzo del cocinado, el horno se pondrá en marcha y se realizará el cocinado durante el tiempo seleccionado. En la pantalla del reloj verá iluminado los símbolos AUTO y . Atención En caso de un corte de suministro eléctrico, se borrará toda la programación de su reloj electrónico y aparecerá parpadeando la indicación 00:00 en el reloj.
2917 Modello 2917 1 2 + - 3 4 5 6 12 7 8 9 HI 900 4056-01 10 1 Fissaggio al mobile 2 Uscita dell'aria 3 Resistenza del grill ripiegabile 4 Supporto cromato/ Guida telescopica 5 Griglia 6 Ventola 7 Vassoio per arrosto 8 9 10 11 12 Vassoio per dolci Cerniera Sportello Pannello di controllo Luce Pannello di controllo + - 1 1 Orologio elettronico. 2 Selettore funzione. 2 3 4 HI 900 4056-01 28 11 3 Selettore temperatura. 4 Spia pilota riscaldamento.
Funzioni del forno Spegnimento del forno Standard Utilizzato per pan di spagna e dolci in cui il calore deve essere uniforme per ottenere una consistenza morbida e spugnosa. Standard ventilato Adatto ad arrosti e dolci. La ventola diffonde il calore in modo uniforme all'interno del forno. Grill + inferiore Adatto agli arrosti. Si utilizza per qualsiasi pezzo di carne, indipendentemente dalle sue dimensioni. Grill Funzione adatta alla preparazione di piatti con gratinatura superficiale.
Uso del forno Impostazione dell'orologio elettronico Modifica del tono dell'allarme acustico Quando si accende il forno, si noterà che AUTO lampeggia sul display insieme a 00:00. Premere i simboli + e – fino a quando si sentirà un bip e si vedrà un punto lampeggiante tra le cifre dell'orologio. A questo punto impostare l'orologio premendo i simboli + o –. Si sentirà un bip che confermerà che l'orologio è stato configurato. Il simbolo resterà acceso. 1 Premere + e – contemporaneamente.
5 Trascorso il tempo di cottura impostato, il forno si spegnerà e sarà emesso un allarme acustico. 6 Premere qualsiasi simbolo per disattivare l'allarme. Il forno resterà spento e AUTO continuerà a lampeggiare. 7 Continuare a mantenere premuto MODE fino a quando si sentirà un bip per indicare che la funzione è stata disattivata. Portare i comandi in posizione per spegnere il forno. Sarà possibile visualizzare quanto tempo rimane e modificare il restante tempo di cottura.
12 Premere MODE fino a quando si avvertirà un bip sonoro per disattivare la funzione. Portare i comandi in posizione per spegnere il forno. In qualsiasi momento è possibile visualizzare lo stato del timer seguendo le istruzioni al punto 1 e 4. Per modificare le impostazioni del timer occorre annullare la funzione premendo + e – contemporaneamente. Riprogrammare poi il forno seguendo le istruzioni fornite.
FICHE / EIGENSCHAPPEN / DATENBLATT / SPECIFICATIONS / FICHA / SPECIFICHE Fabricant Fabrikant Hersteller Manufacturer Fabricante Produttore NOVY Modèle Model Model Model Modelo Modell 2917 Classement selon son efficacité énergétique sur une échelle allant de A (économe) à G (peu économe). Energieefficiëntieklass e op een schaal van A (meest efficiënt) tot G (minst efficiënt). Energieeffizienzklasse auf einer Skala von A (niedriger Verbrauch) bis G (hoher Verbrauch).