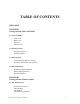
TABLE OF CONTENTS WELCOME CHAPTER 1 Getting Started with Your Kindle 1.1 Views of Kindle Front View Back View Top View Bottom View 1.2 Getting Around Using the Buttons Using the Menus 1.3 Entering Text Lowercase and Uppercase Letters Numbers, Punctuation, and Symbols 1.4 Status Indicators Whispernet Status Indicators Battery Status Indicators Activity Indicator CHAPTER 2 Getting to Know Kindle Content 2.
2.2 Managing Your Content Removing Kindle Items More about Managing Items CHAPTER 3 Reading on Kindle 3.1 Types of Content Books Newspapers Magazines Blogs Personal Documents Audiobooks Background Music 3.2 Content Formatting on Kindle Progress Indicator Changing the Text Size Increasing the Size of a Picture 3.3 Moving from Place to Place Using the Menu to Get Around Navigating within a Periodical Selecting Internal Links Viewing a Table Reading Across Multiple Kindles 3.
3.6 Listening to Audio Materials Audiobooks Background Audio Text-to-Speech CHAPTER 4 Searching on Kindle 4.1 Introduction to Search Types of Searches Performing a Search 4.2 Search Results Page Search Results for a Specific Item Search Results for a Definition 4.3 Performing Remote Searches Searching Wikipedia Searching the Web Searching the Kindle Store CHAPTER 5 The Kindle Store 5.1 Getting Started at the Store Connecting to the Kindle Store 5.
.4 Making Purchases Trying a Sample Book Buying Your Selections Returning an Item CHAPTER 6 Accessing the Web 6.1 Using Basic Web Entering a URL Using Bookmarks and Adding Your Own Using Next Page and Previous Page Selecting Links, Buttons, and Boxes Using History The Basic Web Menu 6.2 Other Features Text Size Downloading Files Basic Web Settings CHAPTER 7 Settings and Experimental 7.
8.2 Handling Files through USB Managing Your Documents Transferring Your Clippings 8.3 Converting and Transferring Your Documents Supported Formats for Conversion Sending Your Documents for Conversion 8.4 Audiobooks and MP3s Audiobooks from Audible.com Transferring MP3s CHAPTER 9 Your Kindle and Amazon.com 9.1 Shopping for Kindle Content on Amazon.com Browsing the Kindle Store Searching the Kindle Store Getting the Details Ordering Content 9.2 Managing Your Kindle on Amazon.
10.4 Transferring Audiobooks 10.
Thank you for purchasing Amazon Kindle 2. You are reading the Welcome section of the Kindle 2 User's Guide. This section provides an overview of Kindle 2 and highlights a few basic features so you can start reading as quickly as possible. You can leave this guide at any time by pressing the Home button on your Kindle. To turn to the next page, press one of the Next Page buttons. If your Kindle was a gift, you will need to register your device.
Getting Around You navigate Kindle using the 5-way controller; the Home, Menu, Back, and Next/Previous Page buttons; and the keyboard: To select a particular item such as a menu option or a specific word in your reading material, move the 5-way controller up, down, left, or right to highlight your choice and then press to select. You can press the Next or Previous Page buttons to move forward or backward in your reading material and press the Back button to retrace your steps on your Kindle.
Easy-to-Read Display Kindle uses a high-resolution display technology called electronic paper. It works using ink just like books and newspapers, but it displays the ink particles electronically. The page flash you see when you turn the page is part of the ink placement process. The electronic paper display is reflective, which means unlike most displays, you can read it clearly even in bright sunlight.
To try it now, press the Text key , move the 5-way controller to choose the size you prefer and press the 5-way to select. The text changes to the new size. Repeat the same steps to change the text size back or to change it to a size comfortable for you to read. Let Kindle Read to You You can also choose to turn on the experimental application, Text-to-Speech, which will read aloud your books, newspapers, blogs, and personal documents.
Shop Anytime, Anywhere If you have Whispernet on and you select "Shop in Kindle Store" from any menu, Kindle connects you to a broad offering of reading material including books, newspapers, blogs, and magazines. You can browse by category or check out the latest bestsellers, new and noteworthy items, or your personalized recommendations. You can see details about an item, read customer reviews, and even download free samples of books you are interested in.
Bookmark Your Reading Kindle automatically saves your place in whatever book you are reading, but you can also add a bookmark to any page by pressing the Menu button and selecting "Add a Bookmark." You can see that the upper right corner of the page is dog-eared. Kindle stores all your bookmarks for the current content in your annotations. You can view them at any time by pressing the Menu button and selecting "My Notes & Marks.
The Table of Contents for the Kindle 2 User's Guide shows you all of the topics covered in this guide. You can get to the table of contents by pressing the Menu button from any page. Move the 5-way down until you underline "Table of Contents" and press the 5-way to go to it. You can also navigate by clicking an underlined word or words like the "Table of Contents" above. Underlined words indicate a link to somewhere else in the material you are reading, like a footnote, a chapter, or a web site.
CHAPTER 1 Getting Started with Your Kindle In the Welcome chapter of the Kindle 2 User's Guide, you read about many of the things you can do with your Kindle. This chapter reviews all of the physical features of Kindle and covers the basics of using the Kindle buttons, menus, and keyboard. 1.1 Views of Kindle Front View The front of your Kindle contains the screen the keyboard, and the navigation controls. These features are illustrated below and explained in the list that follows.
Home button — shows content stored on your Kindle as well as content archived at Amazon. Next Page button — takes you to the next page in your reading material. To accommodate different ways of holding the Kindle, there is a Next Page button on both sides. Menu button — displays application and navigation choices that are related to the screen you are viewing. 5-way controller — selects an item or action when pressed down. Moves the on-screen highlight or cursor up and down when moved up and down.
Back View The back of your Kindle contains stereo speakers for audio content.
Power switch — puts your Kindle to sleep, wakes it up, and turns your Kindle on or off. To put your Kindle to sleep, slide and release the power switch; a full screen image appears on the display. While your Kindle is asleep, other keys and buttons are locked so that you don't accidentally change the place in your reading. To turn your Kindle off, slide and hold the power switch for four seconds until the screen goes blank and then release.
Tip: The Kindle power adapter is a universal power adapter and will work worldwide. If you are traveling outside the United States, and want to recharge your Kindle, connect the power adapter to a country-approved physical plug adapter (not included) for the country that you are in. To transfer content between your computer and your Kindle, connect the provided USB cable to the Kindle and to the computer's USB port.
The illustration below shows the Home menu; the bold line under "Shop in Kindle Store" indicates that it is ready to be selected.
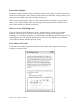
The Application Menu You can display a menu from any screen on your Kindle. When you press the Menu button, it displays choices related to the screen you are viewing. The sample screen below shows you the screen you would typically see when you press the Menu button from within a book.
1.3 Entering Text To use the Kindle keyboard, most people find it easiest to hold the device in both hands, and use the tips of their thumbs to press the keys. Lowercase and Uppercase Letters To enter lowercase letters, press the appropriate letter key. To enter uppercase letters, hold down the Shift key , and then press the desired letter key like you do on your computer keyboard. Alternatively, you can press and release the Shift key and then press the desired letter.
Numbers, Punctuation, and Symbols The number keys are located at the top of the keyboard. If you need a punctuation mark or a symbol that is not shown, press the Symbol key on the bottom row of the keyboard. You will see a menu of punctuation marks and symbols. Use the 5-way controller to choose the character you want and it will appear in your text entry box.
1.4 Status Indicators At the top of every screen, you also see Whispernet and battery life status indicators to keep you in the know. Whispernet Status Indicators The Whispernet status indicator shows you whether the wireless radio is turned on or off, the signal strength of your Whispernet service, and the connection speed. Here are the possible indicators and their meanings. The Whispernet service is active and your Kindle has a strong signal.
The battery is too low to power the Whispernet service. You must charge your Kindle battery to restore wireless service. Activity Indicator Your Kindle is busy downloading new content, checking for new items, searching for an item, or loading a web page.
CHAPTER 2 Getting to Know Kindle Content The Kindle Home screen gives you an overall picture of what you currently have on your Kindle. It shows you what has arrived recently, what you are reading, and where you are in your reading. It also allows you to remove content from your Kindle and to move content from Amazon.com to your Kindle. Read below for more details. 2.
Home Screen Features What you see on your Home screen varies depending on what reading materials you have purchased, and how you choose to show and sort this list. The screen sample and list below explain the features that you may find on your Home screen. Device name — the name of your Kindle. You can edit this name on the Settings screen. Show options — choose which types of content you want displayed in Home. Sort options — choose the order you want content displayed in Home.
Unread title — the "new" label indicates the item has never been opened and is less than 24 hours old. Once you open a new document or more than 24 hours has passed since the item arrived on your Kindle, the "new" label is removed. Archived Items — items stored at Amazon.com that you can re-download to your device. Sample title — the "sample" label indicates the book is a sample. If you like it, you can purchase the full book from within the sample.
Show Options The following screen sample shows the location of the Show options and the list below explains each of the options. Moving the 5-way controller to the left lets you select what items to show in Home. Personal Docs — shows only the Personal Documents you have stored on your Kindle. Subscriptions — shows only the periodicals and blogs you have stored on your Kindle. Books — shows only the books and audiobooks you have stored on your Kindle.
Changing What Your Home Screen Shows By default, the Home screen shows all of your content. To change the type of content displayed, follow these steps: 1. 2. 3. 4. 5. If you are not already on the Home screen, press the Home button. Move the 5-way up until the Show and Sort options are underlined. Move the 5-way to the left to see the Show options. Move the 5-way to underline the type of content you want to display. Press the 5-way to select it. The new display option changes immediately.
Changing How the Home Screen Is Sorted By default, your content is sorted by most recent first, meaning all of the new items and the content you are currently reading are at the top. To change this option, follow these steps: 1. 2. 3. 4. 5. If you are not already on the Home screen, press the Home button. Move the 5-way up until the Show and Sort Options are underlined. Move the 5-way to the right to see the Sort options. Move the 5-way to underline how you want the items sorted.
View Archived Items — takes you to Archived Items where you can view and wirelessly redownload content you are storing at Amazon.com. Search — brings up the Search text entry page for submitting a word or phrase to search for. Settings — takes you to the Settings screen. Experimental — takes you to the Experimental page where you can see and use some of the experimental prototypes we are working on. Sync & Check for Items — connects to Amazon.
When you remove a Kindle book you bought from Amazon, we automatically save all of your annotations for the book in case you ever want to download it again. However, if you remove a subscription issue that is older than seven days, a blog of any age, or an item you did not get from Amazon, any annotations you created on Kindle for those items do not get saved.
CHAPTER 3 Reading on Kindle Kindle retains the best qualities of printed books, but adds many features that are available only through digital technologies such as word look up, changeable text size, and clippings. This chapter explains more about Kindle's reading features. 3.1 Types of Content There are many types of reading material available for your Kindle such as books, newspapers, magazines, and blogs. If you want to begin purchasing and downloading reading material, you can learn more in Chapter 5.
Personal Documents In addition to purchased content, you can read your personal documents on Kindle. If you have files formatted as text, Microsoft Word, HTML, PDF, or image files like GIF or JPEG, you can e-mail the files as attachments to your Kindle e-mail address. Amazon will convert the files if necessary and send them back to your computer for free or wirelessly to your Kindle for a small fee, whichever you prefer. Currently, the conversion of PDF documents is an experimental feature.
While you are reading, each page displays a header showing the content title and/or issue date. The top of the page shows the battery and Whispernet status indicators. Progress Indicator At the bottom of every page of your reading material, you can see where you are by glancing at the progress indicator. As you progress further into the content, you will see a solid bar growing longer. The progress indicator also shows structural marks within content such as chapters, articles, or bookmarks.
Changing the Text Size You can adjust the size of the text to suit your preference. You have a choice of six sizes for reading content on Kindle. (You cannot change the text size on menus or on Kindle screens, such as the Home screen or the Kindle Store.) To pick the text size that you want to use while reading, follow these steps: 1. Press the Text key located on the bottom row the keyboard. The text size choices are displayed as well as controls for Text-to-Speech. 2.
3. Press the 5-way to zoom the image. You will see a expanded view of the picture that rotates if necessary to maximize the use of the display. 4. Press the 5-way to return to your content. 3.3 Moving from Place to Place There are several ways for you to get from place to place once you have opened your reading material. Most often you will turn pages using the Next Page and Previous Page buttons (described in Chapter 1).
If you are reading a Kindle book, the menu shows the following options: Turn Wireless Off — turns off Whispernet. When Whispernet is off, this option will change to "Turn Wireless On." Shop in Kindle Store — takes you to the Kindle Storefront. Buy This Book Now — connects to the Kindle Store, purchases, and downloads the full book to your Kindle. Only appears if you are reading a sample from the Kindle Store. Cover — takes you to the cover page of the item you are reading.
If you are reading a periodical or blog, you will see the following different options: Clip This Article — makes a copy of the entire article and adds it to your "My Clippings" file. Keep This Issue — designates the newspaper or magazine issue as one to be stored in your Kindle until you remove it. Navigating within a Periodical At the bottom of a newspaper or magazine you will see options for quickly navigating within an issue. When viewing a blog, you will see similar options for navigation.
View Articles List — takes you to the articles list of a blog when you press the 5-way. Next Article — advances you to the next article when you move the 5-way controller to the right. By default, "View Sections List" for newspapers and magazines is highlighted and when you press the 5-way, a list of the sections will appear. If you are viewing a blog, "View Articles List" is highlighted and pressing the 5-way shows a list of the blog's articles.
To navigate to a particular section, use the 5-way controller to underline the section title and then press the 5-way to select. Selecting the number to the right of the section title will take you to a list of articles found within that section. To dismiss this view and return to where you were last reading in the magazine or newspaper, select "Close Sections List" located at the bottom of the screen.
To select a link: 1. Move the 5-way over the link. 2. 3. 4. 5. The cursor changes to look like this: Press the 5-way to select the link. Kindle takes you to the linked location. Press the Back button to go back to where you were. Your reading material may also contain external links that take you to locations on the Web (if you have Whispernet turned on and are in range). Viewing a Table Your reading material may contain a large table that is not entirely contained within the screen.
3.4 Looking Up Definitions While reading a book or periodical, you can see a brief definition of a word using the Lookup feature. The Lookup feature uses The New Oxford American Dictionary by default, but you can also purchase other dictionaries and make them your default dictionary using the Settings page. See Chapter 7 for details on how to change your default dictionary. The Lookup Feature To see the definition of a particular word in your reading content, follow these steps: 1.
Tip: All of your annotations on a Kindle book are backed up on Amazon servers in case you transfer your Kindle to another person or lose or break the device. When you download a previously annotated book from Amazon.com, your annotations and last location read will come down with it. When you open the book, you will be right where you were the last time you read the book and all of your annotations will be included. Note that your "My Clippings" file is not listed as a separate downloadable item.
Removing a Bookmark To remove a bookmark: 1. Go to the bookmarked page. 2. Press the Menu button. 3. Move the 5-way controller down until "Delete Bookmark" is underlined. Press the 5-way to select. The bookmark is removed. To remove several bookmarks at one time: 1. Press the Menu button. 2. Move the 5-way controller down until "My Notes & Marks" is underlined. Press the 5way to select it. 3. Using the 5-way, navigate to the bookmark you want to remove. 4. Press the Delete key 5.
Deleting a Highlight To remove a highlight, follow these steps: 1. Navigate the cursor over the highlight you want to remove. 2. Press the Delete key Or, 1. Press the Menu button. 2. Move the 5-way controller down until "My Notes & Marks" is underlined. Press the 5way to select it. 3. Using the 5-way, navigate to the highlight you want to remove. 4. Press the Delete key 5. Move the 5-way down until "Close Notes & Marks" is underlined and press the 5-way to exit.
Viewing Your Annotations To view your bookmarks, highlights, and notes, press the Menu button and select "My Notes & Marks." Each entry has a location number followed by the bookmark, highlighted passage, or note. Your annotations are listed in the order that they occur in the content. There is no limit to the number of annotations you can have. Use the Next Page and Previous Page buttons to turn the pages just as you would in a book.
download to your computer as TXT file. Once on your computer, you can edit it or send your clippings to someone else. Clipping and highlighting are a great way to capture your favorite quotes and share with others. To clip an article: 1. Go to the article you want to clip. 2. Press the Menu button. 3. Move the 5-way controller down until "Clip this Article" is underlined. Press the 5-way to select. Kindle adds your clipping to the "My Clippings" file.
To remove the "My Clippings" file from your Kindle: 1. Press the Home button and move the 5-way down until "My Clippings" is underlined. 2. Move the 5-way to the left. 3. Press the 5-way to remove "My Clippings" from your Kindle. Kindle adds a new "My Clippings" file the next time you add a clipping or annotation to any content. 3.6 Listening to Audio Materials There are three types of audio materials that you can listen to on your Kindle. You can purchase, transfer, and listen to audiobooks from Audible.
To listen to one of your audiobooks, select it from your Home screen. You will see a page similar to the one shown below. Kindle provides a standard set of controls that are explained below. Progress Indicator — indicates how far you have come in the audiobook, the elapsed time, and the section you are in. Pause/Play — pauses or plays the audiobook (there is no Stop control). Forward 30 Seconds — moves ahead thirty seconds from the current location.
Background Audio To play background audio (MP3 files) that you have transferred to your Kindle, follow the steps below: 1. 2. 3. 4. If you are not already on the Home screen, press the Home button. Press the Menu button. Move the 5-way down until "Experimental" is underlined and press the 5-way to select it. Move the 5-way down until "Play MP3" is underlined and press down to select it. The songs are played in order, by the date you added them to your Kindle.
Press the Text key for Text-to-Speech controls. By default, content is spoken with a male voice, but using the 5-way you can select a female speaking voice. You can also slow down or increase the rate of speech as well as pause or turn off Text-to-Speech. Text-to-Speech can also be turned off by pressing the Menu button and selecting "Stop Text-to-Speech.
CHAPTER 4 Searching on Kindle Kindle allows you to take advantage of powerful search capabilities. You can search locally on Kindle or remotely at the Kindle Store, Wikipedia, or the Web. 4.1 Introduction to Search This section describes the types of searches that you can perform using Kindle and how to use search. Types of Searches Kindle supports several types of search as summarized below. Searching What You Are Currently Reading You can limit a search to only what you are currently reading.
Performing a Search To perform a search, follow these steps: 1. Type in your search term, the Search line will automatically appear. You can use whole words or partial words, and no distinction is made between lower and upper case. You can enter up to 255 characters. 2. To find the word or phrase in the content you are currently reading, move the 5-way to the right to highlight "find." Press the 5-way to select. 3. Or, to choose the type of search, continue moving the 5-way right.
The example below shows a typical Search Results page. The screen shows the titles of the items that contain your search term and indicates how many times the term occurs. The list is ordered by the number of occurrences of the search term in each item. Use the Next Page and Previous Page buttons if there are more results than fit on the current page. Showing Results for a Specific Item To see the results for one of the items listed: 1. Use the 5-way to underline the item. 2.
3. A page appears showing all instances of the search term in that particular title. Each occurrence lists its location number and is shown in context so you can see how the search term is used. To go to a specific location in the content where the search term occurs, use the 5-way to underline the location and press the 5-way to select. Search Results for a Definition When you want to look up the meaning of a word, you can limit a search to the dictionary.
To find a definition, follow these steps: 1. Type in the word you want defined. 2. Move the 5-way right to highlight "dictionary." 3. Press the 5-way to submit your search. You will see a complete definition of the word. 4.3 Performing Remote Searches To search remotely, you must have Whispernet switched on. You can select any of the remote searches described in this section. If Whispernet is not already on, press the Menu button.
Searching the Web To search the Web, enter your term and move the 5-way to select "google." This opens Basic Web and submits your search term to Google. Searching the Kindle Store To search the Kindle Store, enter your term and move the 5-way to select "store." Your Kindle connects to the Kindle Store and displays the search results page for the store sorted by relevance, as shown in the example below. You can page through the results just like you would content on your Kindle.
CHAPTER 5 The Kindle Store The Kindle Store is the place to purchase your Kindle books, newspapers, magazines, and blogs. Find an item in the store, select "Buy," and you will typically receive your item wirelessly in under a minute. All of your Kindle purchases use Amazon 1-Click for easy purchasing and Amazon automatically backs up all of your purchases in case you lose your Kindle or want to download a title again.
Browse the Kindle Store — displays the currently available content by type in the Kindle Store. National Best Sellers List — displays a list of current best sellers in the Kindle Store from the New York Times, USA Today and Wall Street Journal. Kindle Top Sellers — displays a list of Kindle bestselling titles. New & Noteworthy Books — displays a list of new or noteworthy books on the Kindle Store. Kindle Daily Post — displays a daily blog from Amazon on content-related topics.
The Store Menu The menu you see while you are connected to the Kindle Store allows you to go to other places in the store easily and includes the selections listed below. Turn Wireless Off — turns the Whispernet connection off. If you turn wireless off, you will not be able to access the Kindle Store. Kindle Storefront — takes you to the Kindle Storefront. Books — displays the books currently available in the Kindle Store. Newspapers — displays the newspapers currently available in the Kindle Store.
Recommended for You — displays items recommended for you by Amazon based on your previous digital and physical purchases. "Save For Later" Items — displays items you have previously noted as something that might be of interest to you. Browsing the Store Another way to find reading material in the Kindle Store is to browse through the different content categories such as books or newspapers. Once inside a category, you can further refine your browse by topic.
Categories — groups the content by topics of interest to make browsing easier. Select the category you are interested in to show only items in that particular subject. Getting the Details The product detail page for books and periodicals provides the most pertinent information about an item. To get to the product detail page for a particular item, use the 5-way controller to select it. Product Detail Page Example The example below shows you a product detail page for a book available at the Kindle Store.
Buy — purchases the item using your default Amazon 1-Click payment method and sends it wirelessly to your Kindle for free. Reviews — displays the customer reviews for this item. Provides links to editorial reviews and for writing your own review. Try a Sample — downloads the beginning of the book for free so you can sample it before buying. Save for Later — adds the item to your "Save for Later Items" list so you can peruse or purchase it later.
5.3 Recommendations, Reviews, and Ratings The Kindle Store provides several features to help you decide which reading materials you may want to purchase. This section describes the various ways you can find what is available. Your Recommendations The Recommendations page provides a list of things that you might enjoy based on the types of materials (digital and printed) you have purchased in the past either on Kindle or on Amazon.com.
Writing Your Own Ratings and Reviews You can share your opinions with other readers by rating and reviewing the materials that you have read. To get to this page, select "Customer Reviews" from the product detail page for the item you want to critique, and then select "Write a Review." The sample screen below shows you the type of information you can enter. Entering a Rating and Review 1. Indicate the rating you think this item deserves by selecting the line with the appropriate number of stars. 2.
5.4 Making Purchases This section explains various aspects of purchasing items from the Kindle Store. Trying a Sample Book Most Kindle books allow you to download a sample before you decide to buy the item. The end of the sample book has a link to revisit the product detail page for the item or a link to purchase the item directly. In addition, while reading a sample, the Menu shows "Buy this Book Now" so you can purchase the sample at any time during your reading.
CHAPTER 6 Accessing the Web Your Kindle comes with an Experimental application called Basic Web, which is a Web browser optimized to read Web sites that are primarily text-based. It supports JavaScript, SSL and cookies but does not support media plug-ins (Flash, Shockwave, etc.) or Java applets. 6.1 Using Basic Web There are three ways to open the Basic Web browser. The two main ways are to select "Basic Web" from the Experimental screen or to follow a link from within your reading material.
The URL text field is embedded in a navigation bar with a few other key shortcuts. To the right of the URL text field there is a button to stop loading or reload the current page. From there, move your 5-way to the right, and you can quickly search the Google search engine for the text entered in the URL text field.
Using Next Page and Previous Page Most Web pages you find on the Internet will have more content than can be displayed on one page. Use the Next Page and Previous Page buttons to move through these pages. This is equivalent to using your mouse on a computer to move up and down through a Web page. You can also move the cursor down with the 5-way controller until it reaches the bottom of the page.
Using History You can easily return to Web sites you recently viewed by pressing the Menu button and selecting "History." You will then see a list of recently visited Web sites to select from. As noted above, you can also use this list to add a site to your Bookmarks by moving the 5-way to the right. The Basic Web Menu The Basic Web menu contains other items you can select, many of which also appear in the Browser's navigation bar.
Bookmark This Page — adds the current page to the bottom of your list of bookmarks. History — displays your History page, which keeps track of the sites you have visited. Settings — displays your list of settings where you can change the options for Basic Web. Use Advanced Mode — for complex Web sites. This mode squeezes pages down to fit the width of the Kindle screen. In this mode, JavaScript can also be enabled.
Basic Web Settings You can modify the default browser behaviors and perform simple maintenance procedures using Basic Web Settings. To display the Settings screen, press the Menu button while in the browser and then use the 5-way to select "Settings." Switch to Advanced Mode — switches between Basic and Advanced modes, when you view Basic Web. Clear Cache — removes temporary Internet files from your Kindle. Move the on-screen highlight to "Clear Cache" and move the 5-way controller to the right.
Disable Images — select whether you want images to appear when you load a Web page. Note that if you do not show images, Web pages will load faster.
CHAPTER 7 Settings and Experimental Use the Kindle Settings page to personalize items on Kindle such as the name of your Kindle, automatic backup, personal information, etc. The Settings page also gives you information about your Kindle, such as the software version number. The Experimental page contains a number of prototype concepts we are working on. 7.1 Adjusting Your Kindle Settings The Settings page is shown below and the features are explained in the list that follows.
Device E-mail — this is the e-mail address of your Kindle. You and your friends can send documents to this address and they will be converted by Amazon and sent to your Kindle. To edit this e-mail address, go to http://www.amazon.com/manageyourkindle. Personal Info — enter any personal or contact information here such as an address or phone number in case you lose your Kindle. Version — indicates which version of software your Kindle is using.
Note that you will not be able to buy or download samples from the store, or use Basic Web if your Kindle is not registered. You can also deregister your Kindle from the Manage Your Kindle page on Amazon.com. Personalizing Your Kindle Your Kindle acquires a default name when it is first registered. This name is based on your Amazon.com account name, and is displayed at the top of your Home screen. If you want to edit this name on your Kindle only, follow these steps: 1. 2. 3. 4.
You can enable or disable automatic backup by following the steps below: 1. 2. 3. 4. 5. If you are not already on the Home screen, press the Home button. Press the Menu button. Move the 5-way to underline "Settings" and press to select. Press the Menu button. Move the 5-way to underline "Disable/Enable Annotations Backup" and press to select. The Settings Menu The Settings menu allows you to go to other places on your Kindle as well as update your software or restart your device.
Change Primary Dictionary — change the dictionary you are using for the built-in Lookup function. This menu option is only present if you have at least one additional dictionary loaded on your Kindle. Update Your Kindle — installs the latest software for your Kindle. When an update is loaded on your device, this menu option becomes available, otherwise it is grayed out. Restart — restarts your Kindle. Reset to Factory Defaults — resets your Kindle to its original factory settings.
CHAPTER 8 Kindle and Your Computer You can download and read text-based content on your Kindle without using your computer. However, if you want to access audiobooks or MP3 files, you need to transfer them by connecting Kindle to your computer over USB. In addition, there are other tasks you can accomplish using your computer as described in this chapter. 8.1 Getting Started This section lists the requirements for connecting Kindle to your computer.
The illustration below shows a Kindle and a laptop computer connected through the USB cable. When you are connected to your PC, your Kindle will go into USB drive mode and its battery will be recharged by the computer. Your Whispernet service is temporarily shut off and you will not receive any of your subscriptions while in this mode. Also, your Kindle is not usable as a reading device while you are in USB drive mode, but will return right to where you were when you unmount the device from your computer.
Tip: Mobipocket files must have no Digital Rights Management (DRM) protection applied to be readable on your Kindle. If you purchased a Mobipocket file from a Mobipocket retailer, you will not be able to open the file on your Kindle. Transferring Your Clippings Your clippings are stored in a file called "My Clippings.txt," which is located in the "documents" directory.
To set up your Kindle e-mail address, follow the steps below: 1. On your computer, open your Web browser and go to http://www.amazon.com/manageyourkindle 2. Sign-in to your Amazon.com account. 3. In the Your Kindle(s) section, select "Edit Info." 4. In the Kindle E-mail Address text field, change the first part of the e-mail address to what you would like it to be. The @kindle.com will automatically be appended. 5. Select "Update information" to save your changes and close the text entry box.
Audiobooks from Audible.com Kindle supports the thousands of audiobooks available through Audible.com. You can purchase and download one or more of these books from Audible.com through your Windows or Macbased computer and then transfer these books over USB to your Kindle's "Audible" folder, and listen to them on your Kindle. Once on your Kindle, an Audible file will be displayed on your Home screen with your other documents.
To transfer MP3s to your Kindle, follow these steps: 1. Connect your Kindle to your computer, using the USB cable that came with the device. 2. Your Kindle should appear on your computer in the same location you would normally find an external USB drive. 3. Open your Kindle. You should see a folder entitled "music." Drag any MP3s you'd like to play on your Kindle, into this folder. 4. Using your computer, unmount your Kindle from your computer.
CHAPTER 9 Your Kindle and Amazon.com In addition to shopping directly from your device, you can acquire the same books, magazines, newspaper subscriptions, and other content you find on the Kindle Store using a Web browser on your computer. You can also go to the Manage Your Kindle page on Amazon.com to manage your Kindle account, change or cancel a subscription, or look up a past Kindle order. If you need help, Kindle Support on Amazon.
delivered wirelessly to your Kindle. You do not need to use your computer to download your content. If you have more than one Kindle, you can use the Buy Box to choose which Kindle should receive your order. The following describes the "buy box" actions: Buy now with 1-Click: — click this button to purchase a Kindle book or current periodical issue. Your order will be auto-delivered wirelessly to your Kindle in under a minute.
Your Kindle approved e-mail list — allows you to maintain a list of e-mail addresses authorized to send e-mail personal documents to your Kindle. Managing Your Orders Delivery status for — view the status of recently ordered books and your subscriptions to determine what content has been recently delivered wirelessly to your Kindle(s). Your default 1-Click payment method — allows you to update the payment method Kindle uses to make purchases on Amazon.com.
Downloading Content from Your Computer To transfer content downloaded to your computer, over to your Kindle, follow these steps: 1. Connect the USB cable (provided with your Kindle) to the Kindle and your computer. 2. Your Kindle should appear on your computer in the same location you would normally find an external USB drive. 3. Open your Kindle. You should see a folder entitled "documents." 4. Transfer the downloaded files into the "documents" folder of your Kindle. 5.
CHAPTER 10 Migrating Content to Your New Kindle 2 If you already own another Kindle, this section will help you understand how to transfer your content to your new device. Copies of all your books and recent issues of newspapers and magazines purchased from the Kindle Store are kept on Amazon.com. Tip: You can download and share Kindle books with multiple Kindles registered to your Amazon account. 10.1 Transferring Books To transfer Kindle books to your new device, follow these steps: 1. 2. 3. 4.
6. Using your computer, unmount your Kindle from your computer. The content you transferred should now appear in Home. 10.2 Transferring Periodical Subscriptions To transfer a periodical subscription from one Kindle to another, follow these steps: 1. From your computer's Web browser, open http://www.amazon.com/manageyourkindle 2. Scroll down to the section entitled "Your Active Kindle subscriptions." 3.
6. Open your Kindle. Transfer the "Audible" folder from your computer desktop to your Kindle. You may receive a message asking if you want to replace the folder already on the Kindle, select "Replace" or "Yes." 7. Using your computer, unmount your Kindle from your computer. The content you transferred should now appear in Home. The first time you play an Audible audiobook on your new Kindle, you will be prompted to register the device with Audible.
APPENDIX Safety Information Use Responsibly. Read all instructions and safety information before use to avoid injury. CAUTION! FAILURE TO FOLLOW THESE SAFETY INSTRUCTIONS COULD RESULT IN FIRE, ELECTRIC SHOCK, OR OTHER INJURY OR DAMAGE. Battery Safety Charge the battery only in temperatures that range from 32° to 95° Fahrenheit (0° to 35° Celsius). Wireless Safety Turn Amazon Whispernet off in areas where wireless use is forbidden or when it may cause interference or danger.
more of the following measures: reorient or relocate the receiving antenna for the radio or television; increase the separation between the radio or television and your Kindle; connect equipment and receivers to different outlets; or consult the radio or television dealer or an experienced radio/TV technician for help. Watch for Signs There are some places where RF signals could constitute a hazard. For example, health care facilities, construction sites, and so forth.
ONE-YEAR LIMITED WARRANTY This Warranty is provided by Amazon Fulfillment Services, Inc. for the Kindle Device (the "Device"). We warrant the Device against defects in materials and workmanship under ordinary consumer use for one year from the date of original retail purchase.
EXCLUSION OR LIMITATION OF INCIDENTAL OR CONSEQUENTIAL DAMAGES, SO THE ABOVE EXCLUSION OR LIMITATION MAY NOT APPLY TO YOU. This limited warranty gives you specific legal rights, and you may have other rights which vary from state to state.
Although the SAR is determined at the highest certified power level, the actual SAR level of Kindle while operating can be well below the maximum value. This is because Kindle is designed to operate at multiple power levels so as to use only the power required to reach the network. In general, the closer you are to a wireless base-station antenna, the lower the power output. The highest measured SAR value for this model Kindle as reported to the FCC when held at least 0.39 of an inch (1.
RealSpeakTM and Nuance® are trademarks or registered trademarks of Nuance Communications, Inc. in the United States and/or other countries. All other brands, product names, company names, trademarks, and service marks are the properties of their respective owners. Copyright Notices Kindle device software, the Kindle Quick Start Guide, and the Kindle 2 User’s Guide © 2004 - 2009 Amazon Technologies, Inc. or its affiliates. All rights reserved. NF Browser v3.4 © 1996 - 2008 ACCESS Co., Ltd.