MacSpeech, Inc. 50A Northwestern Drive Salem, New Hampshire 03079 www.macspeech.
MacSpeech Dictate™ License Agreement 5. U.S. Government Restricted Rights The SOFTWARE PRODUCT is provided with Restricted Rights. Use, duplication or disclosure by or to the United States Government is subject to restrictions as set forth in subparagraph (c)(1)(ii) of the Rights in Technical Data and Computer Software clause at DFARS 252.227-7013 and/or subparagraphs (c)(1) and (2) of the Commercial Computer Software - Restricted Rights at 48 CFR 52.227-19, as applicable. Manufacturer is MacSpeech, Inc.
Credits MacSpeech Engineering: Jeff Ganyard …and the rest of MacSpeech: Matt Gemmell Sheila Ganyard Chuck Rogers Paul Herzog Stephane Gauthier Eric Hon-Anderson Janis Rogers T. Patrick Henebry Anne Schwing Carla Hernandez Michael Schwing Donald MacCormick Brenda Shiepe Fernanda Mera-Weakley Carly Taylor Jesper Lindholm Fernando Lucas S. L. Santos Robert Stuller Andrew Taylor Colin Taylor Chad Weider Craig Nesbitt Nathan Nesbitt Special Thanks To: Nuance Communications, Inc.
Table of Contents MacSpeech Dictate™ License Agreement 2 Credits 3 Chapter 1: Introduction 5 Chapter 2: Installation 8 Chapter 3: Getting Started 9 Chapter 4: Training 12 Chapter 5: Dictation 17 Chapter 6: Controlling Your Mac 24 Chapter 7: Reference 29 Index 36 Table of Contents 4 MacSpeech Dictate
Chapter 1: Introduction What Is MacSpeech Dictate? Will MacSpeech Dictate Replace My Mouse And Keyboard? Welcome! You are about to use your voice in a new way — to replace your keyboard! With MacSpeech Dictate, what you say will appear on the screen, in virtually any Macintosh application. The technology that allows this amazing feat is called TalkAnywhere™, and it translates speech to text and characters almost anywhere you would normally type. Probably not totally.
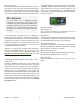
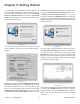
Microphones The MacSpeech Dictate Status Window The Status Window is MacSpeech Dictate’s main interface. This window floats on top of all the other windows on your screen, so it is always available to you. The Status window may be small, but it packs a surprising amount of information, as shown in Figure 1-1 Although today’s Macintosh computers appear to have a port for sound input, this only works with devices that provide a LINE IN signal, which is different from the signal produced by a microphone.
The Available Commands Window Command Mode Command mode is used when you only want to control your Mac by voice. In Command mode, anything not recognized as a command will be ignored. The advantage of using Command mode is that the commands will be more easily recognized and will be less likely to be confused as something you want dictated instead. With its self-explanatory name, the Available Commands window provides a list of commands that are available to be spoken at that time.
Chapter 2: Installation Click the Register Now button to begin using the program. (Registration requires an Internet connection.) A dialog box will appear to confirm your registration has been accepted. Insert the Program CD. A window like the one in figure 2-1 should appear. If it does not, double-click the CD image on your desktop. Drag the MacSpeech Dictate icon in the middle of the window over Applications folder on the right.
Chapter 3: Getting Started Continue button. MacSpeech Dictate will not allow you to proceed until Enable access for assistive devices is on. The first step is to get MacSpeech Dictate used to your voice. You begin by creating your first profile, and setting up your microphone. MacSpeech Dictate requires you Enable access for assistive devices in the Mac OS X Universal Access System Preference.
you should be able to drink from a normal-sized glass without spilling the liquid or touching the microphone. IMPORTANT You must use a USB adapter for your microphone. All microphones sold with MacSpeech Dictate should include a USB adapter. Make sure the correct side of the microphone (usually marked with a dot or the word “Talk”) is pointing towards your mouth. When the microphone is adjusted correctly, click the right arrow.
If the volume meter remains empty, or the text doesn’t disappear after you read it four times, you probably have a sound input problem. See the Troubleshooting Sound Input section at the end of this chapter for more information. Clicking the Manual Gain Setting check box will allow you to bypass automatic volume adjustment and set the gain manually. Listen for static, excess noise, a hum, or any other odd sound. If you hear any these of things, check your microphone’s connections.
Troubleshooting Sound Input If MacSpeech Dictate doesn’t respond to your voice or doesn’t seem to be working at all, check your sound input. The problem can either be with the hardware (your microphone or computer) or with software (the Macintosh sound input settings). Checking Your Microphone Make sure the USB adapter is plugged into an open USB port on your Macintosh. You may want to unplug it and plug it back in to make sure, then try the following: 1). Quit MacSpeech Dictate if it is running. 2).
Chapter 4: Training In this chapter, we cover training MacSpeech Dictate to recognize your voice. Along the way, we will share some insight into how MacSpeech Dictate works, as well as tips for better recognition. We will also explain how to manage multiple profiles. Why Do I Need To Train MacSpeech Dictate? MacSpeech Dictate is speaker dependent, which means it needs to be trained to get the best accuracy.
The text you read turns green as it is recognized (Figure 4-2). TIP: If you get a lot of red text, read fewer words, then pause until the text turns green. Gradually increase the number of words you read before pausing as long as the text continues to turn green. As you complete each panel, the progress bar indicates where you are in the story, and how far it is to the end. Keep reading until you finish the “Welcome” story. Figure 4-2 MacSpeech Dictate automatically moves to the next panel as you read.
Vocabulary Training Besides analyzing your voice, MacSpeech Dictate can analyze documents you have written. It will learn new words and adjust itself to your speech patterns. To do this, you choose one or more documents for Vocabulary Training to evaluate, select which words you want the program to learn, and then save the results. Here’s how to have MacSpeech Dictate analyze documents: 1. Choose “Vocabulary Training…” from the Tools menu. The Introduction screen appears.
7. When finished, MacSpeech Dictate will display a screen informing you the words have been added to your vocabulary, as shown in figure 4-8. Click the “Close” button or the red close window button to dismiss this window. Don’t Over-enunciate! If you read the training text with perfect enunciation, like a radio announcer, MacSpeech Dictate will think you speak that way all the time. Now, it is possible you really do talk like a radio announcer. Heck, you might be a radio announcer.
2. Click the Plus Sign to create a new profile. MacSpeech Dictate will create the new profile, as shown in figure 4-11. Working With Profiles Your profiles — your personalized voice files — are the most important part of MacSpeech Dictate. You have invested your time and effort into building them. So knowing how to back up and restore these valuable files is important. More About Profiles You can have as many profiles as you have room on your hard drive space.
Most customers will get better than 95% accuracy after the first story. Deleting Profiles To delete a profile, follow these steps: 1. Choose “Profiles” from the Tools menu to open the Profiles window, as shown in figure 4-10. 8. Once your accuracy is above 95%, stop reading training stories. 2. Highlight the profile you want to delete. 9.
Chapter 5: Dictation In this chapter we will explore using MacSpeech Dictate for dictation, and show how to dictate special words, such as capital letters and punctuation. Before we get into all of that, however, let’s take a look at a few pointers on how to get best results. Don’t Strain Your Voice! Dictation may help alleviate RSI (Repetitive Strain Injury), because it eases the burden on your arms and hands. But speech recognition has its own potential problem, which is vocal strain.
Handling Mistakes No matter how good MacSpeech Dictate is — or how careful you speak — both it and you will make some mistakes. When that happens, there are some special commands available to assist you. Scratch That or Forget That Both of these commands do the same thing — they delete the last utterance, which is what you said from the last time you paused. Scratch Word If Scratch That or Forget That deletes too much, say Scratch Word or Forget Word instead to erase only the last word.
Moving Around Documents By Voice Just because you can’t use the keyboard or mouse before you are finished editing doesn’t mean you can’t get around. In fact, once you get used to how to do it, you may prefer moving around by voice in the documents you have dictated. Here’s how: Editing and Navigation Commands What You Say Deletes the instance of the word or phrase spoken that is closest to the insertion point.
Adding New Words If you are using MacSpeech Dictate’s Note Pad, you can add new words using Train Vocabulary from Selection. Here’s how: 1. Make a selection in a MacSpeech Dictate Note Pad document that contains the word or words you want to add. 2. Select “Train Vocabulary from Selection…” from the Tools menu. 3. You may not want MacSpeech Dictate to learn all the unknown words. For example, there might be proper names that are not a usual part of your writing, or abbreviations, or parts of URLs.
Dictating Special Kinds of Words As you learned while training MacSpeech Dictate, it is necessary to speak punctuation so it can accurately tell where sentences begin and end, among other things. There is an extensive list of things you can say. The following tables provide a guide to the different things you can say that do not produce words on the page. One thing we get asked frequently is how MacSpeech Dictate knows the difference between punctuation and a real word.
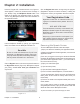
Punctuation Examples What You Say Punctuation Examples What You Say What Happens What Happens Copyright SIgn © Tab Key Dash -- Tilde ~ Degree Sign ° Trademark Sign ™ Dollar Sign $ Underscore _ Dot . Vertical Bar | Ellipsis … Em Dash --- En Dash -- Equals Sign = Euro Sign € Exclamation Mark (All Dialects) Exclamation Point (US Only) ! Forward Slash / Full Stop (all dialects) .
Number Examples Roman Numeral Examples What You Say What Happens Forty-Three POINT Twenty Eight PERCENT SIGN 43.28% Oh Two Four Six Zero What You Say Roman Numeral Thirty One 02460-1458 Two and Three Fourths 2 3/4 Eleven Over Thirty Two 11/32 Eleven Thirty Seconds 11/32 Ninety Nine Dollars and Fifty Five Cents $99.55 Forty Five Euros and Thirty Five Cents €45.35 Pound Sterling Sign One Hundred and Twenty POINT Thirty Five £120.
Troubleshooting Dictation Date and Time Examples What You Say Three SLASH Eleven SLASH Two Thousand and Two April First What Happens Using MacSpeech Dictate for dictation is fairly straight forward 3/11/2002 — you speak, and the text appears at the location of the April 1 insertion point, in any document. Occasionally, however, you March Twenty Second March 22 may experience reduced accuracy or other problems. There The Nineteen Eighties the 1980’s is usually an easy solution to these issues.
Chapter 6: Controlling Your Mac In this chapter, we will look at how MacSpeech Dictate can control a Macintosh. It can open files, type keys, press buttons, and click the mouse. Will MacSpeech Dictate completely replace your keyboard and mouse? Probably not – it’s still faster to do some things the old-fashioned way. Think of MacSpeech Dictate as a “third hand” to click a button without raising your hands from the keyboard, or open a file without digging through folders.
NOTE: You can’t launch MacSpeech Dictate by voice, because it has to be running before it can interpret your speech. If you want it to launch when you start your Macintosh, do one of the following: - Launch MacSpeech Dictate. Move the mouse over the MacSpeech Dictate icon in the Dock. Press and hold the mouse button until a menu appears. Select “Open at Login” from the menu. - Drag the MacSpeech Dictate icon into the Login Items section of the Accounts panel in System Preferences.
• Text Macro: A text macro types a predefined block of text when you speak its name. The text can be a whole form letter or just an address; in fact it can be any amount of text. • Automator Workflow: This command will run the referenced Automator Workflow when its name is spoken. Creating and Modifying Commands Most commands are written in AppleScript, Apple’s system-wide scripting language. An AppleScript tutorial is beyond the scope of this manual.
Creating Commands Manually You can also create a command manually. Use this method when you don’t have pre-existing content that will work with MacSpeech Dictate’s ability to automatically create a command. To create a command manually, follow these steps: Turn off MacSpeech Dictate’s microphone. AppleScript Anything that can be written as an AppleScript can be made speakable. MacSpeech Dictate includes a full AppleScript Script Editor. Enter the code for the AppleScript into the Source field.
In Mac OS X, shell scripts are most commonly created with Apple’s Terminal program, which you will find inside the Utilities folder on your hard drive. If you save a Shell Script from within Terminal, you can drag it into the Automatic area of a new Command and name it to easily create the command. To manually create a Shell Script command, select Shell Script from the Type pop-down menu and write the shell script directly into the Source field of the Command window, then choose a name for your command.
4. Highlight the command you want to delete in the command list. Duplicating Commands To duplicate a command, do the following: 1. Launch MacSpeech Dictate if it is not already running or switch to it by saying “Bring Dictate to the front.” 2. Select “Commands…” from the Tools menu. 3. In the side bar, click the command set to which the command you want duplicated belongs. 4. Highlight the command you want to duplicate in the command list. 5.
Chapter 7: Reference This chapter provides a quick reference to menus and windows. Getting Technical Support Via the World Wide Web MacSpeech provides technical through our web site, 24 hours a Startup Mode This controls the state MacSpeech Dictate is in when it is launched. You can have it start up with the Microphone off (Idle - Mic Off), in Dictation mode, in Command mode, or Sleep. assistance day. Go to http:/www.macspeech.com/support_center for answers to many questions.
Recognition Moving the slider towards Faster makes text appear more quickly, but may sacrifice accuracy. Moving the slider towards More Accurate makes the program try harder to understand you, which could slow it down. By default, the slider is set to balance the two factors. Feel free to experiment to see which setting works best for you. 2. Command Preferences Command Preferences allow you to adjust the ways commands are handled.
File Menu Figure 7-5 Figure 7-7 New Note Pad (Cmd-N) Choose this to open a new Note Pad window (figure 7-6). You can dictate directly into a Note Pad window and transfer the text to another document. Multiple Note Pad windows can be open at once. Open (Cmd-O) Opens a previously saved Note Pad document. Close (Cmd-W) This closes the active window. Save (Cmd-S) This allows you to save the current Note Pad window. Save As… (Cmd-Shift-S) Saves the current Note Pad document under a different name.
Speech Menu Figure 7-9 The Speech Menu is used to turn the microphone on or off, or select MacSpeech Dictate’s mode. Microphone On/Off Using this menu item toggles the microphone on and off. The menu item changes to Microphone Off when the microphone is on. Dictation Choosing this puts MacSpeech Dictate into Dictation mode. Command Choosing this puts MacSpeech Dictate into Command mode. Figure 7-11 Highlight the profile you want to use, then click the Make Active button.
Train Vocabulary from Selection… This allows you to select text in a MacSpeech Dictate Note Pad document and have the program learn new words “on-the-fly.” Vocabulary Training and Train Vocabulary from Selection both display a window similar to the one shown in Figure 7-15. Figure 7-13 Voice Training… Select Voice Training (Figure 7-14) when you want to read more training stories in order to further improve your accuracy.
Text Show Fonts (Cmd-T ) This menu item displays the Font palette, as shown in Figure 7-17. Figure 7-19 The menu items in the Text sub-menu allow you to align the selected text left, right, centered, or justified. Figure 7-17 Window Menu Bold, Italic, Underline (Cmd-B, Cmd-I, Cmd-U) These menu items format your selection in Bold, Italics, or Underlined, respectively. Bigger, Smaller (Cmd-Plus Sign, Cmd-Minus Sign) The menu items increase and decrease the size of the selected text.
Help Menu Figure 7-23 Figure 7-21 Search Enter a word or phrase in this field to search for a particular topic on which you need help. Welcome Displays the MacSpeech Dictate Welcome window. Microphone Asleep (Sleep mode) When MacSpeech Dictate is in Sleep mode the microphone will be on, but any incoming sound will be ignored. There will still be activity in the signal meter when the program is in Sleep mode, but no action will be taken on what it hears (Figure 7-24).