
1.2

9 MacSpeech DictateChapter 3 — Getting Started
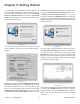
The first step is to get MacSpeech Dictate used to your
voice. You begin by creating your first profile, and setting up
your microphone. MacSpeech Dictate requires you Enable
access for assistive devices in the Mac OS X Universal
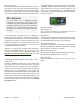
Access System Preference. If this option is not turned on you
will see the following window:
Figure 3-1
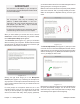
If you see this window, click the icon next to Show Universal
Access Settings. This will bring up the window shown in
Figure 3-2.
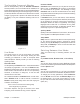
Figure 3-2
Make sure the check box next to Enable access for assistive
devices is checked. (Don’t turn on VoiceOver at the top of
the window by mistake unless you want your Mac to talk
back to you for everything it does). Once you have verified
Enable access for assistive devices is on, you can close
the Universal Access System Preference and click the
Continue button. MacSpeech Dictate will not allow you to
proceed until Enable access for assistive devices is on.
If Enable access for assistive devices is on, the first
window you see will be the Read Me window. If you have not
registered yet, you will see a window asking you to register or
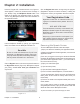
select your license key. Finally, you will see the Create Profile
window (Figure 3-3).
Figure 3-3
Click the Create a New Profile button. Enter your name in
the New Profile Information panel (Figure 3-4). Make sure
you select the type of microphone you are using from the
Microphone pop-down menu, then select the dialect that
best suits your voice. MacSpeech Dictate comes with voice
models for US, UK, Australian, Indian English, Southeast
Asian English, and Teen English.
Figure 3-4
If you use the microphone that came with MacSpeech Dictate
or iListen, select Standard Acoustics. If you are using an
Array microphone, click on the Advanced button and then
select “Array” from the pop-down menu next to the word
“Acoustics.”
Chapter 3:
Gettin Started