Nubia N80 (Nubia 8011) (FCC ID :2AHJO-N80) Quick Start Guide 1
LEGAL INFORMATION Copyright © 2021 Nubia Technology Co., Ltd. All rights reserved. No part of this publication may be quoted, reproduced, translated or used in any form or by any means, electronic or mechanical, including photocopying and microfilm, without the prior written permission of Nubia Technology Co., Ltd. Notice Nubia Technology Co., Ltd. reserves the right to make modifications on print errors or update specifications in this guide without prior notice.
United States and/or other countries. © DTS, Inc. All Rights Reserved. Other trademarks and trade names are those of their respective owners. Version No.: R1.
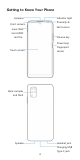
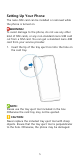
Getting to Know Your Phone Earpiece Indicator light Proximity & Front camera light sensor nano-SIM/ microSDXC card tra Volume key Power key/ Fingerprint Touch screen sensor Back cameras and flash Headset jack Speaker Charging/USB Type-C jack 4
Setting Up Your Phone The nano-SIM card can be installed or removed while the phone is turned on. WARNING! To avoid damage to the phone, do not use any other kind of SIM cards, or any non-standard nano-SIM card cut from a SIM card. You can get a standard nano-SIM card from your service provider. 1. Insert the tip of the tray eject tool into the hole on the card tray. NOTE: Please use the tray eject tool included in the box. Otherwise the card tray may not be ejected.
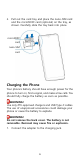
2. Pull out the card tray and place the nano-SIM card and the microSDXC card (optional) on the tray, as shown. Carefully slide the tray back into place. microSDXC card nano-SIM card Charging the Phone Your phone’s battery should have enough power for the phone to turn on, find a signal, and make a few calls. You should fully charge the battery as soon as possible. WARNING! Use only ZTE-approved chargers and USB Type-C cables.
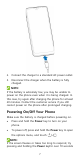
2. Connect the charger to a standard AC power outlet. 3. Disconnect the charger when the battery is fully charged. NOTE: If the battery is extremely low, you may be unable to power on the phone even when it is being charged. In this case, try again after charging the phone for at least 20 minutes. Contact the customer service if you still cannot power on the phone after prolonged charging. Powering On/Off Your Phone Make sure the battery is charged before powering on.
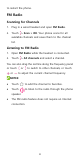
to restart the phone. FM Radio Scanning for Channels 1. Plug in a wired headset and open FM Radio. 2. Touch > Scan > OK. Your phone scans for all available channels and saves them to the channel list. Listening to FM Radio 1. Open FM Radio while the headset is connected. 2. Touch > All channels and select a channel. You can also drag the red line along the frequency panel or touch or or to switch to other channels, or touch to adjust the current channel frequency.
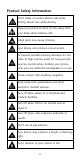
Product Safety Information Don’t make or receive phone calls while driving. Never text while driving. Keep your phone at least 10 mm away from your body while making calls. Small parts may cause choking. Your phone can produce a loud sound. To prevent possible hearing damage, do not listen at high volume levels for long periods. Exercise caution when holding your phone near your ear while the loudspeaker is in use. Avoid contact with anything magnetic.
Avoid extreme temperatures. Avoid contact with liquids. Keep your phone dry. Do not attempt to disassemble your phone. Only use approved accessories. For pluggable equipment, the socket-outlet shall be installed near the equipment and shall be easily accessible. Don’t rely on your phone as a primary device for emergency communications.
1.6 W/kg. This device is complied with SAR for general population/uncontrolled exposure limits in ANSI/IEEE C95.1-1992 and had been tested in accordance with the measurement methods and procedures specified in IEEE1528. The FCC has granted an Equipment Authorization for this model phone with all reported SAR levels evaluated as in compliance with the FCC RF exposure guidelines. SAR information on this model phone is on file with the FCC and can be found under the Display Grant section of www.fcc.
Part 15 of the FCC Rules. These limits are designedto provide reasonable protection against harmful interference in a residential installation. This equipment generates, uses and can radiate radio frequencyenergy and, if not installed and used in accordance with the instructions, may cause harmful interference to radio communications. However, there is noguarantee that interference will not occur in a particular installation.