
User's Manual
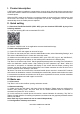


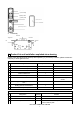
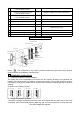

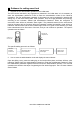
Table Of Contents

NUCTECH COMPANY LIMITED
6
screws. When opening the door right outwards or inwards, rotate the handle to No.1 position; when
opening the door left inwards, rotate the left direction to No.2 position. The specific steps are shown
as follows:
3. Change the direction of lock body latch bolt
When the door is opened right outwards and left inwards, the direction of lock body latch bolt is
shown in Fig. 1; when the door is opened right inwards and left, the direction of lock body latch bolt
is shown in Fig. 2. The specific steps are shown as follows:
1. Before installation, make sure to confirm the direction of opening the door and change the
directions of handle and latch bolt according to the installation manual.
2. After installing the whole lock, open the front surface plate cover, enter any 6-12-digit password
any fingerprint to simulate an unlocking action. If the lock body latch bolt and the dead bolt can be
controlled normally by pressing the front handle when the LED indicator light is on in green, the
installation is successful. Do not close the door outside before the successful installation.
Turn the
screw
Change the direction
of external handle
Direction of handle for
right open
Direction of handle for
left open
A: Unscrew the hexagon
socket screw and Philip's
head screw with the Allen
wrench and cross screwdriver,
take down the external
handle, adjust the direction,
and then return the screws.
Change the direction
of external handle
Direction of handle for
left open
Direction of handle for right
open
B: Press the safety button,
unscrew two screws with a
screwdriver, rotate the
handle by 180° to the
correct position, and then
return the screws.
Notes
Lock body
Change direction
Fig. 1
Fig. 2
Unscrew the
screws of lock
body and panel
with a cross
screwdriver.
After removing
the panel, rotate
the latch bolt by
180°, install the
panel into the
lock body, and
then tighten the
screws.