Retractable Awning Owners Manual 6000 Series 7000 Series 8000 Series
Futureguard Owner’s Installation & Operation Manual Products Covered 6000 Series 7000 Series 8000 Series TABLE OF CONTENTS 1. Introduction: 1-1 Customer Service 1-2 Product Handling Pages # 2 2 2. Installation: 2-1 Tools Needed for Assembly 2-2 House Preparation 2-3 Awning Installation 2-4 Weatherguard Cover 2-5 Roof Mount Installation 2-6 Motors & Controls 2 2 3 7 9 12 3. Operation: 3-1 Manual Gear Operation 3-2 Motorized Operation 3-3 Pitch Adjustment 12 12 13 4.
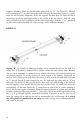
1. INTRODUCTION 1-1 Customer Service: Congratulations and thank you for purchasing a Futureguard Retractable Awning. We are confident of your satisfaction and years of enjoyment with our product. In order to make the best of your investment, be certain to familiarize yourself with the contents of the entire owner's manual before installation or operation. If you feel this procedure is too difficult to achieve on your own, seek the assistance from a local home improvement or building contractor.
support the weight of the awning when extended. It is critical that the mounting lag bolts be installed into a stud or header board. Plywood sheathing or equivalent will not support the awning. If the awning is to be mounted under the soffit (overhang), a Weatherguard Cover is not necessary. However, if your awning is not protected we strongly recommend the purchase of a Weatherguard Cover. See your local retailer where you purchased this awning.
at your local retailer, however if your home has vinyl siding we recommend cutting and removing the siding, and securing the header board through the sheathing into the studs directly. (Be sure the header board is level). Hardware for securing the header board to the wall is not provided but it is recommended that 3/8" galvanized lag bolts and washers be used. It is critical that all lag bolts be mounted into structural material such as studs or box sill. Counter sink the lags, and caulk all joints.
supports (shoulder). Mark this on the header board with an "A". (See Detail #3). Measure over a minimum of 3" to either side of this mark and using the mounting bracket as a guide, mark the hole locations. Important: If the arm supports are more than 12" from the end of the awning, install the mounting brackets to the outside of the arm support. Drill 1/4" pilot holes centered on the hole and then install the mounting brackets with the 3/8" x 4" galvanized lag bolts and washers provided.
DETAIL #4 Place one bracket on either side of the arm support shoulder. INSTALLATION ON MASONRY: Tools needed for assembly: A. B. C. D. Drill 3 /16" or 1/4" masonry drill bit 5 /8" masonry drill bit 9 /16" socket or adjustable wrench (See Detail #5) Caution - Installation must be on structural masonry. If mounting on brick veneer, you must use longer lag bolts and secure into framing members. Ask your local home center for proper fasteners and techniques.
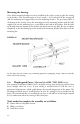
Mounting the Awning: Once all the mounting brackets have been installed on the wall, it is time to place the awning in the brackets. This step will require at least 2 people. ( See Detail #6) Lift the awning and slide the mounting bar (support tube) into the mounting brackets. The gear loop will be at the bottom of the awning. Secure the mounting bar to the mounting brackets with the bolts supplied. Be sure the mounting bar is seated flush to the back of the bracket.
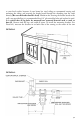
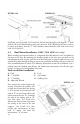
1. Attach a Weatherguard Hood Bracket next to each wall bracket (See Detail #7) DETAIL #7 2. Slide the hood sections together as shown in (Detail #8). For hood covers with multiple sections, stagger the joints. (See Detail #9) Slide 2 "T" bolts in the center track placing one on either side of the joint. Place a splice bar over the bolts and fasten with nuts. Repeat this process on the front portion of the hood. For hood to perform properly, joints must be staggered.
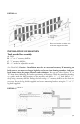
DETAIL #11 DETAIL #10 the Philips screws provided. (See Detail #10) Lift the hood into place and align the "T" bolts with the slot in the hood brackets and secure with nuts. If the Weatherguard Cover needs to be closer to the house, then the "T" bolts should be moved from the outer track to the center track (See Detail #11) 2-5 Roof Mount Installation: (6000, 7000, 8000 series only) When installing roof mount brackets, it is important that all brackets be level, and plumb to the front of the facia.
Locate the "R" mark closest to the "A" mark. With roof bracket Section "1" as a guide, position the bracket on the "R" mark and drill three 1/4" pilot holes through the roofing and into the rafter. Now attach Section "1" of each roof mount bracket using three 3/8" x 4" galvanized lag bolts with a washer under each head. Do not completely tighten at this time.
Attach remaining sections to Sec. "1" using the 3/8" x 3 1/2" hex bolts, washers, and nuts provided. (See Detail #15) Do not completely tighten the bolts at this time. Attach Sec. "2" to the front of Sec. "1". Attach Sec. "4" to the back of Sec. "1". Attach Sec. "3" to the top of Sec. "2". Once all roof brackets have been assembled, fold the bracket forming a triangle. Section "3" and "4" can now be adjusted to form a level vertical face on Sec. "2".
2-6 Motors and Controls: (optional) If you purchased the optional motorized version, your Futureguard Retractable Awning has been equipped with a state of the art electric motor that requires no maintenance and is prewired and ready to use. Remote Control System: A 12' plug-in power cord and hand held transmitter are provided for ease of installation and operation. Warning; Before you plug in your motor, be sure the receptacle is equipped with a GFI (Ground Fault Interrupter).
3-2 Motorized Operation: Your new motorized retractable awning has been equipped and preset with factory limit switches. These settings will allow you to extend or retract your awning to any position at the touch of a button, without the worry of over extending or retracting your awning. This system uses a remote control transmitter to operate the awning. Pressing the up button will retract the awning, pressing down will extend the awning, and to stop the awning, simply press the stop button.
4. CARE & MAINTENANCE 4-1 Fabric Care & Cleaning: The fabric on your awning is made from 100% solution-dyed acrylic yarns. Solution dying is the process of adding color to acrylic fibers during manufacturing while they are in a liquid state. By following a few simple steps, the fabric will maintain its good looks for years. Because the fabric is woven, it is also highly breathable, which is why it dries quickly with only air exposure.
opposite end from the gear or motor). Using the silicone spray with a straw attached to the spray nozzle, lubricate generously the area between the end of the roller tube and the end bracket (pivot pin). (See Detail #20) Take care not to overspray on the fabric material. 4-3 DETAIL #20 Before Calling for Service: Important; If you are experiencing any problems with the installation or operation of your awning.
4. Unable to adjust the pitch on the awning. (8000 Series only) Solution The awning is already at its maximum height or drop. Do not force the awning any further. Solution Flex Pitch adjustment is being performed incorrectly. Please refer to Section 3-4 Pitch Adjustment for proper operation directions. 5. The awning does not move in or out. Solution Be sure there is power to the outlet. Check to see if there is a reset button on the exterior outlet or if a circuit breaker is off. 6.
5. WARRANTY INFORMATION 5-1 Frame Warranty: Limited Frame Warranty All Futureguard Awnings are covered by a limited warranty from the date of original purchase. This warranty covers Futureguard awning framework and hardware but excludes any fabric or optional motors and/or electrical accessories associated with this awning. Please refer to accompanying warranties regarding fabric and motor coverage. Awnings installed for non-residential use will have a warranty period of 3 years only.
5-3 Motor Warranty: Motor Limited Warranty Futureguard warrants that its motors and electronics will be free from defects and perform to the standards applied in the normal operation of this awning. The following series have specific coverage terms. 6000 Series 7000 Series 8000 Series Motor 5 years 5 years 5 years Electronics 1 year 1 year 1 year Awnings installed for non-residential use will have a warranty period of 3 years only.
Manufactured by Futureguard, Inc.