
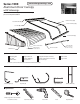
Installation Guide
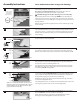

Align Canopy Rafter with pre-punched holes in the center of the Top Trim first
and secure with small screws. Then, repeat with the other end of the Canopy
Rafter in the center on the Front Gutter and secure with small screws.
NOTE: Door canopies wider than 60” need more than one canopy rafter.
Pre-punched holes will guide installation of multiple canopy rafters
Canopy
Rafter
Top Trim
8
FIG. 8
Connect Canopy Slat Section to the Canopy Rafter using Interlock Clips at each
joint where the slats interlock. Installing clips is a two-step process: (1) Insert
the curved part of clip into slat joint; (2) Slide clip onto Canopy Rafter. Interlock
Clips are installed on the flat section of the awning only, not at the curve. If
stubborn, make sure they are straight and parallel with the slat joint.
Interlock
Clip
9
FIG. 9
Installation Instructions
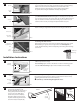
Sidewings
SERIES 1500
Attach Sidewings to Edge Rafters with small screws using pre-drilled holes.
Edge Rafter
Connector
Small Screws
10
FIG. 10
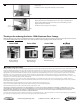
Prior to installation, measure the area above your door to confirm there is
sufficient space for the canopy.
NOTE: Sidewings require 13 inches of headroom over door for mounting. Special
ordered Low Mount Sidewings require 6 inches of headroom for mounting.
Standard
Sidewings
6 inch
13 inch
Special order
Low Mount
Sidewings
1
FIG. 1
2
Caulk
Mounting
Bar
3-inch
minimum
FIG. 2
Install Mounting Bar with large screws above the door. Be sure the Mounting
Bar is level and centered over the opening. Screws must be in studs or heavy
sheathing. (Drill alternate holes in bar if necessary).
l
!
Caulk the top of the Mounting Bar against the house.
For awnings 85” wide and over:
Attach Support Arm in the center of the Front Gutter with small screws. Install
Deluxe Castings to opposite ends of Support Arms and hand-tighten set
screws. The Deluxe Castings will need readjusting and leveling when fastening
to the house.
Adjustable
Hinge Bracket
Arm
Front
Gutter
11
FIG. 11
3
small screw
interlocked
lower front
of canopy
slowly
sidewing
lift
canopy
upward
insert
FIG. 3A
FIG. 3B
FIG. 3C
Lift the front of the canopy upward
and insert the Top Trim into the
Mounting Bar (FIG. 3A). Lower front of
canopy slowly and allow Sidewings
to rest on the house (FIG. 3B); be
sure the two parts are completely
interlocked. Align holes and secure
Top Trim to Mounting Bar with small
screws from bottom side (FIG. 3C).