
How to Guide

page 10 | Retractable Awning Installation & Operation Manual
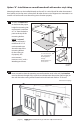
Detail #11
!
IMPORTANT!
Be careful not to hit
the fabric with the
brackets as it can
cause a tear or hole
that is not covered by
the warranty.
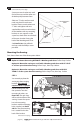
STEP 2
Install your Weatherguard
Cover onto the square bar.
This step will require at least
2 people.
With the Cover facing the
proper direction see Detail
#11 lower the cover brackets
down onto the square bar.
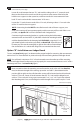
Slide the clamping bolts up through from the bottom of the bracket and thread into
the top hole. Be sure to tighten completely so that the locking lip on the inside of the
mounting bracket locks down over the square bar.
3-8
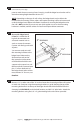
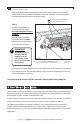
continued from previous page
Insert the cover bracket clamping screws and tighten the cover brackets onto the square
bar. Carefully remove any and all remaining packing materials including the plastic slip
covers holding the arms closed.
Cover Bracket
secured onto
square bar.
Slide Cover Brackets BEHIND fabric roll
to properly attach to square bar.
Lower Cover facing front, BEHIND fabric roll, and
secure cover bracket down onto square bar.
FABRIC ROLL
Continue now to section 5 of this manual: Awning Operation (page 16)
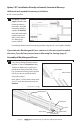
4. Roof Mount Installation
When installing roof mount brackets, it is important that all brackets be level and plumb to the
front of the fascia. By mounting the brackets plumb to the fascia, gear operation can be utilized
from the deck or patio with the use of the hand crank.
A proper sealant must be used around all lag bolts through roong to prevent any possibility of
leaking. Ask your local home improvement store for its recommendation of sealant.
The following instructions assume the installation is on a pitched roof with standard roof
shingles and wood frame construction. For all other types, seek the assistance of a local
building contractor. A 2” x 8” pressure treated ledger board will be required for ALL roof mount
applications.