
How to Guide


page 11 | Retractable Awning Installation & Operation Manual
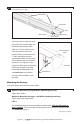
Install one roof bracket on the roof rafter closest to the inside of each of the two “E’s”.
For awnings 14’ or less, install the third bracket on a roof rafter near the center of the
other two. For awnings 15’ and over, install the two additional brackets divided evenly
between the two end brackets.
4-1
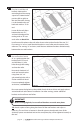
First, let’s install the roof
brackets. Measure the
entire length of the awning
square bar. Determine the
position (left or right) on
the roof where the awning
is to be located and mark
both ends with an “E” for
end.
Locate all the roof rafters
between the two “E’s”
and mark the edge of the
roong with an “R” over
each rafter see Detail #12.
END
RAFTER
RAFTER
RAFTER
(E)
(R)
(R)
(R)
Detail #12
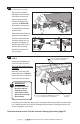
Be sure to center the lag bolts in the middle of each of the oval slots and apply sealant
around each bolt at the time of installation. On wider awnings, center additional
brackets and install over roof rafters.
TIP: Stretch a piece of string along the front of all the roof brackets and adjust as
necessary. The oval slots in Section #1 allow this piece to be adjusted. Once all the
Section #1 pieces are attached and on the same plane, they can be tightened securely to
the roof.
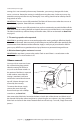
4-2
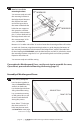
Use roof bracket Section
#1 as a guide; position the
bracket on the “R” mark
and drill three ¼” pilot
holes through the roong
and into the rafter.
Now attach Section #1 of
each roof mount bracket
using three 3/8” x 4”
galvanized lag bolts with a
washer under each head.
Do not completely tighten
at this time, see Detail #14.
SECTION #1
Detail #14
!
IMPORTANT!
Before securing lag bolts, be sure all roof brackets are on the same plane.