
How to Guide


page 12 | Retractable Awning Installation & Operation Manual
4-3
4-4
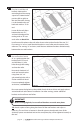
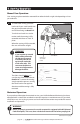
Attach the remaining
Sections #2, #3 and #4
using the 3/8” x 3½” hex
bolts, washers, and nuts
provided see Detail #15.
Do not completely tighten
the bolts at this time.
Attach Section #2 to the
front of Section #1.
Attach Section #4 to the
back of Section #1.
Attach Section #3 to the
top of Section #2.
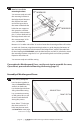
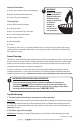
Next, let’s install the
ledger board.
Measure the entire length
of the awning square bar
and add 2”.
Using a pressure treated
2” x 8”, cut the ledger
board the length of the
square bar plus 2” and
paint all sides and ends to
match the awning frame.
Once dry, install the ledger
board to the roof mount
brackets, see Detail #16.
VERTICAL
VERTICAL
SECTION #4
SECTION #3
SECTION #2
SECTION #1
Detail #15
Detail #16
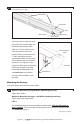
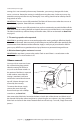
Once all roof brackets have been assembled, fold the bracket forming a triangle.
Sections #3 and #4 can now be adjusted to form a plumb vertical face on Section #2.
Once the face is plumb, you will need to drill two 3/8” holes though Section #4 using the
predrilled holes in Section #3 as a guide.
TIP: A clamp can be used to hold Sections #2 and #3 together while drilling the holes.
Once this is completed, secure the two sections together with two 1½” hex bolts,
washers and nuts provided.
All other sections of the roof mount bracket may now be tightened securely. Complete
the same procedure on the remaining roof brackets.
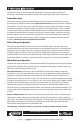
Be sure the ledger board is level. Hardware for securing the ledger board to the roof
brackets is provided. Use two 3/8” x 3” bolts with washers under the head and Nylock
nut on each roof bracket. Tighten well.
Secure ledger board to roof bracket
with two 3/8” x 3” bolts with washers
under the head and Nylock nut
Roof bracket
LEDGER BOARD