
How to Guide


page 13 | Retractable Awning Installation & Operation Manual
4-5
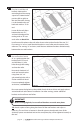
Now let’s install the
mounting brackets.
You are now ready to install
the mounting brackets to
the ledger board. Measure
the distance from each
end of the square bar to
the center of the bolt that
holds the arm support to
the square bar, and then
transfer this measurement
plus 1” in from both ends of
the ledger board and mark
this measurement “A” for
arms, see Detail #4.
LEDGER BOARD
“A”
“A”
1½”
3”
TOTAL
1½”
1½”
1½”
3” MINIMUM
3” MINIMUM
Detail #4
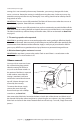
Measure 1½” to either side of the “A” mark to locate the closest edge of the wall bracket
on each side. Continue using the mounting bracket as a guide, keeping the bottom of
the mounting bracket ush to the bottom of the ledger board, with the threaded hole
for the clamping bolt FACING UP, mark the hole locations and drill ¼” pilot holes. Attach
the mounting brackets using the 3/8” x 4” galvanized lag bolts and washers provided.
Repeat on the other end.
You are now ready to install the awning.
If you ordered a Weatherguard Cover, see the next step to assemble the cover;
if you did not, proceed now to Mounting the Awning (page 14)
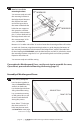
Assembly of Weatherguard Cover:
4-6
REAR SECTION
FRONT SECTION
Detail #8
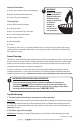
First, start by sliding the
hood sections together as
shown in Detail #8 so they
are ush on both ends.
Lay the hood upside down
along side of the awning.
Lay a protective covering
on the ground rst so you
do not scratch the hood
during this process.
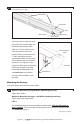
Next, slide 4 “T” bolts into
the outer track and 4 “T”
bolts into the inner track,
see Detail #9 on next page.
continued on next page