
How to Guide


page 14 | Retractable Awning Installation & Operation Manual
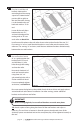
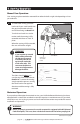
Detail #10
WEATHERGUARD™
COVER
END COVER
COVER BRACKET
Space one cover bracket near each
end of the cover and the other two
divided equally between them.
Slide two “T” bolts, one from each
track, into place for each cover
bracket. Place a cover brackets over
“T” bolts and tighten with nuts
supplied. Be sure the cover brackets
do not interfere with any mounting
brackets or arm supports on the
square bar, check to be sure the back
of the cover bracket is facing the
back of the Weatherguard Cover.
See Detail #10 and install both
end caps with the Phillips screws
provided.
4-6
continued from previous page
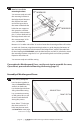
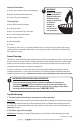
Detail #9
FRONT TRACK
COVER BACK
COVER FRONT
“T” BOLTS
COVER BRACKETS
OUTER TRACK
CENTER TRACK
INNER TRACK
4-7
Mounting the Awning:
First, choose from one of the two options below.
Option #1: Mount the awning WITHOUT a Weatherguard Cover:
Follow Step 1 below
Option #2: Mount the awning on a wall WITH a Weatherguard Cover:
Follow Step1, then Step 2 below
continued on next page
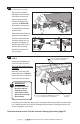
STEP 1
You are ready to place the awning into the mounting brackets. This step will require at
least 2-3 people. Lift the awning and slide the square bar into the mounting brackets,
see, Detail #6A (page 15).