
How to Guide


page 19 | Retractable Awning Installation & Operation Manual
continued from previous page
awning; this is not covered by the warranty. Remember, your awning is designed for shade,
not as a rain cover. Retract the awning in carefully removing the water. On the next sunny day,
extend the awning and allow it to dry thoroughly. Your awning should not be rolled up wet for
long periods of time.
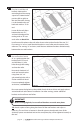
SOLUTION 2: The arms are not fully extended. The fabric will be most taut when the arms are at
their furthest projection. Extend the arms until they lock.
SOLUTION 3: The arms are at full projection but you have continued to unwind the fabric o the
roller tube. Reverse cranking direction and retract the awning in until the fabric is taut. Important:
The fabric should always rollover the top of the roller tube, not from underneath see Detail #18
on page 16.
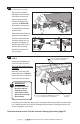
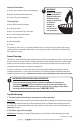
3. The awning squeaks when operated.
SOLUTION: A squeaking noise can resonate throughout the awning making it dicult to identify
the area to be lubricated. Most commonly it will be the pivot end of the roller tube specically, the
area between the end bracket and the roller tube. Apply a small spray of pure silicone or lithium
grease spray. NEVER use any petroleum based spray lubricant as permeant damage will occur.
4. Motorized awning does not move in or out.
SOLUTION: Be sure there is power to the outlet. Check to see if there is a reset button on the
exterior outlet or if a circuit breaker is o.
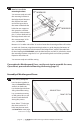
Valance removal:
You may wish to remove and store
the valance during long periods
when the awning will not be in
use, such as the winter months. As
this portion of the fabric is exposed
to the weather, even while the
awning is retracted, it will wear
and discolor sooner than the main
top will. Valance damage is not
covered by the warranty.
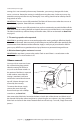
To remove the valance, simply
remove the screws from the
front rail end caps with a Phillips
screwdriver, see Detail #21.
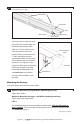
Now remove the fabric locks located in the hem on both sides of the valance and slide it out of
the channel. Roll up the valance and place in a plastic bag (be sure valance is dry) along with the
fabric locks and store for the winter. Reattach the front rail end caps. To install, simply reverse the
process.
END CAP
FABRIC LOCK
FRONT
RAIL
AWNING FABRIC
AWNING
VALANCE
Detail #21