
How to Guide

page 5 | Retractable Awning Installation & Operation Manual
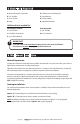
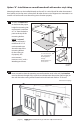
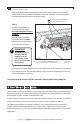
AWNING WIDTH
E-END
S-STUD
E
E
S
S
S
S
S
S
S
A
1½”
MINIMUM
ON EACH SIDE
1½”
MINIMUM
ON EACH SIDE
A
Detail #1A
Detail #2
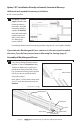
Option “A”: Installation on a wood framed wall with wood or vinyl siding
Mounting brackets can be installed directly on the wall. It is critical that all brackets be mounted
level, plumb and on the same surface plane. Brackets that are out of alignment or mounted on an
uneven wall surface will cause the awning not to function properly.
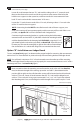
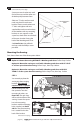
To start, see Detail #1A
to determine the proper
height for mounting. We
recommend a minimum
of 7’-6” from the deck or
patio to the top of the
mounting bracket.
NOTE: See Detail
#1B, you will need a
minimum of 3½” of
unobstructed room
above the top of the
mounting bracket
for the awning to
t properly; this
measurement
increases to 4½” with a
Weatherguard Cover.
3-1
3-2
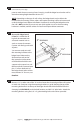
Next, we need to select the mounting area and locate the studs in the wall. See Detail #2,
measure the entire length of the square bar and determine the position (left to right) on
the wall where the awning will be located and mark both ends with an “E” for end.
continued on next page
Detail #1B
3½” of unobstructed
space required above
mounting bracket.
If using a
Weatherguard Cover,
increase to 4½”.
3½”
mounting
bracket