
How to Guide


page 6 | Retractable Awning Installation & Operation Manual
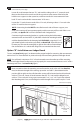
Option “B”: Installation on a Ledger Board
To start, see Detail #1A (page 5) to determine the proper height for mounting. We recommend a
minimum of 7’-6” from the deck or patio to the top of the mounting bracket and ledger board.
NOTE: You will need a minimum of 3½” of unobstructed room above the top of the mounting
bracket and ledger board for the awning to t properly this measurement increases to 4½” with a
Weatherguard Cover. See Detail #1B (page 5).
3-2
continued from previous page
Locate all studs between the two “E’s” and mark the siding with an “S” over each stud.
Measure the distance from each end of the square bar to the center of the bolts that
hold the arm supports to the square bar, and then transfer this measurement in from
both “E” marks and mark this measurement “A” for arms.
Locate the “S” mark closest to each of the “A” marks, allowing at least 1½” on each side
of the “A” mark for the arm support.
NOTE: A mounting bracket MUST be installed on each side of the arm support, on a
stud, or the awning will not operate properly and the warranty will be void. If this is not
possible, see Option “B” now for installation with a ledger board.
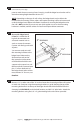
Continue using the mounting bracket as a guide, marking the hole locations
centered on the stud and drill 1/4“ pilot holes. Attach the mounting brackets
with the threaded hole for the clamping bolt FACING UP, using the 3/8” x 4”
galvanized lag bolts and washers provided, see Detail #5B. If possible, it may
be necessary to move the awning left or right on the wall to accommodate
the stud locations. It is critical that all lag bolts are mounted into the studs.
3-3
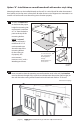
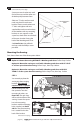
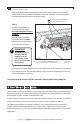
Next, we need to select the mounting area and locate the studs in the wall. See Detail #3,
measure the entire length of the awning square bar and add 2”, then determine the
position (left to right) on the wall where the awning will be located and mark both ends
with an "E" for end. Locate all studs between the two "E's" and mark the ledger board
with an "S" for each stud. Using a pressure treated 2” x 6”, or 2” x 8” if you have ordered
the Weatherguard Cover, cut the ledger board the length of the square bar plus 2” and
AWNING WIDTH
DO NOT EXCEED 32”
E-END
S-STUD
LEDGER BOARD
E
E
S
S
S
S
S
S
S
A
A
1½”
MINIUMUM
ON EACH
SIDE
1
½”
MINIUMUM
ON EACH
SIDE
1½”
MINIUMUM
ON EACH
SIDE
Detail #3
continued on next page
Detail #5B