
How to Guide

page 7 | Retractable Awning Installation & Operation Manual
3-3
continued from previous page
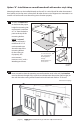
paint to match house or awning frame. Once dry, install the ledger board on the wall at
desired mounting height between the two “E’s”.
NOTE: Depending on the type of wall surface, the ledger board may be able to be
installed over the existing surface; others will require the siding/surface to be removed
under the ledger board before installation. Hardware for securing the ledger board to
the wall is NOT provided. If you are not sure which applies to you or what mounting
hardware is needed, seek the advice of a local home improvement contractor.
3-4
3-5
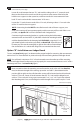
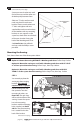
Be sure the ledger board
is level. It is critical that all
lag bolts be mounted into
structural material such as
studs or structural concrete.
Counter sink the lags and caulk
all joints.
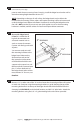
You are now ready to install
the mounting brackets to the
ledger board. Measure the
distance from each end of
the square bar to the center
of the bolt that holds the arm
support to the square bar, and
then transfer this measurement
plus 1” in from both ends of
the ledger board and mark this
measurement “A” for arms, see
Detail #4.
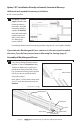
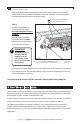
Measure 1½” to either side of the “A” mark to locate the closest edge of the wall bracket
on each side. Continue using the mounting bracket as a guide, keeping the top of the
mounting bracket ush to the top of the ledger board with the threaded hole for the
clamping bolt FACING UP, mark the hole locations and drill 1/4“ pilot holes. Attach the
mounting brackets using the 3/8” x 4” galvanized lag bolts and washers provided.
Detail #4
LEDGER BOARD
“A”
“A”
1½”
3”
TOTAL
1½”
1½”
1½”
3” MINIMUM
3” MINIMUM