
How to Guide

page 8 | Retractable Awning Installation & Operation Manual
3-7
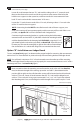
If you ordered a Weatherguard Cover, continue to the next step to assemble
the cover; if you did not, proceed now to Mounting the Awning (page 9)
Assembly of Weatherguard Cover:
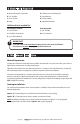
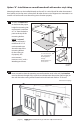
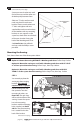
3-6
Use Option “A” from
page 5 and follow the
bracket positioning
instructions. Using the
mounting brackets as
a guide, see Detail #5,
mark the hole locations
on the masonry and
drill 5/8” hole about
2¼” deep using a
masonry drill bit.
Insert the lag shields and secure mounting brackets using the 3/8” x 2½” lag bolts supplied.
Option “M”: Installation Directly on Smooth, Structural Masonry
Additional tools needed for masonry installation:
A. 5/8” masonry drill bit
STEP 1
STEP 2
Detail #5
REAR SECTION
FRONT SECTION
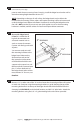
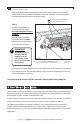
Detail #8
First, start by sliding the hood sections
together as shown in Detail #8 so they
are ush on both ends. Lay the hood
upside down along side of the awning.
Lay a protective covering on the ground
rst so you do not scratch the hood
during this process.
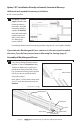
Next, slide 4 “T” bolts into the outer track
and 4 “T” bolts into the inner track, see
Detail #9.
Detail #9
FRONT TRACK
COVER BACK
COVER FRONT
“T” BOLTS
COVER BRACKETS
OUTER TRACK
CENTER TRACK
INNER TRACK
continued on next page