
User's Manual

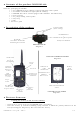
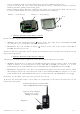
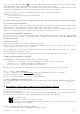
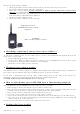
Table Of Contents

● Contents of the product CANICOM 400
Inside the packaging you will find:
▪ 1 or 2 CANICOM receiver collar(s) equipped with short contact points
▪ 1 or 2 lithium 3 Volt CR2 battery(ies) for the collar(s)
▪ 1 CANICOM 400 remote control equipped with 1 lithium 3 Volt CR2 battery
▪ 1 neon test lamp
▪ 1 or 2 pair(s) of long contact points
▪ 1 carry strap
▪ 1 DVD
▪ this user’s guide
● Description of the product
Red mark:
Area where the On/Off
switch magnet is located
On/Off indicator
+
indicator of radio reception
+
battery level indicator
2 contact points
(short or long)
Indicator of
radio
transmission
Stimulations level
indicator
from
1 to 15
Battery
level
indicator
Adjustment of
the level of the
stimulations
Area where the
On/Off switch
magnet is located
Beeper
button
Flash
stimulations
lower than
1 second
Booster
button
Selection key
dog B
yellow collar
Selection key
Dog A
black collar
Continuous
stimulations
limited to 8
seconds
On/Off switch
+
LCD screen
retro-lightning
CANICOM 400 LCD SCREEN
Diagram 4
RECEIVER COLLAR
Diagram 1
CANICOM 400 REMOTE CONTROL
Diagram 2
LCD screen
Collar selection indicator
A or B
● First use from new
Fitting the battery in the receiver collar(s)
- Unscrew the 4 screws of the top of CANICOM using a screwdriver.
- Insert the battery (3 Volt CR 2 lithium) paying attention to follow the polarity indicated on the
battery housing (ref. Diagram 6). The tab is under the battery.
CANICOM 400 – user-s guide – indice A 3/12