
User's Manual

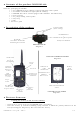
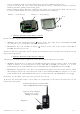
Table Of Contents

If you press the “Beeper” button the receiver collar will emit sound signals. There is no time limit for
this function: the beeper will continue to sound as long as you press the button.
A “transmission” symbol will appear on the LCD screen of the remote control; the indicator light on the
collar goes from flashing green to permanent green as long as you press the button.
It is up to you to use the beeper depending on the way you want to train your dog.
With the beeper you can:
- send a sound to your dog when it is disobedient,
- draw its attention …
It is very important to always use the beeper in the same way in order not to disturb your dog.
F button: Flash stimulation
Press the “F” button to send a warning to your dog using stimulations transmitted by two contact points
located on the receiver collar for a defined length of time of less than one second.
A “transmission” symbol will appear on the LCD screen of the remote control; the indicator light on the
collar goes from flashing green to permanent red as long as you press the button.
C button: Continuous stimulation
Press the “C” button to send a warning to your dog using stimulations transmitted by two contact points
located on the receiver collar, the duration will be as long as you press the button but limited to 8
seconds maximum.
Booster button
Press the Booster button to stop your dog instantaneously.
You are able to choose the level of stimulation you think to be the best for an immediate effect. As a
result, you do not need to press the “+” button.
Those stimulations are transmitted briefly by the two contact points located on the collar for a defined
length of time of less than one second.
The stimulation level selected thanks to the “Booster” button can be different for each collar.
Configuration of the Booster button:
Programming the Booster button for the dog A or 1 (black collar):
- press “A” or “1” button for 5 seconds (stimulation level flashes on the LCD screen)
- press the “+” or “-” button to modify the stimulation level
- press the “A” or “1” button to confirm the level selected
Renew the same procedure to program the Booster button for the dog B or the dogs 2, 3 and 4..
“+” and “-”: control buttons
Use the +/- buttons for rapid
adjustment of the level of stimulation of the receiver collar.
15 levels of stimulation are available for CANICOM 400.
Level 1: very weak stimulation – Level 15: strong stimulation
Retro-lightning of the LCD screen
You can light the LCD screen for approximately 6 seconds by pressing briefly the On/Off switch
(approx.
½ second).
● Checking/replacing battery(ies) of remote control
Performance (radio range) of the remote control may deteriorate as batteries become weak. Be prepared
to replace the battery(ies).
To check the condition of the battery, turn on the remote control CANICOM 400 and look at the battery
level indicator on the LCD screen. The symbols which appear indicate the following:
Battery fully charged
Weak battery: prepare to replace the battery
Dead battery: your CANICOM 400 functions in safety mode and the system locks up. The
battery(ies) must be replaced.
Remove the old battery(ies) and replace it(them):
- 1 3-V Lithium CR2 for the CANICOM 400 remote control
CANICOM 400 – user-s guide – indice A 6/12