
User's Manual


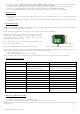
Table Of Contents
- Index Page
- ● Contents of the product CANICOM 200 First
- ● Checking/replacing battery of remote control
- To check the condition of the battery, observe the indicator light located on the front of the remote control. If the light indicator flashes green 3 times when you press a button, the battery is weak.
- Performance (radio range) of the remote control deteriorates as battery becomes weak. You should soon replace the battery.
- ● Checking/replacing battery of receiver collar
- ● Maintenance
- ● Troubleshooting
- ● Technical specifications
- ● Receiver collar battery life
- ● Guarantee
- ● Guarantee conditions
- ● Spare parts
- ● Collection and recycling of your device at the end of its life

If you press the “Beeper” button on the remote control, the receiver collar will emit sound signals. There is no time
limit for this function: the beeper will continue to sound as long as you press the button. The indicator light on the
collar goes from flashing green to permanent green as long as you press the button.
It is up to you to use the beeper button depending on the way you want to train your dog. With the beeper button you
can:
- send a sound to your dog when it is disobedient,
- draw its attention, …
It’s very important to always use the beeper in the same way in order not to disturb your dog.
1 to 5 buttons: continuous stimulations
Button 1: lowest stimulation / Button 5: strongest stimulation.
Always start with the lowest level of stimulation.
Press the button 1, 2, 3, 4 or 5 to send a warning to your dog using stimulations transmitted by the two contact
points located on the receiver collar, the warning will last as long as you press the button but limited to 8 seconds
maximum. The indicator light on the collar goes from flashing green to permanent red as long as you press the
button.
● Checking/replacing battery of remote control
To check the condition of the battery, observe the indicator light located on the front of the remote
control. If the light indicator flashes green 3 times when you press a button, the battery is weak.
Performance (radio range) of the remote control deteriorates as battery becomes weak. You should soon
replace the battery.
Replace the old battery with a new one as follows:
▪ On the back of the remote control, unscrew the screw and remove the battery cover.
▪ Remove the old battery using the special tab.
▪ Insert the new battery (3 Volt CR 2430 lithium)
making sure the polarity “+” noted on the battery is
visible (ref. Diagram 5). The tab is under the battery.
▪ Put the battery cover back in place, making sure the tab is in correct position (inside the battery housing) to
maintain water tightness.
▪ Retighten the screw.
▪ Check the remote control operates correctly:
Press a button: if the light indicator located on the front of the remote control flashes green, the battery is
properly inserted. If the indicator does not light, remove the battery and check the polarity before inserting
it once again (ref. Diagram 5: “+” noted on the battery must be visible).
“+” of the battery
must be visible
Diagram 5
When the battery is empty, you can not use the remote control. If pressing a button, the LED located on
the front of the remote control will not light.
● Checking/replacing battery of receiver collar
To check the condition of the receiver collar battery, observe the light indicator located on the front of the receiver
collar:
▪ battery fully charged: flashes slow green.
▪ weak battery: flashes quickly red.
Replace it with a new 3 Volt Lithium CR2 battery (See § First use from new: Fitting the battery in the receiver
collar). Check the receiver collar operates correctly.
● Changing the contact points
Two different series of contact points are supplied. The length of the contact points must be sufficient to have proper
contact with the dog’s skin, enabling the device to operate correctly.
If you have a long-haired dog and the short contact points fitted to the collar in the factory are inadequate, remove
and replace them with the long ones supplied with the kit. Carefully tighten them manually (do not use any
key).
User’s guide CANICOM 200 FIRST – indice A 5/8