® Professional Disc Jockey Products DIMENSION 3 & DIMENSION 4 FULL POWERED STEREO AMPLFIERS OPERATING MANUAL ©2001 Industries http://www.numark.
DIMENSION 3 & 4 AMPLIFIERS Safety Information and Product Registration CAUTION 6. Heat - Avoid placing this product to close to any high heat sources such as radiators. RISK OF ELECTRIC SHOCK DO NOT OPEN CAUTION: TO REDUCE THE RISK OF ELECTRIC SHOCK DO NOT REMOVE ANY COVER. NO USERSERVICEABLE PARTS INSIDE. REFER SERVICING TO QUALIFIED SERVICE PERSONNEL ONLY. 7. Ventilation - The appliance should be situated so that it’s location or position does not interfere with it’s proper ventilation.
DIMENSION 3 & 4 AMPLIFIERS WARNING: To reduce the risk of fire or electrical shock, do not expose this appliance to rain or moisture. Electrical equipment should NEVER be kept or stored in damp environments. Unpacking / Setup: Please check your amplifier for any damage after unpacking (before connecting) and contact your dealer in case of any related complaints. Take care of choosing your installation place and the correct AC connection.
DIMENSION 3 & 4 AMPLIFIERS ® Dimension 3 & 4 PROFESSIONAL POWER AMPLFIERS CONGRATULATIONS... Thank you for choosing a power amplifier. The Dimension 4 offers 1900 watts of clean power output and the Dimension 3 offers 1300 watts. These amplifiers have many unique DJ driven features and plenty of power. Besides the cosmetic appeal the units also have an internal crossover so the DJ can power their subwoofer and main speakers with the same amplifier, simplifying user operation and equipment setup.
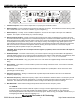
DIMENSION 3 & 4 AMPLIFIERS Front Panel Diagram 2 6 3 5 1 4 1. Power Switch- Press to turn amplifier on and off. Always turn your amplifier on last and off first to avoid speaker damage. 2. Stereo/Mono Selector – This switch controls the input signal. this button will have no function. Note: If Bridge button on the rear is active, then 3. Level controls- Rotate controls clockwise to increase volume. 4. Signal meter- Lights up as output wattage is increased. 5.
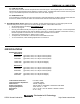
DIMENSION 3 & 4 AMPLIFIERS Rear Panel Diagram 7 15 14 9 18 17 16 13 8 12 10 11 7. Unbalanced Inputs- Connect mixer outputs with ¼” input plugs for channels A and B. 8. Balanced Inputs- Connect a balanced signal through XLR input connectors. These should be used for all long cable runs. Please note: Pin 1 Ground, Pin 2 Positive (+), Pin 3 Negative (-). 9. Balanced (Thru) – for daisy- chain of additional amplifiers. Go from the thru output to the input of an additional amplifier.
DIMENSION 3 & 4 AMPLIFIERS 2-5: LOW CUT FILTER The low-cut filter removes ultra-low frequencies from the audio signal. Most amplifier power is consumed by low frequencies and most speaker woofer damage is caused by them. Activating this switch ensures that more power can go to the middle frequencies and there is less chance for audio clipping. 3-4: 50HZ/30HZ roll off If low cut filtering is activated, then the roll off frequency should be determined.
® Professional Disc Jockey Products LIMITED PRODUCT WARRANTY What is covered and for how long? a) NUMARK INDUSTRIES LCC ("NUMARK") warrants to the original purchaser that NUMARK products; including but not limited to DJ mixers, amplifiers, CD players, CD Mix Stations, turntables, preamplifiers, beatkeepers, equalizers, microphones, headphones, cartridges, and all other accessories; are to be free from defects in material and workmanship under normal use and service for the period commencing upon the date o