Professional Disc Jockey Products DM1200/DM1235/DM1285 STEREO MIXER OWNER’S MANUAL INDUSTRIES 11 Helmsman Avenue, North Kingstown, RI 02852 http://www.numark.
DM1200/DM1235/DM1285 6. Heat - Avoid placing this product too close to any high heat sources such as radiators. CAUTION RISK OF ELECTRIC SHOCK DO NOT OPEN CAUTION: TO REDUCE THE RISK OF ELECTRIC SHOCK DO NOT REMOVE ANY COVER. NO USER- SERVICEABLE PARTS INSIDE. REFER SERVICING TO QUALIFIED SERVICE PERSONNEL ONLY.
DM1200/DM1235/DM1285 NUMARK DM1200/DM1235/DM1285 STEREO MIXER INDEX ©1998 Safety Information Product Registration Page 2 Introduction Features Page 4 System Precautions Page 5 Front Panel Diagrams Page 6 Guided Tour of Features Operating Instructions Page 7 DM1235 Beatkeeper Operation Page 10 DM1285 Sampler Operation Page 14 Rear Panel Diagram and Features Page 16 Connection Diagram Page 17 Specifications Page 18 Block Diagram Page 19 Warranty and Service Rear Cover Numark - The
DM1200/DM1235/DM1285 CONGRATULATIONS! You have purchased a quality stereo mixer designed and manufactured by This equipment features all new circuitry and the latest in manufacturing and design technology to give you greater quality and better reliability than ever before. This mixer brings to you the finest quality of DJ equipment available today. . Thank you for buying Numark DJ products! DM1200 FEATURES...
DM1200/DM1235/DM1285 IMPORTANT INFORMATION... Please read this entire manual before connecting the DM1200 to your system. For optimum performance: SYSTEM PRECAUTIONS • Always make sure that AC power is OFF while making any connections. • Use appropriate cables throughout your system: Quality shielded audio cables and terminated shielded video cables, low-capacitance preferred. Speaker cables must be 14-gauge minimum; 12- or 10-gauge is better. • Do not use excessively long cables (i.e.
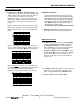
DM1200/DM1235/DM1285 DM1200 FRONT PANEL DIAGRAM... 16 19 7 20 15 11 17 1 13 10 9 12 2 8 4 14 3 5 6 17 DM1235/DM1285 FRONT PANEL DIAGRAM... 16 19 7 20 15 11 17 1 13 10 9 12 2 8 4 5 BEATKEEPER or SAMPLER 3 6 17 14 ©1998 Numark - The Leader in DJ Technology Industries 6 http://www.numark.
DM1200/DM1235/DM1285 GUIDED TOUR OF FEATURES AND OPERATING INSTRUCTIONS... INSTALLATION AND OPERATION Study the Connections Diagram on page 14. First, connect all stereo input sources. Next connect your microphone(s) and monitor headphones. Make sure all faders are at "zero" and the unit is off. Finally, connect the stereo outputs to the power amplifier(s) and/or audio sources. Plug your mixer into AC power. Now you are ready to switch it on.
DM1200/DM1235/DM1285 DJ MIC SECTION MASTER/BOOTH OUTPUT SECTION Your mixer has an extremely flexible DJ Mic channel. The Talkover function reduces the level of the music while leaving the DJ Mic at normal volume. 7. Neutrik™ “Combo” connector allows connection of either a 1/4” jack or an XLR jack. This is ideal for connecting an XLR gooseneck directly into the mixer. 8. Treble and Bass Controls fine-tune the tone of your voice on both mics through the sound system.
DM1200/DM1235/DM1285 EQUALIZER SECTION 16. 6-Band Stereo Graphic Equalizer ( E Q ) . EQ compensates for differences in source material sound quality. In ultra-compact mobile systems this EQ can be used to tailor the sound to the acoustical requirements of the room. Center frequencies are 42Hz, 152Hz, 480Hz, 1.5kHz, 4.8kHz and 15.4kHz. Faders have a center detent for an accurate "flat” response. Below is a typical "house" EQ curve. Notice how the knobs above "0" balance out the knobs below.
DM1200/DM1235/DM1285 DM1235 with theBEATKEEPER F G H I E A B C D A. CHANNEL SELECTTap this button to select desiRed pre-fader input channel. The respective input channel LED will light up 1 , 2 , 3 , o r 4 . B. SYNC LOCK BUTTONWhen an input is not yet set and scanning for the tempo, tapping the Sync Lock button once will lock in the music as long as there is a BPM number displayed for the input.
DM1200/DM1235/DM1285 Channel Selection When your mixer is first turned on, the channels selected will be 1 & 2 respectively. If you wish to track the beat of another channel, tap on the channel select button until the desired input is reached. NO T E : The Beatkeeper will track the source that is selected with the channel toggle switch. Syncing Your Beatkeeper When learning how to use the Beatkeeper, choose some dance music with a hard, steady beat.
DM1200/DM1235/DM1285 In order to create the perfect mix, your goal is to keep both bar graphs as close to centered (Greenor Yellow) as possible. First, align the top graph, the Tempo Difference Graph. This graph indicates how close the two BPMs are to each other. If they are exactly the same tempo, the GreenLED in the middle will light up. If one song is faster than the other, the bar graph will shift towards the faster song.
DM1200/DM1235/DM1285 BEATKEEPER TROUBLESHOOTING T1 The BPM goes way off when using the search button on my high tech CD mixer. Some high tech CD mixers have a cueing feature which allows you to cue precisely to an exact spot in the music so you can slam mix. The only problem is that this mode repeats the first beat of the music at a rate which is unrelated to the actual BPM of the music. As a result, the BPM goes off track. The best way to avoid this is to restart the music after a search.
DM1200/DM1235/DM1285 DM1285 with DIGITAL SAMPLER 1 2 TO RECORD A SAMPLE 3 a - Press the Write button once to go into stand by mode. The Red LED will go on. 4 5 7 6 8 The DM1285 Sampler uses dynamic RAM with a 16-bit microprocessor controller. The same digital signal processing components used in professional audio equipment deliver CD-quality samples. 1. The Mode Pushbuttons switch from effect to effect. The accompanying LEDs illuminate to show you which specific mode you are in at any time.
DM1200/DM1235/DM1285 3. The Speed Control plays samples faster or slower resulting in a pitch shift of the sample. In the center position, the sample is played at recorded speed. Moving the knob to the left will slow down playback by up to 50%; moving the knob to the right will speed up the playback by up to 200%. Positions near the center provide fine changes in playback speed. Positions further from the center detent provide more drastic changes in playback speed. 4. Effect Level Mix fader.
DM1200/DM1235/DM1285 DM1200/DM1235/DM1285 REAR PANEL DIAGRAM ... 11 8 1 8 8 10 4 5 3 6 2 7 7 7 9 7 9 7 9 REAR PANEL: INPUTS AND OUTPUTS 1. Power Connector. Plug in power cord here and check the voltage level to match your country’s standard. 2. GND is the grounding lug for turntables 1, 2 and 3 (phono inputs on Channels 1, 2 and 3). Always use this connection (your turntable cable should have a grounding wire). 3.
DM1200/DM1235/DM1285 CONNECTION DIAGRAM... Main Balanced Sound System w/ Amplifier Digital Sampler Tape Deck Microphone 2 Keyboard Turntable 1 AC Outlet Zone Sound System w/ Amplifier Tape Deck CD Player Turntable 2 Turntable 3 Main Unbalanced Sound System w/ Amplifier ©1998 Numark - The Leader in DJ Technology Industries 17 http://www.numark.
DM1200/DM1235/DM1285 SPECIFICATIONS... INPUTS: Line:10kΩ input impedance 80 mV rms sensitivity (for 1.22 V output) DIMENSIONS: 482mmx232mmx111mm 19” x9 1/8” x4 3/8” WEIGHT: Mic: 10kΩ input impedance balanced/unbalanced 2.5 mV rms sensitivity (for 1.22 V output) 500 mV rms max input Phono: 47kΩ input impedance 1.5 mV rms sensitivity @ 1 KHz (for 1.22 V output) OUTPUTS: Line: 9V rms max (+20 dBm) 470Ω balanced. 3.5Vrms 100Ω balanced 1.12Vrms Headphone Amp: .5 watt into 47Ω Distortion less than .
DM1200/DM1235/DM1285 BLOCK DIAGRAM... ©1998 Numark - The Leader in DJ Technology Industries 19 http://www.numark.
Professional Disc Jockey Products Warranty and Service Information Numark Industries, LLC and Numark International, Inc. (hereafter “Numark”) warrants each new product manufactured and/or supplied by it to be free from defects in material or workmanship under conditions of normal use and service for 360 days, beginning on the date of purchase from an authorized Numark Dealer, but not to exceed 2 years from date of shipment by Numark.