Professional Disc Jockey Products TT-100 DIRECT DRIVE TURNTABLE OWNER’S MANUAL ©2000 Industries http://www.numark.
PRO TT-2 Turntable 8. Safety Information 9. 10. 11. 12. 13. 14. Grounding or Polarization - Precautions should be taken so that the grounding or polarization means built into the CD player is not defeated. 15. Internal/External Voltage Selectors - Internal or external voltage selector switches, if any, should only be reset and re-equipped with a proper plug for alternative voltage by a qualified service technician. Do not attempt to alter this yourself. SAFETY INSTRUCTIONS 1. 2. 3. 4. 5. 6. 7.
PRO TT-2 Turntable IMPORTANT INFORMATION... GENERAL SYSTEM PRECAUTIONS Please read this entire manual before connecting the unit to your system. • Use appropriate cables throughout your system: Quality shielded audio cables and terminated shielded video cables, low-capacitance preferred. Speaker cables must be 14-gauge minimum; 12- or 10-gauge is better. For optimum performance: 1. Always make sure that AC power is OFF while making any connections. • 2.
PRO TT-2 Turntable TT-100 PROFESSIONAL DIRECT-DRIVE TURNTABLE CONGRATULATIONS! You are now the owner a TT-100 Direct Drive Turntable. This unit has been designed to deliver solid performance at a reasonable price. With its full selection of adjustment features the TT-100 offers essential control to the user.
PRO TT-2 Turntable TABLE OF CONTENTS Safety Information Page 2 Introduction Page 4 Product Registration Page 5 Diagram and Parts Description Page 6 Operating Instructions Page 10 Specifications Page 11 Warranty and Service Page 12 Contents of this package • • • • • • • • Main Unit Turntable platter Turntable slip mat Dust cover Dust cover clips 45-rpm adapter Counterweight Headshell 1 1 1 1 2 1 1 1 Product Registration Please record the serial number of your unit as shown on the chassis, u
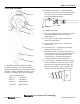
PRO TT-2 Turntable DIAGRAM AND PARTS DESCRIPTION 9 10 8 11 7 12 6 13 5 14 4 15 17 1 16 2 3 To fully appreciate the features of the TT-100, please read this entire manual before you begin operation. The TT-100 should be placed on a level sturdy surface. Keep in mind that there are a few features you may never have seen before on a turntable of this type that you will need to read about to use properly. Start by removing all parts from the package and place on a level surface.
PRO TT-2 Turntable TONE ARM ASSEMBLY 19. Headshell Locking Nut - Attach headshell by inserting into the front end of the tonearm, then turn the locking nut clockwise with the head shell firmly held horizontally. 26 25 22 24 23 20. S-Shaped Tone Arm 21. Tone Arm Clamp and Rest - Use this rest for the tone arm and clamp it in position during transportation. 22. Tone Arm Lift - This elevates the tone arm above the record surface. 23. Tone Arm Lift Adjust Screw - Controls the amount of lift. 24.
PRO TT-2 Turntable TONE ARM SETTINGS The following explains proper counterweight and anti-skating set up. Cartridge manufacturers usually specify the proper settings. a) Remove the stylus protector, do not touch the stylus tip during the adjustment. b) Set the cueing lever to the lower position so it does not effect tone arm height. c) Set Anti-skate adjustment to 0. d) Place counterweight on the rear of the tone arm e) Release the arm clamp and lift the tonearm from the arm rest so it moves freely.
PRO TT-2 Turntable REAR PANEL DIAGRAM 27 34 32 28 33 30 29 31 27. Removable Lid - Protects the turntable from dirt and dust. 28. Hinge Assembly - Holds the lid and turntable together. Attach now by sliding the bottom tabs of the Hinge Assembly into the Hinge Holders. 29. Platter Speed Output - This output is to be used with external devices that require platter speed information. 30. Remote Start/Stop - This is used with external control devices. Tech note: This circuit is normally open.
PRO TT-2 Turntable GENERAL OPERATING INSTRUCTIONS 1. Turn the power dial to turn on and the speed indicator and the strobe-illuminator will light up. 2. Turn on and raise the target light for illuminating the stylus tip by pushing the target light button. 3. Place a record on the turntable mat. When playing a 45rpm record with a large center hole; place the 45rpm adapter on the center spindle. 4. Set the rotation speed (33/45/78) to match the record. 5. Release the arm clamp. 6.
PRO TT-2 Turntable SPECIFICATIONS TURNTABLE SECTION Type Driving method Motor Turntable platter Turntable speed Pitch Variance Starting Torque Braking OUTPUT Wow and flutter S/N ratio Output Difference Channel Separation Pitch TONEARM SECTION Type Effective length Overhang Tracking Force Anti-Skate Cartridge Weight GENERAL Power supply Power consumption Dimension (W x D x H) Weight 3-speed, full manual Direct drive 12 Pole, 3 Phase, Brushless DC Motor Aluminum diecast 330mm dia.
Professional Disc Jockey Products LIMITED PRODUCT WARRANTY What is covered and for how long? 1. NUMARK INDUSTRIES LCC ("NUMARK") warrants to the original purchaser that NUMARK'S DJ mixers and amplifiers are free from defects in material and workmanship under normal use and service for the period commencing upon the date of purchase from an authorized NUMARK dealer and continuing for the following period of time after that date for (2) Years.