5.
TABLE OF CONTENTS INTRODUCTION....................................................................................................................... 1 INTRODUCTION TO DJING..................................................................................................... 2 INSTALLATION / UPGRADE NOTES ..................................................................................... 4 THE INTERFACE - ZONES.................................................................................................
INTRODUCTION Welcome to VirtualVinyl! VirtualVinyl is a revolutionary software which allows you to mix audio and video right from your computer. We have designed VirtualVinyl to be simple and intuitive to use but do not be fooled — there are many advanced features to explore and customize.
INTRODUCTION TO DJING The work of a disc jockey can be divided into three tasks: 1. Choosing the music (programming) 2. Mixing the music 3. Modifying the music (remixing) The first task consists of choosing the appropriate music, which obviously depends on the type of evening and your style. Generally a good rule of thumb is to avoid playing all the hits” from the very start of the evening and to keep some in reserve to generate new interest when the audience starts to become tired.
The third task of a DJ is to modify the music with various effects or by mixing various tracks or samples, in order to create an impression of a “remix” and to give a more personal and artistic feel to a mix. The effects traditionally used are scratch, loops, and samples: A scratch consists of creating an entirely new sound by playing a small portion of music repeatedly.
INSTALLATION / UPGRADE NOTES If installing VirtualVinyl 5.0 as a fresh, clean install please make the following notes: Default application path provided during the install is C:\Program Files\VirtualVinyl 5.0\ All Application Configuration, Plug-in, Skins and Support Files are stored in C:\MyDocuments\VirtualVinyl 5.0 **VERY IMPORTANT – EXTERNAL DRIVE USERS** You should have your COMPLETE gig ready computer setup connected before launching VirtualVinyl 5.0 for the first time.
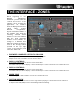
THE INTERFACE - ZONES Before beginning to use Numark VirtualVinyl, familiarize yourself with the controls and “zones” of the software. Upon opening the application, an interface menu is displayed. Interfaces called “skins” feature different configurations, layouts and functionalities of the software. Let’s begin by selecting “Internal mixer interface” to become familiar with the most important features of the software.
BROWSER ZONE The Browser Zone is where you can navigate and organize files stored on a local, external, or network hard disk. The browser contains the compatible file types (i.e. whose extensions are associated with the decoders in Numark VirtualVinyl) to access the compatible extensions list. Click the “Config” menu then choose the “Codecs” tab. See the “Codecs” section of the manual for further details. The Browser zone is divided into 4 key panels: 1. 2. 3. 4.
Desktop – shows the File System navigation option. Napster – shows the integrated Napster search. Using this feature requires a Napster login. Login information can be provided by a right-click on the Napster Globe in the “Browser” panel interface and choosing “Login…” Genres – provides a generated tree of Genre types based on the imported ID3Tag Genre field. By selecting on the various listed genres, the file browser panel (2) only shows those entries which match the tag.
FILE / SEARCH RESULTS PANEL (2) VirtualVinyl provides several elements of information about each track. The information is a combination of ID3 Tag and VirtualVinyl defined data fields. By default, the title of the song and artist are listed for each file along with columns for beats per minute (BPM) and duration (Length). The width size for each column can be modified individually and you can sort the column contents clicking on the column.
ID3TAG SUPPORT VirtualVinyl features extensive ID3 Tag support. However, it is not the same support that many other applications implement. VirtualVinyl has always provided the fastest access to information about the tracks in the database. Adding direct ID3Tag access to every file would have considerably slowed VirtualVinyl 5.0’s ability to browse and search, as can sometimes be experienced with other applications. VirtualVinyl 5.0 stores identified ID3Tag fields as part of its own database.
Next possible way of retrieving ID3Tag information is by right clicking on a file in the browser and selecting File Info. The dialog shown on the right displays the information stored in the database, along with the ID3Tag information that is retrievable. Under each field with a button, you will see the ID3Tag info. Click on the button to copy that data into the VirtualVinyl 5.0 data field. This data will then be stored and used by the VirtualVinyl 5.0 database.
DISPLAYING VirtualVinyl 5.0 DATA FIELDS (ID3TAG) COLUMNS In the browser or playlist panels, you can right-click on any column and choose from the pop-up list any or all of the available data fields now stored in the VirtualVinyl 5.0 database. Changing the order of the columns is very easy by selecting the Order… option from the bottom of the list. Here you can choose the order by highlighting the field and using the up and down arrows.
ADDITIONAL VirtualVinyl 5.0 DATA FIELDS [Additional VirtualVinyl 5.0 Fields] The VirtualVinyl 5.0 database now stores additional data about each track for additional search features and the NEW Filter Folders. Key – stores the key value of a song for use doing Harmonic Mixing. ** note that VirtualVinyl 5.0 does not analyze and populate this field. Manual entry using the File Info.
AUTOMIX PLAYLIST (3) The Automix feature allows VirtualVinyl to automatically beat-match and transition between tracks stored in the Automix Playlist on the right side of the Browser. Note that Automix will mix the tracks in the playlist on a single deck, which allows you to use the opposite deck for staging the first song to be used once you decide to stop the Automix process. By default it is Deck 1. However, if Deck 2 is selected as the active deck prior to starting Automix, then Deck 2 is used.
PLAYLIST & AUTOMIX MANAGEMENT You can use the Playlist management menu (click on the functions, as well as how tracks are loaded in the playlist.
Sequential Order Play Display – The playlist navigation during automix play of what is playing and what is next is sequential from top to bottom (like most media players). The the track which is currently playing is always highlighted. If the Repeat option is on, the playlist will repeat from the beginning once the final track has played out. Add, Move or Remove Track – Reordering tracks by adding more, moving their order, or removing can be done at any time.
SIDELIST (4) VirtualVinyl incorporates its own version of a waitlist called the Sidelist. The Sidelist panel (4) can be used to hold tracks that the DJ knows they will play sometime during their session. It also provides a location for VirtualVinyl to move tracks that were loaded but never played because a new track was loaded to the deck. The Sidelist can also be used to stage and construct Playlists and VirtualFolders by drag-and-droping tracks into the Sidelist panel.
FILE SYSTEM / FOLDER STRUCTURE ORGANIZATION In order to simplify browsing and provide better file management, VirtualVinyl provides three methods for organizing the database.
VIRTUAL FOLDERS Similarly to Favorite Folders, Virtual Folders aid you in quickly accessing music stored on your hard drives. A Virtual Folder, however, holds a collection of shortcuts to tracks instead of shortcuts to folders. You can create a virtual folder by clicking on the red Virtual Folder icon the new folder a title. and giving Now browse the database or run various searches to find tracks which you would like to group together in the Virtual Folder.
Now enter the Filter to be used for filtering out the results. This is where it can be complicated or simple. This example is simple, using the keyword ‘top’ with the number ‘100’ and the element ‘nbplay’. ‘nbplay’ looks at the Play Count data field. As the filter statement is entered, VirtualVinyl evaluates that the statement is properly created. The OK button will remain ‘grayed’ out if the statement is not well-formed. So the entire filter statement would look like ‘top 100 nbplay’.
DATABASE MANAGEMENT The Database Management system comes with additional tools as part of the VirtualVinyl 5.0 Configuration Browser tab. Save ‘On the Fly’ during each session use Automatic check of database integrity at launch Manually check the database integrity Fix database error(s) Clean out database entries for missing/moved files VirtualVinyl 5.0 now saves the database immediately when additions or updates are required. VirtualVinyl 5.
GLOBAL SEARCH DATABASE VirtualVinyl 5.0 now provides an intuitive on-the-fly search capability. Adding files for use with the global search database can be done in two ways: First is by setting the ‘Search Database’ property in Browser tab to ‘Add the Configuration automatically’. This will add all files encountered while browsing folder structures to the search. The other option is ‘Add manually’.
VARIABLE SEARCHING What can be searched? Searching in VirtualVinyl 5.0 is now versatile and variable. What is meant by that? Just to the right of the search box there is a “search fields” selection button. Click on the bull’s eye circle and you are presented with a list of 10 searchable fields. Depending on which fields are selected, your search results will vary. If you want to ensure maximum results for all your searches, select all the fields.
DECK CONTROLS There are two virtual “decks” on the screen. Drag and drop files into each of the decks to load music tracks or video clips. Each of the two decks is equipped with the following controls and displays: 1. Title of track 2. Waveform display This view shows the waveform of the entire track, allowing you to see the remaining duration of the track, as well as what has already been played.
4. Loop Sampler Sample Selection Dropdown Arrow This menu lets you choose which sample you wish to use. There are 12 slots which are available for you to record, load and play samples. Sample Selection Window Click to play the sample listed in the selection window. REC button When initiated, this function records the loop to the selected sample slot. If no loop is currently set on this deck, a 4 bar loop will be recorded by default. Wet/Dry knob Controls the level of gain applied to the loop sample. 5.
7. Transport VirtualVinyl Returns and pauses the music at the default Cue Point. To set a Cue Point, pause the song, seek to the desired position (for example by rotating the control dome indicators), and then click on “VirtualVinyl”. Alternatively you can also right-click on the “VirtualVinyl” button to set a Cue Point while playing. Once you’re on the Cue Point, pressing and holding down “VirtualVinyl” allows for temporary play of this point.
INTERNAL MIXER CONTROLS VirtualVinyl features an internal mixer section as part of the InternalMixer skin. The mixer can be accessed by selecting “VirtualVinyl:InternalMixer” in the Configuration Skin section. It can be used just like a regular DJ mixer. The controls on the mixer include: 1. Channel Gain This knob sets the gain level for the corresponding channel (deck). (Right-clicking will bring it to the value that matches the other deck level. Doubleclicking brings it back to 0) 2.
TOP TOOLBAR CONTROLS Please note that not all skin interfaces provide this set of controls. However, there are some elements common in all the skins (those are annotated with an asterisk * ). 1. Headphone level Volume control for headphone level. 2. VirtualVinyl/Mix blend Fade to hear just the cue, cue/mix, or mix signal only in the headphones. 3. BPM button * Opens BPM edit window. Each button respective to it positioned deck. 4. Master Volume * Controls main output of program 5.
THE RHYTHM WINDOW Above the players, a window posts curves corresponding to the two rates/rhythms of the music. These curves are represented in a waveform, allowing you to see your music. The peaks in the curve represent beats. In order to synchronize the music, these peaks should coincide. The present is represented by the line in the middle of the screen. All on the left was already played, while what is on the right represents the next seconds of the track.
MANUAL BPM CORRECTION The CBG is calculated automatically when a track is loaded for the first time in VirtualVinyl. VirtualVinyl uses powerful algorithms to calculate the BPM and the CBG of music (you can choose between fast but effective algorithm which works well for techno and house, and a slower algorithm which is effective on any type of music). However, in some rare cases, the CBG is not correctly positioned on the beats of the song. In this case, you can easily carry out a manual correction.
CONFIGURATION SETTINGS VirtualVinyl is designed to be very simple and easy to use but it is also fully customizable to match your preferred system performance. To make changes to VirtualVinyl’s configuration, click on the button. This will bring you to the “Settings” dialog. The options in the “Settings” dialog can be viewed and edited by clicking on the corresponding tab on top of the “Settings” window and include: SOUND SETUP The “Sound Setup” tab is where your sound card (or device) configuration.
OPTIONS The Options settings allow you to customize how VirtualVinyl performs. BPM Engine – Allows you to choose between the two different algorithms available for the analysis of BPM. The first algorithm, “techno/house,” bases itself on the detection of the beats in the music, and should be used with music that has a very pronounced beat. The second, “any music”, should be used with music which does not have a distinct, pronounced beat.
AutoLoad Playlists – See “Playlist Setup” section (page 13) AutoSave Unplayed – See “AutoSave Unplayed” (page 16) Auto Pitch Matching – When loading a song, automatically adjusts the pitch so that the BPM matches the BPM of the song currently playing. Auto Gain – This is the gain adjustment setting for VirtualVinyl. If you Select “always 0db,” VirtualVinyl will automatically modify the level of the tracks to obtain a level of 0dB (the loudest level without clipping the signal).
PERFORMANCES VirtualVinyl provides a simple, yet complex interface for optimizing performance to the capabilities of your computer. Depending on the system’s resources, some settings will work better than others. We recommended that you take time to experiment with these settings prior to using VirtualVinyl in a live performance in order to achieve the best performance.
SCRATCH (Allows for adjustment to how VirtualVinyl reacts to scratch motions) Optimize for: Quality – VirtualVinyl will more accurately represent how a scratch sounds when moving the virtual record back and forth Latency – VirtualVinyl reacts as quickly as possible but might result in a somewhat more metallic sound.
SKIN VirtualVinyl allows you to choose between several different “skins”. VirtualVinyl:Basic – a simple, basic skin. VirtualVinyl:Full – a skin which features full VirtualVinyl controls. VirtualVinyl:FullVideo – a skin featuring full VirtualVinyl controls plus a video section in the middle. VirtualVinyl:InternalMixer – a skin featuring full VirtualVinyl controls plus an audio mixer in the middle.
SHORTCUT MACROS A shortcut macro is the process of assigning multiple actions to the same key or key combination. The power of the macro comes from the order they are listed. Open the Configuration dialog and select the Keyboard Shortcuts tab. Here is an example of a macro which provides a ‘Mix Now’ capability. The actions to be used are auto_crossfade, play, and select – in this example, all three actions will be activated consecutively by pressing the Space bar once.
NETWORK VirtualVinyl can be synchronized between multiple instances and/or synchronize multiple computers running VirtualVinyl. No synchronization – turns synchronization off. Local synchronization – allows multiple instances of VirtualVinyl to run and synchronize together on the same computer. Network synchronization – allows several computers running VirtualVinyl to synchronize over a network.
REMOTE CONTROL VirtualVinyl can be controlled using a wide array of external controllers. Once the controller is connected, start VirtualVinyl, select the Config Remote Control tab and enable your controller by checking the corresponding “Enable” box. If the controller is properly set up and connected, a green dot appears next to it. If the controller is improperly connected, a red dot will appear next to it. If the controller does not seem to function, try to un-check and re-check the “Enable” box.
CODECS This is a list of the codecs which Cue will use to interpret and decode sound and video files. These include the most common sound and video file extensions. VirtualVinyl does not natively pick up on all available codecs for decoding audio and video. Specific to video decoding, there is a small collection that VirtualVinyl's Video Decoder is coded to handle. The Windows Media Player Video Decoder is available if a codec not natively supported by VirtualVinyl is needed for decoding.
VIDEO Activate – Turn the video engine on or off. TV Output – Select the monitor which will display the video master output. NOTE: Only Monitors which are part of the windows desktop can be selected. If the monitor is not in the list, open Windows’ display settings and activate the ‘Extend desktop on this monitor’ for the desired monitor. Use Hardware Acceleration – Uses DirectX to compute and display the video. NOTE: Unless you are using a video card that is fairly old, you shouldn’t turn this off.
INFO The VirtualVinyl Info tab provides the version number along with copyright information about application. In addition, there are three buttons: Check for Updates: makes an internet query to the VirtualVinyl Download Center and checks to see if any updates are available. NOTE: An Internet Connection is required for update checks and plug-in download. Download Plug-ins: Logs onto the VirtualVinyl website to display available plug-ins.
TIMECODE CONTROL When you open the Timecode Configuration window, you can choose to view the window in Simple or Advanced view. For the most part, you might never have to go into the Advanced View – the Simple View shows the most essential timecode configuration that you will probably need. You will notice that there is an Auto-Config button for each virtual deck. This button can be used to automatically detect the required timecode settings for the software to function properly.
Please refer to the following descriptions of the timecode configuration parameters (shown with Advanced View on the right): 1. Vinyl – Choose this option if you are using timecoded vinyl. 2. CD – Choose this option if you are using timecoded CDs. 3. Mode – You can choose between 3 different timecode tracking modes. These modes will influence how the timecode is controlling playback position on the corresponding deck: Absolute – This mode is similar to how music is normally played on vinyl.
5. Pitch Sensitivity – This is the time that it takes for the waveform display to become adjusted after you alter the pitch of the timecode signal. Too small of a value will attempt to redraw the waveform when you scratch the timecode, which is not recommended. Setting too high of a value will take longer to redraw the waveform, which may be visually confusing. Please experiment with a few different values to find the one best suited for your style. 6.
DJING WITH ONE TURNTABLE VirtualVinyl’s flexible time-code control allows you to easily mix with only one turntable. Please see below for instructions on how to DJ using only one turntable. 1. Press the CONFIG button at the top right corner of the screen to access VirtualVinyl’s preferences. 2. Select Single Timecode under the Inputs pull-down menu. 3. Click on Timecode Config… to access the timecode configuration and calibration options. 4.
THE SAMPLER VirtualVinyl features a powerful sampler, which provides the ability to record, load, save and play samples on the fly. The sampler can be accessed by clicking on the “Sampler” tab in the lower window and features 12 slots for samples which are available to use at any given point in time. There are two types of samples that are supported – linear (one shot), and circular (looping) samples. Linear samples are samples which are played beginning to end.
Samples can be played from the loop sampler menu on each deck. Simply select the sample from the pull-down menu, and then click on the sample title to play it. The frame around the title will light up during playback. If the sample is a loop, then click the sample title again to stop the loop. Linear samples will stop when the end is reached. The volume of the sample can be controlled using the Volume knob. RECORDING SAMPLES VirtualVinyl can easily record samples available for instant playback.
EFFECTS VirtualVinyl features a comprehensive set of audio and video effects and transitions which can be accessed by clicking the “Effects” tab on the lower window. The effects list is displayed on the left side of the window. Multiple effects, both audio and video, can be applied to either or both decks. To use an effect, select the effect and activate it by clicking on one of the two “Activate” buttons in the middle panel of the window. Deactivate the effect by clicking on the “Activate” button again.
VIDEO In addition to mixing traditional audio, VirtualVinyl makes it possible to mix video content with the ease and familiarity of a DJ interface. Instead of audio files (.mp3, .wma, .m4a, etc.), video files (.avi, .mpg, .wmv, .vob, etc.) can be played. Video files are distinguished in the Browser with a small, blue and can be loaded to either deck. When “V” on their icon playing a video file, a video window will open in VirtualVinyl.
There are two ways to mix video clips: automatically or manually. To mix manually, use the video crossfader to transition from one video to another. Or, just click on one of the video preview windows to smoothly crossfade to that deck. If the “Link the Video crossfader” is checked in the Video configuration tab, the skin’s audio crossfader will crossfader the video when it is moved from one deck to the other. Alternatively, VirtualVinyl can do the video mixing automatically.
OPTIMIZATION In general, video mixing is much heavier in computer resources than audio mixing so certain optimization may help performance, especially when dealing with full frame rate video (such as DVD in high definition).
KARAOKE In addition to being able to play music and other video content, VirtualVinyl allows provides support to play and mix karaoke files. VirtualVinyl is compatible with MP3+G, WAV+G, WMA+G, OGG+G, as well as karaoke DVD and .ZIP files. When using CDG files, the songs will have two files that appear in VirtualVinyl’s browser: • The first is a file with a “K” in its icon – this is the video karaoke file.
BROADCASTING AND RECORDING VirtualVinyl also allows you to record or broadcast your mix. To access the recording and broadcasting features, click on the “Record” tab. The following interface is displayed. The following methods are available: • • • Record File Burn CD Broadcast To access the recording settings click on the “Config” button in the center. RECORD FROM In the “Config” dialog, three different sources for recording are available. These options are available for all three methods.
RECORDING TO A FILE (“RECORD FILE”) “Record File” provides recording a mix session to a .WAV or .MP3 file direct to the system’s hard drive. When the recording is completed, it can then be listened to in VirtualVinyl, edited with an audio editing application, or written to a CD using a CD burning software. To setup the “Record File”, click on “Config” to access the configuration settings for recording a file.
BURN CD VirtualVinyl can record the session in a CD image format. Select “Burn CD” for VirtualVinyl to record the session as a .BIN/.VirtualVinyl file type which contains all the necessary information for burning software which supports .BIN/.VirtualVinyl image types. Click on “Config” to access the configuration settings for CD recording. Record From – chooses the recording source Auto-Start – checking this box will automatically begin the recording when the first track begins playing.
BROADCASTING TO THE INTERNET (“BROADCAST”) VirtualVinyl also allows you to broadcast your session in realtime as a “webcast” on the Internet. This way, people around the world can listen to your mix session. Click on “Config” to access the configuration settings for recording a file. Record From – chooses the recording source Auto-Start – checking this box will automatically begin the recording when the first track begins playing.
Caution: If using a floating Internet connection, the address of the webcast could change from session to session. In this case, the broadcasting address should be communicated each time to the listeners. Caution: To listen to the mix, the software used by the listeners must be able to communicate with the broadcasting computer via the webcast server.
REMOTE CONTROL WITH THE iCDX VirtualVinyl is programmed to work extremely well with the Numark iCDX. This provides a great way to control the most important parameters and controls of the virtual decks without ever having to touch the keyboard. In addition, you only need one iCDX to control both virtual decks. The iCDX will control whichever deck is currently “active” in VirtualVinyl. You can make a deck “active” by switching between the decks with the Eject button on the iCDX.
iCDX CONTROLLER MAPPINGS Please note: The iCDX will always address the deck which is currently “active”. A deck is “active” when the deck number is illuminated. You can always activate a deck by switching between them with the “Eject” button on the iCDX. 1. VirtualVinyl This button returns and pauses the track at the current cue point. Press and hold the VirtualVinyl button for temporary play from the cue point.
7. Scratch Button This button activates the wheel for scratching. If you would like to use the platter on the iCDX to scratch, cue and adjust the track that is playing on the active deck, you need to make sure that the iCDX is in Scratch Mode. If the Scractch button on the iCDX is not lit, press it to turn on Scratch Mode. This will enable iCDX’s platter to control VirtualVinyl. 8. FX button This button will turn on the effect currently selected in VirtualVinyl.
18. Loop section Press the Loop In button to set the beginning point of a loop. Press the Loop Out button to set the end point of a loop. Pressing Loop In again will set a new loop in point. Pressing Loop Out again will set a new loop out point. The Reloop/Stutter button will exit and release the loop, allowing the track to continue playing. You can press the Reloop/Stutter button again to enter the loop. 19.
20. Rec button In SAMPLES mode (see above), the Rec button will arm buttons 1, 2, 3 for recording samples in VirtualVinyl. In VirtualVinylS mode (see above), the Rec button will arm buttons 1, 2, 3 for setting cue points. 21. Mode button This button toggles through LOOP, SAMPLES and VirtualVinylS mode for the 1, 2, 3 buttons. 22. Search button While this button is held down with the Scratch button active, you can quickly search through the selected track. 23.