
Quick Start Manual


5
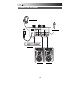
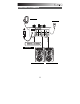
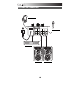
REAR PANEL FEATURES
1. POWER CABLE – Use the attached power
cable to connect the mixer to a power outlet.
While the power is switched off, plug the power
supply into the mixer first, then plug the power
supply into a power outlet.
2. POWER SWITCH – Turn the mixer on and off
with this button.
3. MASTER OUTPUT (RCA) – Use standard
RCA cables to connect this output to a speaker
or amplifier system. The level of this output is
controlled by the MASTER knob on the top panel.
4. LINE INPUTS (RCA) – Connect line-level devices, such as CD players, samplers or audio interfaces,
to these inputs.
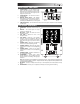
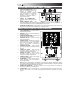
TOP PANEL FEATURES
1. POWER LED – Illuminates when the mixer is
on.
2. MASTER – This control adjusts the output
volume of the Program mix.
3. MIC GAIN – Adjusts the audio level of the
microphone signal.
4. CUE GAIN – Adjusts the level of the
headphone audio.
5. CUE SLIDER – Slide this to mix between
Channels 1 and 2 in the headphones. When all
the way to the left, only Channel 1 will be heard.
When all the way right, only Channel 2 will be
heard.
6. CHANNEL GAIN – Adjusts the corresponding
channel’s pre-fader and pre-EQ gain level.
7. CHANNEL TREBLE – Adjusts the high (treble)
frequencies of the audio on the corresponding
channel.
8. CHANNEL BASS – Adjusts the low (bass)
frequencies of the audio on the corresponding
channel.
9. CHANNEL FADER – Adjusts the audio level on
the corresponding channel.
10. CROSSFADER – Blends audio playing
between Channels 1 and 2. Sliding this to the
left plays channel 1 and sliding to the right plays
Channel 2.
Note: The crossfader is user-replaceable if it should ever wear out. Simply remove the facepanel, then
remove the screws holding it in position. Replace the fader with a quality authorized replacement from
your local Numark retailer only.
11. MIC INPUT – Connect ¼” microphones to this input. The microphone controls are located on the top
panel.
12. HEADPHONES – Connect your ¼” headphones to this output for cueing and mix monitoring.
3 4
4
2
1
1
2
3
4
6
7
8
6
7
8
9
9
5
10
11 12