Quick Start Owner’s Manual BOX CONTENTS • MIXER • POWER SUPPLY Manual de inicio rápido para el usuario (ESPAÑOL) CONTENIDOS DE LA CAJA • MEZCLADOR • FUENTE DE ALIMENTACIÓN Kurzbedienungsanleitung (DEUTSCH) INHALT DER VERPACKUNG • MISCHPULT • STROMKABEL Manuel d’utilisation du propriétaire (FRANÇAIS) CONTENU DE LA BOÎTE • MIXER • BLOC D’ALIMENTATION Manuale rapido di utilizzazione (ITALIANO) CONTENUTO DELLA CONFEZIONE • MIXER • CAVI DI ALIMENTAZIONE
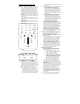
MIXER QUICK SETUP GUIDE (ENGLISH) 1. 2. 3. 4. 5. 6. 7. Make sure all items listed on the front of this guide are included in the box. READ SAFETY INSTRUCTION BOOKLET BEFORE USING THE PRODUCT Study this setup diagram. Place mixer in an appropriate position for operation. Make sure all devices are turned off and all faders are at “zero” Connect all stereo input sources as indicated in the diagram. Connect the stereo outputs to the power amplifier(s), tape decks, and/or audio sources. 8.
off. This music “KILL” control allows for unique mixing styles. FRONT PANEL FEATURES Microphone - Auxiliary Input Controls 1. “MIC – AUX GAIN” (Microphone - Auxiliary Gain): This knob adjusts the volume of both the main microphone and auxiliary inputs. The gain should be turned completely to off when connecting and disconnecting equipment. If both inputs are used simultaneously the inputs will be mixed together. 2.
holding it in position. Replace the fader with a quality authorized replacement from your local Numark retailer. When Master Cue is pressed only the master output is heard. 16. “Headphone Jack” (Quarter Inch Output Terminal): Your headphones can be connected to this ¼” terminals. The Volume should always be set at its lowest setting while connecting and disconnecting headphones to prevent damage to headphones and/or your hearing. 18.
1. 2. 3. 4. 5. 6. 7. MANUAL DE INICIO RÁPIDO PARA EL MEZCLADOR (ESPAÑOL) unidades de cinta magnética y/o fuentes Asegúrese de que todos los artículos de audio. incluidos al inicio de este manual están 8. Enchufe su mezclador y otros incluidos en la caja. dispositivos a la toma de corriente LEA LAS INSTRUCCIONES DEL alterna. FOLLETO DE SEGURIDAD ANTES DE 9. Prenda todo en el siguiente orden: UTILIZAR EL PRODUCTO. • fuentes de entrada de audio (por ej. Estudie este diagrama de instalación.
CARACTERÍSTICAS DEL PANEL FRONTAL Micrófono – Controles de entrada auxiliares 1. 2. 3. 4. “MIC – GANANCIA AUX” (Micrófono – Ganancia Auxiliar): Este botón ajusta tanto el volumen tanto del micrófono principal como de las entradas auxiliares. La ganancia debería está completamente apagada cuando se conecte o desconecte el equipo. Si se utilizan ambas entradas de forma simultánea, las entradas de mezclarán.
ilumina en verde indicando que la fuente está pasando una señal de aviso a los auriculares. Cuando usted pulse “Mic PFL” lo añadirá a la mezcla de Cue. Cuando se pulse Master Cue solo se escuchará la salida Master. 16. “Jack de auriculares” (Terminal de salida de ¼”): Puede conectar sus auriculares a terminales de ¼”. El volumen debe ser siempre regulado en su posición más baja cuando se conecten los auriculares para prevenir que se dañen los auriculares y/o su oído. Controles de Crossfader 17.
MISCHPULT SCHNELLAUFBAUANLEITUNG (DEUTSCH) 1. 2. 3. 4. 5. 6. 7. Versichern Sie sich, daß alle im Anfang dieser Anleitung aufgeführten Teile in der Schachtel enthalten sind. LESEN SIE DIE SICHERHEITSBROSCHÜRE BEVOR SIE DAS GERÄT BENUTZEN. Sehen Sie sich dieses Aufbaudiagramm sorgfältig an. Stellen Sie das Mischpult an eine für den Betrieb geeignete Stelle. Stellen Sie sicher, daß alle Vorrichtungen ausgeschaltet sind und alle Faders auf “null” stehen.
BEDIENUNGSELEMENTE VORDERSEITE Mikrofon - Zusatzeingangssteuerungen 1. “MIC – AUX GAIN” (Mikrofon Zusatzlautstärkeregler): Dieser Regler stellt die Lautstärke des Hauptmikrofons als auch der Zusatzeingänge. Die Lautstärke sollte ganz ausgeschaltet sein wenn Geräte angeschlossen oder ausgesteckt werden. Falls beide Eingänge simultan verwendet werden, werden diese gemischt. 2. “Treble” (Mikrofon - Zusatzhöhenequaliser): Dieser Regler stellt die Eingangs-Höhentöne des Mikrofons ein. 3.
16. dieses zum Cue-Mix hinzugefügt. Wenn “Master Cue” gedr[ckt ist, kann nur die MasterWiedergabe gehört werden. “Headphone Jack” (Viertel-Zoll Wiedergabeanschluß): An diese Viertel-ZollAnschlüsse kann Ihr Kopfhörer angeschlossen werden. Die Lautstärke sollte während des Einund Aussteckens immer auf den niedrigsten Wert eingelstellt werden um eine Beschädigung des Kopfhörers und/oder eine Beeinträchtigung Ihres Hörvermögens zu vermeiden. Crossfader Regler 17.
GUIDE D’INSTALLATION SIMPLIFIÉ POUR CONSOLE DE MIXAGE (FRANÇAIS) 1. 2. 3. 4. 5. 6. 7. Assurez-vous que tous les articles énumérés sur la première page de ce guide sont inclus dans la boîte. LISEZ LE LIVRET D’INSTRUCTIONS DE SÉCURITÉ AVANT D’UTILISER LE PRODUIT Étudiez bien le schéma d’installation. Placez la console en position d’utilisation.
CARACTÉRISTIQUES DU PANNEAU AVANT Entrée Microphone/Auxiliaire (input) Controls 1. Gain microphone/auxiliaire : Ce bouton ajuste le volume d’entrée du microphone et des entrées auxiliaires. Le gain doit être réglé au minimum durant le branchement et le débranchement d’équipement. Si les deux entrées sont utilisées simultanément les données d’entrées seront mélangées ensemble. 2. Égalisation aiguë Microphone – Auxilliaire : Ce bouton ajuste les sons aigus du microphone. 3.
15. 16. lorsqu’il se déplace vers la droite, il joue à droite « voie-2 ». “Bouton de pré-écoute” (Boutons MIC et MASTER): Quand il est pressé, le bouton CUE s'allume en vert pour indiquer que la source est entendue aux écouteurs. Quand vous pressez Mic PFL, cette écoute pré-fader s'ajoute au mixage d'écoute (cue). Quand Master Cue est pressé, seule la sortie Master est entendue. Prise des écouteurs (Entrée pour connecteur de ¼”) : Vos écouteurs peuvent être branchés à ce terminal ¼”.
MANUALE RAPIDO DI MONTAGGIO DEL MIXER (ITALIANO) 1. 2. 3. 4. 5. 6. 7. Verificate che tutti gli elementi elencati sul frontespizio di questo manuale siano inclusi nella confezione. PRIMA DI UTILIZZARE IL PRODOTTO LEGGETE IL LIBRETTO DELLE ISTRUZIONI DI SICUREZZA. Esaminate attentamente lo schema di montaggio. Posizionate il mixer in modo adeguato all’operazione. Assicuratevi che tutti i dispositivi siano spenti e che tutti i fader siano a “zero”.
CONFIGURAZIONE PANNELLO ANTERIORE Microfono – Controlli Ingressi Ausiliari 1. 2. 3. 4. “MIC – AUX GAIN” (Microfono – Gain Ausiliario): Questa manopola regola il volume del microfono principale e degli ingressi ausiliari. La manopola di guadagno deve essere girata completamente in posizione di spegnimento al momento di collegare e scollegare l’equipaggiamento. Se entrambi gli ingressi vengono utilizzati simultaneamente, verranno missati.
15. 16. “Tasto Cue ” (Tasti MIC e MASTER Cue): Quando viene premuto, il tasto CUE si illumina di verde a indicare che la sorgente è diretta in cueing alle cuffie. Quando Mic PFL viene premuto loaggiunge al missaggio del cueing. Quando viene premuto Master Cue, si sente solo l’uscita Master. “Jack Cuffie” (Terminale 1/4”): Le vostre cuffie possono essere connesse a questo terminale da ¼”.