User Guide English ( 3 – 8 ) Guía del usuario Español ( 9 – 14 ) Guide d'utilisation Français ( 15 – 20 ) Guida per l'uso Italiano ( 21 – 26 ) Benutzerhandbuch Deutsch ( 27 – 32 ) Appendix English ( 33 )
User Guide (English) Introduction Box Contents NDX500 Power Cable USB Cable User Guide RCA Audio Cable Safety & Warranty Manual Support For the latest information about this product (system requirements, compatibility information, etc.) and product registration, visit numark.com/ndx500. For additional product support, visit numark.com/support. Quick Start / Connection Diagrams NDX500 as a Media Player Important: When setting up, power on NDX500 before your amplifiers.
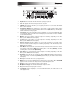
Features Top Panel 1. 2. 3. Display: This screen shows information relevant to NDX500's current operation. See the Display section to learn more. USB Host Port: Connect a standard USB thumb drive (with a FAT16 or FAT32 file system) to this port to allow NDX500 to browse and play MP3 files stored on it. Use the Folder button and Track Knob to navigate the contents. 4. Eject: Press this button to eject a CD from the CD Slot. 5.
8. Platter: The platter serves many functions depending on its current mode: • If a track is not playing, turn the platter to search slowly through a track's frames. To set a new cue point, rotate the platter and begin playback when you have determined the proper position. Press Cue to return to that cue point. • If a track is playing, turn the platter to temporarily bend the pitch of the track. Turning it clockwise speeds it up while turning it counterclockwise slows it down.
17. Pitch Bend –/+: Press either of these buttons to temporarily raise (+) or lower (–) the pitch and tempo of the music up to 4% from the current pitch setting. 18. Tap: Tap this button to the beat of the music to enter a BPM manually. Press and hold this button for 2 seconds to prompt NDX500 to detect a BPM automatically. 19. Master Tempo: Press this to activate or deactivate Master Tempo, which locks the musical key of the track to its original key (as if it were playing with 0% pitch adjustment).
Display 5 1 2 11 9 10 15 12
<album> <artist> 3 4 17 6 14 7 8 16 13 1. Play/Pause: This indicates whether the track is playing or paused. 2. Cue: This appears when the unit is paused at a cue point. 3. CD/USB: This indicates whether you are playing tracks from a connected USB thumb drive or an inserted CD. 4. Track/Folder Number: This indicates the current track or folder number. When viewing or playing a program, the number will have a P in front of it (P01, P02, etc.</p></li><li><h6><a class="text-decoration-none text-link fw-bold" href=/manual/numark/ndx500/user-manual-french/page-8.html>PAGE 8</a></h6><p>Rear Panel 5 4 6 3 2 1 1. Voltage Selector: Set this switch to the voltage for your location. 2. Power Connector: Use the included power cable to connect this jack to a power outlet. 3. Power Switch: Use this switch to power NDX500 on or off. Remember to power off NDX500 before disconnecting its power. Important: When setting up, power on NDX500 before your amplifiers. When tearing down, power off your amplifiers before NDX500. 4.</p></li><li><h6><a class="text-decoration-none text-link fw-bold" href=/manual/numark/ndx500/user-manual-french/page-9.html>PAGE 9</a></h6><p>Guía del usuario (Español) Introducción Contenido de la caja NDX500 Cable de alimentación Cable USB Guía del usuario Cable de audio RCA Manual sobre la seguridad y garantía Soporte Para obtener la información más reciente acerca de este producto (requisitos de sistema, información de compatibilidad, etc.) y registrar el producto, visite numark.com/ndx500. Para soporte adicional del producto, visite numark.com/support.</p></li><li><h6><a class="text-decoration-none text-link fw-bold" href=/manual/numark/ndx500/user-manual-french/page-10.html>PAGE 10</a></h6><p>Características Panel superior 1. 2. 3. Pantalla: Esta pantalla muestra información relacionada con la operación actual del NDX500. Consulte la sección Pantalla para aprender más. Puerto USB host: Conecte una unidad de memoria USB (con sistema de archivos FAT16 o FAT32) a este puerto para permitir al NDX500 explorar y reproducir los archivos MP3 almacenados en ella. Utilice el botón Folder (Carpeta) y la perilla Track (Pista) para explorar el contenido.</p></li><li><h6><a class="text-decoration-none text-link fw-bold" href=/manual/numark/ndx500/user-manual-french/page-11.html>PAGE 11</a></h6><p>8. Plato: El plato cumple muchas funciones dependiendo de su modo actual: • Si no se está reproduciendo una pista, gire el plato para buscar lentamente a lo largo de los cuadros de la pista. Para determinar un nuevo punto de cue, gire el plato y comience a reproducir una vez que haya determinado la posición adecuada. Pulse Cue para volver a ese punto de cue. • Si se está reproduciendo una pista, gire el plato para flexionar temporalmente el pitch de la misma.</p></li><li><h6><a class="text-decoration-none text-link fw-bold" href=/manual/numark/ndx500/user-manual-french/page-12.html>PAGE 12</a></h6><p>18. Toque ligero: Dé golpecitos a este botón siguiendo el beat de la música para introducir los BPM manualmente. Mantenga pulsado este botón por 2 segundos para indicarle al NDX500 que detecte los BPM automáticamente. 19. Tempo maestro: Púlselo para activar o desactivar el tempo maestro, que fija la tonalidad musical de la pista en su tonalidad original (como si estuviera tocando con 0% de ajuste de pitch). Es posible ajustar entonces el tempo de la pista sin afectar a su tonalidad o pitch. 20.</p></li><li><h6><a class="text-decoration-none text-link fw-bold" href=/manual/numark/ndx500/user-manual-french/page-13.html>PAGE 13</a></h6><p>Pantalla 5 1 2 11 9 10 15 12 <title> <album> <artist> 3 4 17 6 14 7 8 16 13 1. Reproducir/Pausa: Indica si la pista se está reproduciendo o está en pausa. 2. Cue: Aparece si la unidad está detenida en un punto de cue. 3. CD/USB: Indica si está reproduciendo pistas de una unidad de memoria USB conectada o de un CD insertado. 4. Track/Folder Number (Número de pista/carpeta): Indica el número de pista o carpeta actual.</p></li><li><h6><a class="text-decoration-none text-link fw-bold" href=/manual/numark/ndx500/user-manual-french/page-14.html>PAGE 14</a></h6><p>Panel trasero 5 4 6 3 2 1 1. Selector de voltaje: Ajuste este interruptor al voltaje de su ubicación. 2. Conector de corriente: Utilice el cable de corriente incluido para conectar el mezclador a una toma de corriente. 3. Interruptor de encendido: Utilice este interruptor para encender y apagar el NDX500. Recuerde apagar el NDX500 antes de desconectarlo de la corriente. Importante: Al comenzar, encienda su NDX500 antes que sus amplificadores.</p></li><li><h6><a class="text-decoration-none text-link fw-bold" href=/manual/numark/ndx500/user-manual-french/page-15.html>PAGE 15</a></h6><p>Guide d'utilisation (Français) Présentation Contenu de la boîte NDX500 Câble d'alimentation Câble USB Guide d’utilisation Câble RCA audio Consignes de sécurité et informations concernant la garantie Assistance technique Pour les toutes dernières informations concernant la configuration système requise, la compatibilité, etc., et l’enregistrement du produit, veuillez visiter numark.com/ndx500. Pour de l’assistance supplémentaire, veuillez visiter le site numark.com/support.</p></li><li><h6><a class="text-decoration-none text-link fw-bold" href=/manual/numark/ndx500/user-manual-french/page-16.html>PAGE 16</a></h6><p>Caractéristiques Panneau supérieur 1. 2. 3. Écran : Cet écran affiche les informations pertinentes aux opérations du NDX500 en cours. Reportez-vous à la section Écran pour en savoir plus. Port USB hôte : Branchez une clé USB (avec système de fichiers FAT16 ou FAT32) à ce port afin de permettre au NDX500 de parcourir et de jouer ses fichiers MP3. Utilisez la touche Folder et le bouton Track afin de parcourir son contenu.</p></li><li><h6><a class="text-decoration-none text-link fw-bold" href=/manual/numark/ndx500/user-manual-french/page-17.html>PAGE 17</a></h6><p>8. Plateau : Le plateau permet de commander plusieurs fonctions, selon le mode en cours : • Si aucune piste n’est en cours de lecture, le plateau permet de parcourir lentement toutes les trames de la piste. Pour régler un nouveau point de repère, faites tourner le plateau, puis lancez la lecture lorsque vous avez trouvé le bon point. Appuyez sur la touche Cue pour retourner à ce point de repérage.</p></li><li><h6><a class="text-decoration-none text-link fw-bold" href=/manual/numark/ndx500/user-manual-french/page-18.html>PAGE 18</a></h6><p>17. 18. 19. 20. 21. 22. 23. 24. 25. 26. 27. Pitch Bend –/+ : Ces deux touches permettent d’augmenter (+) ou de diminuer (–) temporairement la tonalité et le tempo de la musique jusqu’à 4 %. Tap : Tapez cette touche au tempo de la musique afin d’entrer le BPM manuellement. Si vous désirez que le NDX500 détecte le BPM automatiquement, maintenez cette touche enfoncée pendant 2 secondes.</p></li><li><h6><a class="text-decoration-none text-link fw-bold" href=/manual/numark/ndx500/user-manual-french/page-19.html>PAGE 19</a></h6><p>Écran 5 1 2 11 9 10 15 12 <title> <album> <artist> 3 4 17 6 14 7 8 16 13 1. Lecture/Pause : Ceci indique si la piste est en cours de lecture ou arrêtée. 2. Cue : Ceci s’allume lorsque le lecteur est en mode pause sur un point de repère. 3. CD/USB : Ceci indique la source de l'audio en cours de lecture, soit une clé USB ou un disque compact inséré. 4. Indicateur de numéro de piste/dossier : Ceci indique le numéro de la piste en cours ou le numéro du dossier.</p></li><li><h6><a class="text-decoration-none text-link fw-bold" href=/manual/numark/ndx500/user-manual-french/page-20.html>PAGE 20</a></h6><p>Panneau arrière 5 4 6 3 2 1 1. Sélecteur de tension : Régler la tension adéquatement pour votre région. 2. Connecteur d'alimentation : Utilisez le câble d’alimentation inclus pour brancher l’appareil à une prise secteur. 3. Interrupteur d'alimentation : Cet interrupteur permet de mettre le NDX500 sous et hors tension. N’oubliez pas de mettre le NDX500 hors tension avant de le débrancher d’une prise secteur.</p></li><li><h6><a class="text-decoration-none text-link fw-bold" href=/manual/numark/ndx500/user-manual-french/page-21.html>PAGE 21</a></h6><p>Guida per l'uso (Italiano) Introduzione Contenuti della confezione NDX500 Cavo di alimentazione Cavo USB Guida rapida Cavo audio RCA Manuale di sicurezza e garanzia Assistenza Per le ultime informazioni in merito a questo prodotto (requisiti di sistema, informazioni sulla compatibilità, ecc.) e per effettuarne la registrazione, recarsi alla pagina numark.com/ndx500. Per ulteriore assistenza sul prodotto, recarsi alla pagina numark.com/support.</p></li><li><h6><a class="text-decoration-none text-link fw-bold" href=/manual/numark/ndx500/user-manual-french/page-22.html>PAGE 22</a></h6><p>Caratteristiche Pannello superiore 1. 2. 3. Display: questo schermo mostra le informazioni relative all'operazione corrente dell'NDX500. Per saperne di più, si veda il paragrafo Display. Porta USB Host: collegare un drive USB standard (con file system FAT16 o FAT32) a questa porta per consentire all'NDX di navigare tra i file MP3 ivi memorizzati e di riprodurli. Servirsi del tasto Folder e della manopola Track per navigare tra i contenuti.</p></li><li><h6><a class="text-decoration-none text-link fw-bold" href=/manual/numark/ndx500/user-manual-french/page-23.html>PAGE 23</a></h6><p>8. Piatto: il piatto ha diverse funzioni, a seconda della loro modalità corrente: • Se la traccia non è in corso di riproduzione, girare il piatto per effettuare una ricerca lenta tra i frame della traccia stessa. Per impostare un nuovo punto cue, far ruotare il piatto, quindi avviare la riproduzione quando è stata determinata la posizione desiderata. Premere Cue per tornare a quel punto cue.</p></li><li><h6><a class="text-decoration-none text-link fw-bold" href=/manual/numark/ndx500/user-manual-french/page-24.html>PAGE 24</a></h6><p>17. Bend del pitch -/+: premere uno di questi tasti per alzare (+) o abbassare (–) temporaneamente il pitch e il tempo della musica fino a un massimo del 4% dal valore attuale del pitch. 18. Tap: battere questo tasto al ritmo della musica per inserire un BPM manualmente. Tenere premuto questo tasto per 2 secondi per fare sì che l'NDX500 individui il BPM automaticamente. 19.</p></li><li><h6><a class="text-decoration-none text-link fw-bold" href=/manual/numark/ndx500/user-manual-french/page-25.html>PAGE 25</a></h6><p>Display 5 1 2 11 9 10 15 12 <title> <album> <artist> 3 4 17 6 14 7 8 16 13 1. Play / Pause: indica se la traccia viene riprodotta o è in pausa. 2. Cue: questo compare quando l'apparecchio è in pausa a livello di un punto cue. 3. CD/USB: indica se si stanno riproducendo tracce da un drive USB collegato o da un CD inserito. 4. Numero di traccia/cartella: indica il numero di traccia o cartella corrente.</p></li><li><h6><a class="text-decoration-none text-link fw-bold" href=/manual/numark/ndx500/user-manual-french/page-26.html>PAGE 26</a></h6><p>Pannello posteriore 5 4 6 3 2 1 1. Selettore di voltaggio: impostare questo interruttore sulla tensione corrispondente a quella del luogo in cui ci si trova. 2. Connettore di alimentazione: servirsi del cavo di alimentazione in dotazione per collegare questo jack ad una presa di alimentazione. 3. Interruttore di alimentazione: premere questo interruttore per accendere e spegnere l'NDX500. Ricordarsi di spegnere l'NDX500 prima di scollegare l'alimentazione.</p></li><li><h6><a class="text-decoration-none text-link fw-bold" href=/manual/numark/ndx500/user-manual-french/page-27.html>PAGE 27</a></h6><p>Benutzerhandbuch (Deutsch) Einführung Lieferumfang NDX500 Stromkabel USB-Kabel Benutzerhandbuch RCA-Audiokabel Sicherheit & Garantiehandbuch Kundendienst Für die neuesten Informationen zu diesem Produkt (Systemanforderungen, Informationen zur Kompatibilität etc.) und zur Produktregistrierung besuchen Sie numark.com/ndx500. Für zusätzlichen Produkt-Support besuchen Sie numark.com/support.</p></li><li><h6><a class="text-decoration-none text-link fw-bold" href=/manual/numark/ndx500/user-manual-french/page-28.html>PAGE 28</a></h6><p>Funktionen Oberseite 1. 2. 3. Display: Dieser Bildschirm zeigt Informationen zum aktuellen Betrieb des NDX500. Siehe Abschnitt Display, um mehr zu erfahren. USB-Host-Anschluss: Schließen Sie einen handelsüblichen USB-Stick (mit FAT16- oder FAT32-Dateisystem) an diesen Port an, damit das NDX500 am Stick gespeicherte MP3-Dateien durchsuchen und wiedergeben kann. Verwenden Sie die Ordner-Taste und den Track-Regler, um durch die Inhalte zu navigieren.</p></li><li><h6><a class="text-decoration-none text-link fw-bold" href=/manual/numark/ndx500/user-manual-french/page-29.html>PAGE 29</a></h6><p>8. 9. 10. 11. 12. 13. 14. 15. 16. Plattenteller: Der Plattenteller dient je nach aktuellem Modus verschiedenen Funktionen: • Wenn ein Track nicht abgespielt wird, drehen Sie langsam den Plattenteller, um durch die Track-Frames zu navigieren. Um einen neuen Cue-Punkt zu setzen, drehen Sie den Plattenteller und starten Sie die Wiedergabe, wenn Sie die genaue Position bestimmt haben. Drücken Sie Cue, um zu diesem Cue-Punkt zurückzukehren.</p></li><li><h6><a class="text-decoration-none text-link fw-bold" href=/manual/numark/ndx500/user-manual-french/page-30.html>PAGE 30</a></h6><p>17. 18. 19. 20. 21. 22. 23. 24. 25. 26. 27. Pitch Bend –/+: Drücken Sie eine dieser Tasten, um die Tonhöhe und das Tempo der Musik um bis zu 4% des aktuellen Pitch-Wertes vorübergehend zu erhöhen (+) oder zu reduzieren (-). Tap: Tippen Sie im Takt der Musik auf diese Taste, um manuell einen BPM-Wert einzugeben. Halten Sie diese Taste 2 Sekunden lang gedrückt, um das NDX500 dazu zu veranlassen, den BPM-Wert automatisch zu erkennen.</p></li><li><h6><a class="text-decoration-none text-link fw-bold" href=/manual/numark/ndx500/user-manual-french/page-31.html>PAGE 31</a></h6><p>Display 5 1 2 11 9 10 14 15 12 <title> <album> <artist> 3 4 17 6 7 8 16 13 1. Wiedergabe/Pause: Dies zeigt an, ob der Track abgespielt oder angehalten wird. 2. Cue: Wird angezeigt, wenn das Gerät an einem Cue-Punkt pausiert wird. 3. CD/USB: Dies zeigt an, ob Sie Tracks von einem angeschlossenen USB-Stick oder einer eingelegten CD spielen. 4. Track-/Ordnernummer: Dies zeigt die aktuelle Track- oder Ordnernummer an.</p></li><li><h6><a class="text-decoration-none text-link fw-bold" href=/manual/numark/ndx500/user-manual-french/page-32.html>PAGE 32</a></h6><p>Rückseite 5 4 6 3 2 1 1. Voltauswahl: Stellen Sie diesen Schalter auf die korrekte Spannung für Ihren Standort. 2. Stromanschluss: Verwenden Sie das mitgelieferte Netzkabel, um diese Buchse mit einer Steckdose zu verbinden. 3. Netzschalter: Mit diesem Schalter schalten Sie das NDX500 ein oder aus. Denken Sie daran, das Gerät auszuschalten, bevor Sie das NDX500 abstecken. Wichtig: Bei der Einrichtung schalten Sie bitte das NDX500 ein bevor Sie Ihren Verstärker einschalten.</p></li><li><h6><a class="text-decoration-none text-link fw-bold" href=/manual/numark/ndx500/user-manual-french/page-33.html>PAGE 33</a></h6><p>Appendix (English) Technical Specifications Disc Type Redbook CD, CD-R, CD-RW, MP3 CD Time Display Track Elapsed, Track Remaining, Total Remaining (CDs) Freq Response ± 2 dB (20 Hz – 20 kHz) THD < 0.03% Signal-to-Noise Ratio 80 dB (A-weighted) Output Level 1.9 V (+ 0.2) Channel Separation > 80 dB Channel Difference < 1 dB Pitch Control Range + 4%, 8%, 16%, or 100% Power Supply: 115/230 V AC, 60/50 Hz Consumption: 20 W Dimensions 8.5" x 11.5" x 4.</p></li><li><h6><a class="text-decoration-none text-link fw-bold" href=/manual/numark/ndx500/user-manual-french/page-34.html>PAGE 34</a></h6><p></p></li><li><h6><a class="text-decoration-none text-link fw-bold" href=/manual/numark/ndx500/user-manual-french/page-35.html>PAGE 35</a></h6><p></p></li><li><h6><a class="text-decoration-none text-link fw-bold" href=/manual/numark/ndx500/user-manual-french/page-36.html>PAGE 36</a></h6><p>numark.com Manual Version 1.</p></li></ul></nav></div></section></section></main><footer class=page-footer><div class="container flex-column py-3 py-sm-4"><div class="row mb-1 mb-sm-2 mb-md-5"><a href=/ class="brand offset-sm-0 col-sm-4 col-md-3 col-lg-2 offset-2 col-8 text-center text-md-start"><img class=logo-small src=/assets/img/brand-large.png alt=Manualshelf></a></div><div class=row><dl class="text-center text-sm-start col-sm-3"><dt class=fw-bold>Who We Are</dt><dd><a class=text-decoration-none href=/about>About Us</a></dd><dd><a class=text-decoration-none href=/company>Company</a></dd><dd><a class=text-decoration-none href=/careers>Careers</a></dd><dd><a class=text-decoration-none href=/terms>Terms & Privacy</a></dd></dl><dl class="text-center text-sm-start col-sm-3"><dt class=fw-bold>Resources</dt><dd><a class=text-decoration-none href=/brands>List of Manufacturers</a></dd><dd><a href=/ class=text-decoration-none>Support</a></dd><dd><a class=text-decoration-none href=/press>For the Press</a></dd><dd><a class=text-decoration-none href=/press#assets>Media assets</a></dd><dd><a class=text-decoration-none href=/faq>FAQ</a></dd></dl><dl class="text-center text-sm-start col-sm-3"><dt class=fw-bold>Get in touch</dt><dd><a class=text-decoration-none href=#>Blog</a></dd><dd><a class=text-decoration-none href=#>Email</a></dd><dd><a class=text-decoration-none href=/dmca>DMCA</a></dd></dl></div><div class=row><div class="text-center text-sm-start col-sm-4 pe-sm-0"><a href=https://www.facebook.com/pages/ManualShelf/1488826334681423 class="fs-5 text-center d-inline-block social rounded-2 align-middle text-decoration-none me-2"><i class="fab fa-facebook-f"></i></a><a href=https://www.twitter.com/ManualShelf class="fs-5 text-center d-inline-block social rounded-2 align-middle text-decoration-none me-2"><i class="fab fa-twitter"></i></a><a href=https://plus.google.com/+ManualShelf class="fs-5 text-center d-inline-block social rounded-2 align-middle text-decoration-none me-2"><i class="fab fa-google-plus-g"></i></a><a href=http://www.pinterest.com/ManualShelf class="fs-5 text-center d-inline-block social rounded-2 align-middle text-decoration-none"><i class="fab fa-pinterest-p"></i></a></div><div class="col col-sm-8 d-flex flex-column align-items-center flex-sm-row flex-wrap flex-sm-nowrap justify-content-center justify-content-sm-end"><div class="copy w-auto d-flex align-items-center justify-content-center justify-content-sm-end mt-2 mt-sm-0 me-2">ManualShelf © 2013-2025</div><select class="form-select form-select-sm w-auto mt-2 mt-sm-0"><option value=usa>USA</option></select><div></div></div><div id=pixel><script>
googletag.cmd.push(function() { googletag.display('pixel'); });
</script></div></footer><script src=/assets/js/jquery-3.3.1.min.js></script><script src=/assets/js/bootstrap.bundle.min.js></script><script src=/assets/js/jquery.autocomplete.min.js></script><script type=text/javascript>
$.extend({
redirectPost: function(location, args) {
var form = '';
$.each(args, function(key, value) {
form += '<input type="hidden" name="' + key + '" value="' + value + '">';
});
form = '<form id="s1" action="' + location + '" method="POST">' + form + '</form>';
$(document.body).append(form);
$("#s1").submit();
}
});
$(document).ready(function(){
$("#query").autocomplete({
minChars: 3,
groupBy: 'type',
paramName: 'q',
dataType: 'json',
serviceUrl: '/autocomplete',
noCache: true,
showNoSuggestionNotice: true,
noSuggestionNotice: 'Zarro results found',
onSelect: function (suggestion) {
$.redirectPost(suggestion.data.url, {highlight: encodeURIComponent(JSON.stringify(suggestion.data.hls))});
}
});
var toc = $('.toc-selector');
if (toc.length) {
var slideParams = { duration: 800, easing: 'linear' };
toc.click(function() {
$(this).toggleClass('open');
var section = $('.toc-content');
var isCollapsed = section.attr('data-collapsed') === 'true';
if (isCollapsed) {
section.slideDown(slideParams)
section.attr('data-collapsed', 'false')
} else {
section.slideUp(slideParams);
section.attr('data-collapsed', 'true')
}
});
}
});
var lastSmall = $(window).width() < 576;
$(window).resize(function() {
var newSmall = $(window).width() < 576;
if (lastSmall != newSmall) {
lastSmall = newSmall;
window.location.href = window.location.href;
}
});
</script></body></html>