
User manual


8
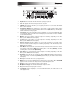
Rear Panel
1
2
3
4
5
6
1. Voltage Selector: Set this switch to the voltage for your location.
2. Power Connector: Use the included power cable to connect this jack to a power outlet.
3. Power Switch: Use this switch to power NDX500 on or off. Remember to power off
NDX500 before disconnecting its power.
Important: When setting up, power on NDX500 before your amplifiers. When tearing
down, power off your amplifiers before NDX500.
4. USB Port: Use a standard USB cable to connect this USB port to your computer. This
lets you use NDX500 as a USB MIDI software controller or as a USB audio device. Use
the Source button to select MIDI as NDX500's operating mode.
Important: Remember to select NDX500 as your playback or audio output device in your
computer's Sound Control Panel or Preferences.
5. RCA Audio Connectors: Use standard RCA audio cables to connect these line-level
outputs to your mixer.
6. Remote Start Connector: Use a standard remote start cable (sold separately) to
connect this jack to a remote-start-compatible mixer.
To adjust the remote start setting, press and hold the Single button and turn the Track
Knob:
• Cue/Play: When you move your mixer's crossfader towards this NDX500, the
loaded track will play from its cue point. When you move your mixer's crossfader
away from this NDX500, the track will return to the cue point and remain paused.
• Tact: When you connect a momentary switch/pedal to the NDX500's Remote Start
Connector, you can start or pause playback by pressing it once.
• Lock: When you connect a momentary switch/pedal to the NDX500's Remote Start
Connector, you can pause playback by holding the switch down and resume
playback by releasing it.