
Use and Care Manual


Turn the adjustment knob clockwise
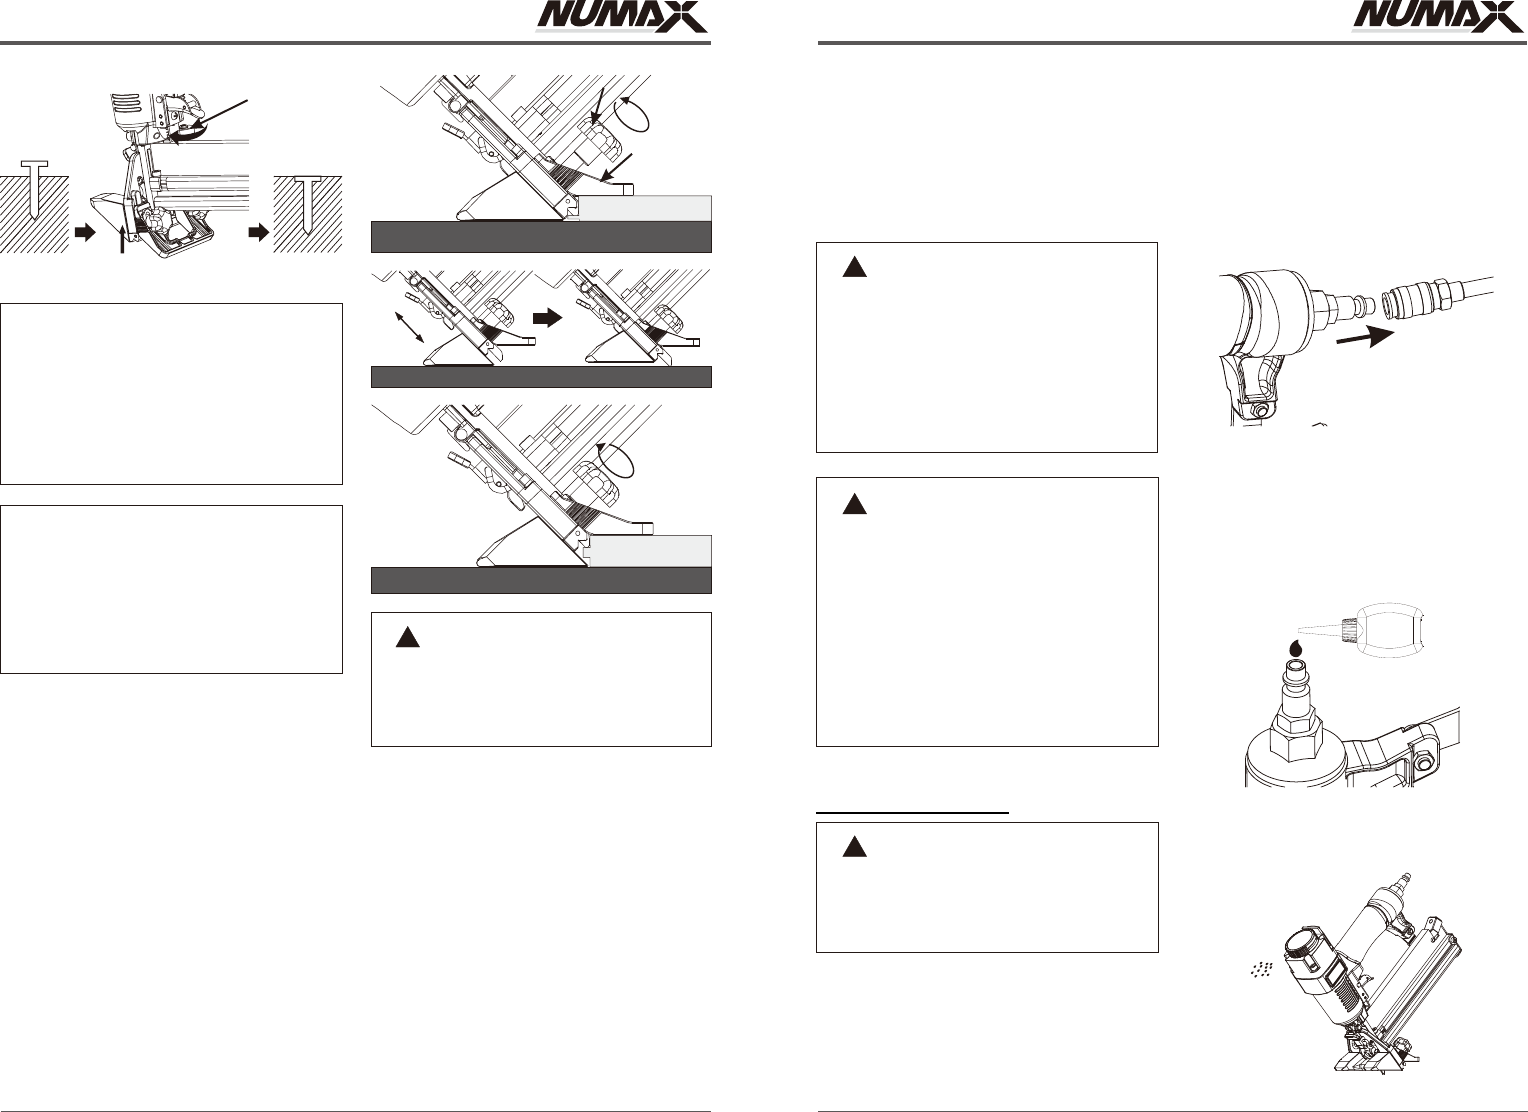
It is advisable to test the depth on a
scrap workpiece to determine the
required depth for the application.
To determine depth of drive, first adjust
the air pressure and drive a test
fastener. Never exceed 110 psi.
CAUTION:
When use the tool as a flooring nailer,
the depth adjustment wheel must be
set at the top of the wheel bar.
To set the wheel:
1.Turn the wheel right to move the
wheel up.
2.Set the wheel at the top of the wheel.
NOTE:
Disconnect the tool from air source.
Loose the plastic screw (K) on both sides of
the flooring plate (L).
Slide the floor plate up or down to suit your
flooring application.
Fasten the plastic screws tightly.
Ensure the correct depth set for the wood
floor by firing into a scrap piece of flooring
and checking for proper fastener
placement.
ADJUSTING THE FLOORING PLATE
When the flooring nose cover set on the nailer,
the floor plate depth is adjustable for 3/8”, 5/8”
and 1/2” thickness floor wood. To adjust the
floor plate depth, please follow these steps as
listed below:
Plastic Screws
(K)
Floor Plate
(L)
Disconnect the tool from the air source
whenever adjust the floor plate. Make
sure there is no fastener in magazine
before adjusting the floor plate.
MAINTENANCE
Any time inspection, maintenance, and
cleaning are done:
◆Disconnect the tool from the air source.
◆ Empty the magazine completely.
Disconnect the air supply from the tool to
add the lubricant.
LUBRICATION
Frequent, but not excessive, lubrication is
required for best performance after long
periods use. Oil for pneumatic fastening tools is
added through the air line connection and will
lubricate internal parts.
Turn the tool so the air inlet is facing up.
Place 2-3 drops of pneumatic fastening tool
oil into air inlet. Do not use detergent oils, oil
additives, or air-tool oils as these lubricants
will cause accelerated wear to the seals and
bumpers in the tool, resulting in poor tool
p e r f o r m a n c e a n d f r e q u e n t t o o l
maintenance.
After adding oil, connect the tool to the air
source, run tool briefly. Wipe off any excess
oil from the cap exhaust.
Each tool is packed with an anti-dust cap on the
air connector, check it after unpacking.
Keep the anti-dust cap cover the air connector
when the tool is not in use.
ANTI-DUST
oil
Too Shallow
Flush
Adjustment
wheel(J)
FIRING THE TOOL
(SEQUENTIAL FIRING MODE)
Single sequential actuation provides the most
accurate fastener placement.
To use the tool to drive nails in this actation
mode, WCE and trigger must be used in a
specific order.
Connect the tool to the air source.
The work contact element(WCE) must be
completely depressed by placing the nose
of the tool against the work piece.
The trigger must be pulled firmly and then
released.
The trigger must be released to reset the
tool before another fastener can be driven.
The tool must be allowed to recoil away
from the work piece.
An improperly functioning tool must not
be used. Do not actuate the tool unless
the tool is placed firmly against the
work place.
Always know the operational mode of
the tool before using. Failure to know
the operational mode could result in
death or serious personal injury.
During normal use, the tool will recoil
immediately after driving a fastener.
This is a normal function of the tool. Do
not attempt to prevent the recoil by
holding the tool against the working
surface. Restriction to the recoil can
result in a second fastener being driven
from the tool. Grip the handle firmly and
let the tool do the work. Failure to heed
this warning can result in serious
personal injury.
HTTP://WWW.NUMAXTOOLS.COM 1-888-669-5672
HTTP://WWW.NUMAXTOOLS.COM 1-888-669-5672
10 11
MODEL: SFBC940 MODEL: SFBC940
1.
2.
3.
4.
5.
!
WARNING:
1.
2.
3.
4.
5.
Note:
Pull the trigger, then depress the WCE on
working surface, the tool CANNOT operate.
This is considered to be more restrictive mode
of operation, suitable for less experienced
users.
Please don’t use the tool for wood density over
3
0.7g/cm .
!
WARNING:
!
WARNING:
!
WARNING:
1.
2.
3.