ROOMSIDE Humidity Sensing Fan Ventilador con sensor de humedad Model numbers: Números de modelo: AERN110SD INSTALLATION AND USE & CARE INSTRUCTIONS INSTRUCCIONES PARA INSTALACIÓN Y USO Y CUIDADO English - See page 2 Español - Consulte la página 10 © 2020 Broan 99046026D
Please visit our website - www.broan.com to register this product and to view installation tips and videos. Installer: Leave this manual with the homeowner. READ AND SAVE THESE INSTRUCTIONS WARNING To reduce the risk of fire, electric shock, or injury to persons, observe the following: • Use this unit only in the manner intended by the manufacturer. If you have questions, contact the manufacturer at the address or telephone number listed in the warranty.
CLEANING & MAINTENANCE For quiet and efficient operation, long life, and attractive appearance - lower or remove grille and vacuum interior of unit with the dusting brush attachment. The motor is permanently lubricated and never needs oiling. If the motor bearings are making excessive or unusual noises, replace the blower assembly (includes motor and impeller). SENSOR CLEANING The humidity sensor is mounted in the control housing.
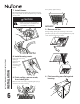
ALL INSTALLATIONS Start here. WARNING • Disconnect the electrical power supply and lock out the service panel. 1. Remove blower and all packing material from fan housing. COOKING AREA Do not install above or inside this area. 45o NOT FOR USE IN A COOKING AREA. 45o Cooking Equipment IMPORTANT - The ducting from this fan to the outside of the building has a strong effect on the air flow, noise and energy use of the fan.
NEW CONSTRUCTION For Retrofit Installation - Skip to Page 6. 5. Connect 4-in. round duct. 3. Attach damper/duct connector to fan housing. Push connector through opening from inside of housing. Engage tabs and secure with screw from parts bag. 6. Connect wiring. Bend tab to expose desired access hole. Connect power cable to housing with appropriate UL approved connector. Connect wires per diagram on page 8. Reinstall wiring panel and secure with screw from parts bag. TABS 4.
7. Install blower. Push grille up against ceiling. Re-install blower. Secure blower with 2 screws from parts bag and plug blower into black receptacle. Plug in humiditysensing control. CAUTION • Make sure that the wiring inside of the housing does not interfere with re-installation of the blower. RETROFIT 3. Remove old fan. Enlarge ceiling opening (if necessary) to 9¾-inches (parallel to joist) by 10½-inches (perpendicular to joist). Leave ductwork and wiring in place.
5. Connect wiring. Bend tab to expose desired access hole. Connect power cable to housing with appropriate UL approved connector. Connect wires per diagram on page 8. Reinstall wiring panel and secure with screw from parts bag. 7. Connect 4-in. round duct. Pull existing ducting through housing discharge opening. Attach and tape ducting to duct connector. Push connector/ducting back through opening. Engage tabs and secure with screw from parts bag.
WIRING DIAGRAMS WIRING OPTION #1 WIRING OPTION #2 • When switch is ON, fan will operate automatically, based on room humidity conditions. • When first switch (1) is ON, fan will operate automatically based on room humidity conditions. • Turn fan ON immediately for the set timer period (to control odors), by cycling switch. • Turn fan ON immediately (to control odors) by using second switch (2).
Visite nuestro sitio web: www.broan.com para registrar este producto y ver consejos y videos para la instalación. Aviso al instalador: Deje este manual con el dueño de la casa. LEA Y CONSERVE ESTAS INSTRUCCIONES ADVERTENCIA Para reducir el riesgo de incendios, descargas eléctricas o lesiones personales, observe las siguientes precauciones: • Use la unidad solo de la manera indicada por el fabricante.
LIMPIEZA Y MANTENIMIENTO Para lograr un funcionamiento silencioso y eficiente, una larga vida y la apariencia atractiva del producto, baje o retire la rejilla y aspire el interior de la unidad con el accesorio del cepillo para sacudir polvo. El motor está permanentemente lubricado y nunca necesitará ponerle aceite. Si los cojinetes del motor están haciendo ruido excesivo o inusual, reemplace el conjunto del ventilador (incluye el motor y el impulsor).
1. Retire el soplador y todo el material de empaque de la cubierta del ventilador. TODAS LAS INSTALACIONES Comience aquí. ADVERTENCIA • Desconectar la fuente de alimentación eléctrica y bloquee el panel de servicio. ÁREA DE COCINA No instalar el producto sobre esta área ni dentro de ella. 45o NO USAR EL PRODUCTO EN UN ÁREA DE COCINA.
CONSTRUCCIÓN NUEVA Para instalaciones de conversión: pase a la página 14. 3. Acople el conector del regulador de tiro/conducto a la cubierta del ventilador. 5. Conecte el conducto redondo de 4 pulg. (10 cm). Empuje el conector a través de la abertura desde el interior de la cubierta. Enganche las lengüetas y fíjelas con los tornillos de la bolsa de piezas. 6. Conecte el cableado. Doble la lengüeta para exponer el orificio de acceso deseado.
7. Instale el soplador. Vuelva a instalar el soplador. Fíjelo con 2 tornillos de la bolsa de piezas y conecte el soplador en el receptáculo negro. Enchufe el control de humedad con sensor. Empuje la rejilla contra el cielo raso. PRECAUCIÓN • Asegúrese de que el cableado dentro de la cubierta no interfiera con la reinstalación del soplador. CONVERSIÓN 3. Quite el ventilador viejo. De ser necesario, agrande la abertura del cielo raso a 9 ¾ pulg. [24.7 cm] (paralela a la vigueta) por 10 ½ pulg. [26.
5. Conecte el cableado. Doble la lengüeta para exponer el orificio de acceso deseado. Conecte el cable eléctrico a la cubierta con una conexión apropiada aprobada por UL. Conecte los cables según el diagrama en la página 16. Vuelva a instalar el panel de cableado y fíjelo con el tornillo de la bolsa de piezas. 7. Conecte el conducto redondo de 4 pulg. (10 cm). Jale el conducto existente a través de la abertura de descarga de la cubierta. Fije y pegue con cinta el conducto al conductor del conducto.
DIAGRAMAS DE CABLEADO OPCIÓN DE CONEXIÓN # 1 OPCIÓN DE CONEXIÓN # 2 • Cuando interruptor está en ON, el ventilador funcionará automáticamente, en base a las condiciones de humedad ambiente. • Cuando primer interruptor (1) está en ON, ventilador funcionará automáticamente en función de las condiciones de humedad ambiente. • Encienda el ventilador inmediatamente periodo de tiempo establecido (para controlar los olores), completando un ciclo interruptor.