
Instructions / Assembly


INSTALLATION AND USE & CARE INSTRUCTIONS
INSTALLATION
5
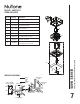
9. Finish ceiling, then install grille.
Pre-assemble mounting rod to grille pan using lock washer
and jam nut. Hand-tighten jam nut - plus 1/4 turn with a
wrench (10-15 in.-lbs.). Do not overtighten jam nut.
Plug light into receptacle in housing. Attach grille pan to
housing with (2) grille mounting screws. Install (2) 60W
(Max.) candelabra bulbs (not included). Install shade using
hardware as shown. Do not overtighten finial nut.
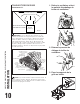
8. Install blower.
Re-install blower. Secure blower with 2 screws from parts
bag and plug blower into black receptacle.
4. Remove old fan.
Enlarge ceiling opening (if necessary) to 9¾” parallel to
joist) by 10½” (perpendicular to joist). Leave ductwork
and wiring in place.
1
2
5. Fold mounting ears flat against
housing.
RETROFIT
GRILLE
PAN
(2) GRILLE
MOUNTING
SCREWS
MOUNTING
ROD
FLAT WASHER
FELT WASHER
(THICK)
JAM NUT
SHADE
FELT WASHER
(THIN)
FINIAL NUT
LOCK WASHER
GRILLE
BRACKETS
LIGHT PLUG
(2) 60W (MAX.)
CANDELABRA BULBS
(not included)