
Instructions / Assembly


1
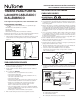
LA600WH WIRED /
WIRELESS DOOR CHIME
To register this product, visit: www.nutone.com
THIS PACKAGE INCLUDES:
n Wired / Wireless Door Chime with MP3 upload capability
n Decorative White Chime Cover
n USB Cable
n Mounting Hardware
n Pushbutton Diode (required for wired installation)
Door chime comes with eight pre-loaded sounds. Prior to installation,
upload desired MP3 sound files.
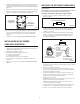
1. Remove chime cover (B) from chime base (A). You may need to
insert a finger into the large hole on the back of the chime base.
(Figure 1)
UPLOAD MP3 TUNES
1. Insert a USB Mini cable end into the doorbell mechanism USB jack
(C). (Figure 1)
2. Insert the remaining larger USB cable end into a USB port on your
computer.
3. On your WINDOWS computer,
• Select“Start”inthebottomcornerofyourDesktop.
• Select“MyComputer”
• Selectthenewdevicedetected.(Thedrive“D:”,“E:”,etc.willvary
from computer to computer).
• Selectthedevice.
• Youwillnowseeawindowthatcontainsseveralmp3files.These
are the tunes that are pre-installed on your doorbell mechanism.
• Searchyourcomputerforothermp3songsthatyouwishtoplay
onyourdoorbellmechanismwhenactivated.Note:Filesmustbe
in mp3 format.
• Onceyouhavelocatedthosefiles,simply“COPY”thefileand
“PASTE” itintothefolderthatcontainsthepre-installeddoorbell
files.
• Confirmthatthetransferedfilesarecomplete.
4. Remove USB cable and proceed to one of the following sections.
INSTALLATION & OPERATING INSTRUCTIONS
READ AND SAVE THESE INSTRUCTIONS
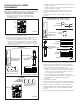
WIRES
TO
CHIME
SUPPLY
WIRE
FIGURE2
FIGURE3
WIRING DIAGRAM
SCREWLESS
WIRING CONNECTOR
ON CHIME BASE
REAR DOOR PUSHBUTTON
120 VAC
WIRING
TRANSFORMER
FRONT DOOR
PUSHBUTTON WITH
DIODE INSTALLED
A
B
C
FIGURE1
NEW WIRED CHIME INSTALLATION
WARNING
•
TO REDUCE THE RISK OF FIRE, ELECTRIC SHOCK, OR INJURY TO
PERSONS, OBSERVE THE FOLLOWING:
•
Use this unit only in the manner intended by the manufacturer. If you have
questions, contact the manufacturer at the address or telephone number
listed in the warranty.
•
Before servicing or cleaning unit, switch power off at service panel and
lock the service disconnecting means to prevent power from being
switched on accidentally. When the service disconnecting means cannot
be locked, securely fasten a prominent warning device, such as a tag,
to the service panel.
•
Installation work and electrical wiring must be done by a qualified
person(s) in accordance with all applicable codes and standards, including
fire-rated construction codes and standards.
•
When cutting or drilling into wall or ceiling, do not damage electrical wiring
and other hidden utilities.
•
UseNuTone
®
16 volt transformer with a minimum rating of 10 VA (purchase
separately).
•
When stapling wires to studs or joists, do not allow staples to cut through
wire insulation.
1. Mount the transformer to a junction box (attic location is not
recommended) or circuit breaker box.
2. Connecthousepowerleadstotransformerleads:blacktoblack,
white to white, ground to green. (Figure 2)
3. Route 2-conductor 18-22 gauge wire from the transformer screw termi-
nals and from the pushbutton terminals to the chime location. (Figure 3)
4. Labelallwiresatchimelocationinthefollowingmanner:
“F”–FrontPushbuttonWire
“T”–TransformerWire
“R”–RearPushbuttonWire(ifinstalled)