
Installation Guide


7
Test System Prior to Cable Burial
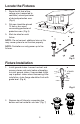
1. Before the cable is buried, power system on and ensure green LED
indicator light on top of each fixture is illuminated.
NOTE: Controller always needs to be turn ON manually by pressing
the ON/OFF button. Not compatible with external timer.
2. If lights do not illuminate try the following troubleshooting tips:
• Make sure controller is plugged into a working 120 volt wall outlet.
• If wall outlet is operated by a switch, make sure it is turned on.
• Make sure branch circuit breaker is not tripped.
• Make sure wire connector is piercing both wires correctly.
• Make sure fixture wire leads are tight in connector.
• Make sure wire did not get cut during burying process.
• Make sure top of fixture is seated properly on the base.
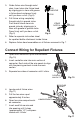
Bury Cable and Connectors
1. Once system is operating properly, bury and
backfill all wire and connectors for the system
(shovel, or sod cutter recommended). (Fig. 12)
National Electrical Code states burial depth of the
wiring should not be more than 6” below grade.
Check local codes to ensure compliance.
Fig. 12
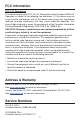
Accessories
HVRBRKTCX - Expander Kit
Additional single fixture can be added on to system for increased square
footage
Note: Each controller can only power a maximum of five fixtures.
Refer to section above “Fixture Installation” section on how to use the
expander kit.
HVRC4CA - Repellent Refills
Four pack of replacement repellent cartridges