
Installation Guide


4
2. PREPARE INSTALLATION
!
WARNING
When performing installation, servicing or cleaning the unit, it is recommended to wear safety glasses and gloves.
Tools needed to install the range hood:
- Phillips screwdriver no. 2
- Pair of long nose pliers
- Flat blade screwdriver (to open the electrical knockout hole)
- Scissors (to cut metal foil duct tape)
- Wire stripper
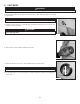
Make sure the following items are included:
- Hood
- Adapter/dampers: Horizontal 3¼” x 10”, vertical 3¼” x 10” and vertical 6” round
- Halogen bulbs (2) (JC type, 12 V, 20 W, G4 base)
- Parts bag including: 1 wire clamp, 4 no. ST4.8 x 15 mm mounting screws, 3 wire connectors
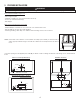
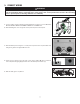
NOTE: If the bottom of the cabinet is recessed, attach wood strips (not included), as shown beside, in
order to properly install the range hood under the cabinet. The wood strips must be as thick as
recess.
HO0153
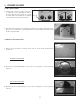
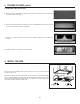
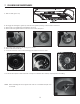
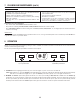
Cut-out the openings for duct (A) and power cable (B), in cabinet or wall, according to the direction of discharge chosen. See illustrations
below.
1¼”
12
5
⁄8”
6” DIA.
C
L
5”
HD0410A
B
A
CABINET BOTTOM VIEW
10½”
1¼”
12
5
⁄8”
C
L
1¾”
3½”
HD0411A
B
A
CABINET BOTTOM VIEW
1¾”
1”
3¼”
C
L
HD0337A
12”
CABINET BOTTOM VIEW
B
A
12
5
⁄8”
VERTICAL DISCHARGE (6”ROUND DUCT)
HORIZONTAL DISCHARGE
VERTICAL DISCHARGE (3¼” X 10” DUCT)