
Warranty

12
INSTALLATION IN EXISTING CONSTRUCTION
LOCATING ACCESS KEYS IN
EXISTING CONSTRUCTION
Unless your home is a ranch-style house where a single trunk
line can run directly through the attic or basement, you should
first investigate your house to find the key to running your
tubing from level to level. Look for an accessible area free from
obstructions that will accommodate the 2" tubing.
If you understand how your existing home is constructed, it can
be relatively easy to find access routes to run the tubing. Refer
again to the illustrations on page 4 as you consider your home
construction.
Some of the keys you might find in your home are illustrated
here.
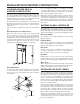
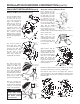
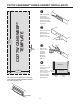
STACKED CLOSETS OR LAUNDRY CHUTE
Many homes will have an upstairs closet located directly
above a downstairs closet. It is easy to run the tubing from
one floor level to another inside these stacked closets. In these
installations the tubing is often left exposed inside the closets.
See figure below. A laundry chute could also provide access
from basement to upper floors. You may also want to consider
running exposed tubing through cabinets or cupboards.
COLD-AIR RETURN
A cold-air return often provides a straight run from basement
to other levels of the house. See figure below. The ductwork is
easily cut for access. Seal around the tube when completing
the installation.
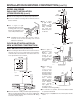
Use the following procedures for installation in existing
construction. Wall inlets in existing construction may be
accessed from below (basement or crawl space) or from above
(attic). Instructions apply to either method.
Starting from farthest wall inlet location, install each inlet as
described below. Working back toward power unit, connect
each inlet line and branch line into main trunk line. See page
24. Complete low voltage wiring as main trunk line is continued
back to power unit. Mount power unit and complete wiring. See
pages 27-29.
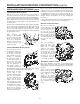
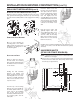
AVOIDING IN-WALL OBSTACLES
The tubing which connects the inlet into the trunk line is
threaded through interior partition walls. After you’ve chosen an
inlet location, make sure the wall doesn’t contain some hidden
obstacle which will prevent you from running tubing to the inlet.
ELECTRICAL WIRING
The insulation in these walls will prevent you from running
tubing through them.
EXTERIOR WALLS
Wiring may not obstruct your tubing, but you should always
make sure that tubing does not damage the wiring. Electrical
outlets and wall switches are signs of wiring.
DUCTWORK
Avoid choosing a section of wall that contains ducting. If you
see signs of ductwork—such as floor or ceiling registers—
move your inlet location to another section of the wall.
PLUMBING
Plumbing may or may not prevent you from running tubing
through a wall. If you must choose a plumbing wall for an inlet
location, be extremely careful when making a cutout in the wall.
WALL STUDS
Make sure your location is between wall studs. Locate studs by
tapping walls, looking for electrical outlet (usually fastened to
studs), or noticing finishing nails in the floor molding.
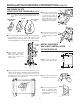
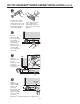
INSTALLING THE INLET TUBING
When your planning is complete, you will have to determine
where all the inlets and the power unit will be located. You have
also mapped out the location of your trunk line and found the
access you need to run vertical tubing from one level of your
house to another level. You should have acquainted yourself
with the methods of joining plastic tubing and acquired the
tools you’ll need to install your NuTone Central Vacuum System.
Now, you can begin installation.
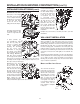
The first step to install the inlet tubing which connects the wall
inlets to the branch lines. As explained before, the inlet lines
run inside interior walls. You will find access to these walls
through your attic or basement. Briefly, you want to find the
exact location in the wall, drill an access hole through the wall
plate or header, and insert the tubing into the wall cavity.
This part of your installation requires close observation and
careful measurements. Take your time and make sure you
accurately line up your access holes with the locations you’ve
chosen for your wall inlets.
A
D0019
AD0061