User guide.
Important safeguards. Warning! To avoid the risk of serious injury, carefully read all instructions before operating your NutriBullet Juicer Pro™. When using any electrical appliance, basic safety precautions should always be observed, including the following important information.
• Do not let the power cord hang over the edge of a table or counter top. • Do not let the power cord touch hot surfaces, such as a stove or let it become tangled or knotted. • Always make sure the pulp basin cover is securely in place (with locking handle in its upright and locked position) before the motor is turned on. Do not unlock the locking handle while the juicer is in operation. Always ensure the juicer is turned OFF after each use.
Ensure that the surface where the appliance operates is stable, level, clean and dry. • Remove rind from all citrus fruits before juicing. • Do not juice stone fruit unless pits or seed stone has been removed. WARNING! Always make sure the Juicer is properly and completely assembled before connecting to power outlet and operating. • Vibration can occur during normal operation.
Contents. 03 Important safeguards 08 What’s included 09 Assembly guide 10 Assembly & use 12 17 18 Usage instructions Control panel Juicing tips 22 Disassembly 24 Care and maintenance 25 Juice and unit storage 26 Troubleshooting guide 26 Replacement parts 27 NutriBullet Juicer Pro™ one-year limited warranty 30 Warranty registration Thank you for purchasing the NutriBullet Juicer Pro™.
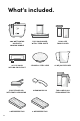
What’s included.
Assembly guide.
Assembly & use. 10 1 Place the Motor Base on a dry, level counter top. Ensure the dial is set to the “OFF” position and the unit is unplugged. 3 Align the Sieve with the motor drive coupling and push down until it clicks into place. Handle the Sieve by gripping the top edges being careful not touch the sharp teeth on the base of the Sieve. Ensure the Sieve is properly seated in place and securely inside of the Pulp Basin. 2 Place the Pulp Basin on top of the Motor Base.
5 Raise the Locking Handle and move it into the “ears” on each side of the Basin Cover. The Locking Handle should be in a vertical position and locked into place. 6 Swing the No-Drip Spout cover up vertically so that it is no longer covering the juice spout. 8 Slightly angle the Juice Pitcher and place it under the juice spout. Align the spout with the hole in the Juice Pitcher Lid and level out the Juice Pitcher. It will fit snuggly into the spout to hold it in place.
Usage instructions. 1 Gather all of your desired ingredients. Wash and prepare them for juicing. 2 After the juicer is fully assembled, plug the power cord into an outlet. NOTE: If no speed is selected after 10 minutes, the unit will power off.
3 Select a speed to begin juicing. The speed selected will illuminate on the control panel. You may start at any speed and can toggle between speeds as desired depending on the type of produce (refer to the chart on page 18 for recommended speeds for each type of produce). 4 To operate the Dual-Size Food Pusher, grip the outer edge of the top of the pusher with one hand and the bottom of the pusher with the other hand. Twist the top of the pusher clockwise to unlock the inner pusher.
5 If you are using smaller ingredients (smaller fruits, leafy greens, stalk vegetables like celery or carrots), place the outer part of the pusher into the chute, making the chute more narrow. While the motor is running, begin gently guiding ingredients into the internal chute using the inner pusher. TIP: When using the narrow chute for juicing leafy greens, take a small handful of greens and squeeze them into a tighter bunch. Place the bunch into the chute and slowly push down into the Sieve.
NOTE: You may alternate between the two chute sizes (narrow and wide) as you are juicing. WARNING: Do not use excess force when pushing food down with the Food Pusher, as it will not allow for maximum juice yield. 7 Juice will begin to flow out of the spout and into the Juice Pitcher, while the pulp will be separated and stored in the Pulp Basin. WARNING: Never use hands/fingers or other tools to push ingredients down the feed chute into the Sieve.
8 When the Pulp Basin is completely full, it must be emptied before continuing juicing. See disassembly instructions. 9 To stop juicing, press the speed at which you are currently juicing. To completely power off the juicer, press the center power button and wait for the Sieve to stop spinning. Unplug the unit after each use. 10 Remove the Juice Pitcher from under the spout. You may close the Juice Pitcher Lid and store juice in the Juice Pitcher if desired.
Control panel. MULTI-SPEED CONTROL PANEL & JUICING SETTINGS. OFF: Power is OFF. If the unit is ON, the center power button will be illuminated. Pressing the center button will turn the unit OFF. LOW: Best for juicing softer fruits and vegetables. HIGH: Best for harder produce like pineapples. TURBO: Best for juicing the toughest vegetables like beets or carrots.
Juicing tips.
VITAMINS / NUTRIENTS source of quercetin excellent source of folate good source of vitamin C high in vitamin C, high in folate, good source of potassium high in vitamin C, good source of folate high in vitamin C excellent source of vitamin A, good source of vitamin C high in vitamin C, good source of folate good source of vitamin C, good source of vitamin A good source of vitamin C good source of vitamin C and potassium contains vitamin C, magnesium, and potassium good source of vitamin K high in vitamin A,
PROPER PRODUCE PREP FEED CHUTE Prepare fruit and veggies before inserting them into the juicer: Selecting which Food Pusher to use (narrow or wide) affects feed chute thickness. If you pull out the thinner inner food pusher from within the full pusher, you’ll place the outer part into the chute, making the chute narrow. If you use the full (wide) pusher, the feed chute will be wider. • Properly clean produce (rinse with produce wash, or lukewarm water and apple cider vinegar).
CONSUMING JUICE AND PULP Instead of composting or throwing away the pulp left over after juicing, you can choose to consume it. See our Recipe Guide for some fun tips on what to do with the leftover pulp. By using these creative ideas, you can enjoy pulp in a variety of delicious (and healthy) ways. • Whether you prefer sweet or savory, you can use pulp to create some tasty treats! OVERHEATING, SPEED SELECTION, & AUTO SHUT-OFF • If the motor overheats, the juicer will turn off.
Disassembly. 22 1 Ensure the unit is powered “OFF” and unplugged. 2 Remove the pitcher from under the spout. To prevent drips use the No-Drip Spout cover to close the juice spout. 3 Unlock the Locking Handle from the Basin Cover by pulling the handle backward out of the “ears” on either side of the Basin Cover. Move the handle down. 4 Remove the Pulp Basin from the Motor Base by pulling upwards with the Basin Cover and Sieve still in place, and take it directly to your sink.
5 Remove the Food Pusher by lifting it out of the feed chute. 6 Lift the Basin Cover vertically off of the Pulp Basin and remove any pulp from the inside of the cover. You may use the flat end of the Cleaning Brush to scrape pulp off of the cover. 7 Gently lift the Sieve vertically out of the center of the Pulp Basin. Clean the Sieve right away (see care instructions). 8 Empty the Pulp Basin.
Care & maintenance. Cleaning the NutriBullet Juicer Pro™ is quick and easy. All components except for the Food Pusher and Motor Base are dishwasher safe. Read on for some cleaning tips and best practices. 1 2 3 Always ensure the Motor Base is unplugged before you begin assembly, disassembly, cleaning or storage of the unit. 4 Once the Pulp Basin is emptied, rinse all parts under running water. Use the Cleaning Brush to scrub the Sieve under running water.
Juice & unit storage. Included with your Juicer Pro are some great storage accessories: a Juice Pitcher, two Juice Storage Bottles, and two Freezer Trays. The storage accessories give you three options for storing juice: 1 IN THE PITCHER: The Juice Pitcher stores up to 27 ounces. Make sure to store the pitcher upright in your refrigerator, with lid tightly sealed, latch closed, and nothing atop the lid.
Troubleshooting guide. 1 PROBLEM: The power button flashes three times and then remains illuminated when I select a speed. SOLUTION: This means that the unit is not properly assembled. Ensure the Pulp Basin is properly seated on top of the Motor Base, and the Locking Handle is locked into place. 2 PROBLEM: The juicer stopped in the middle of juicing, and the power button flashed. SOLUTION: Ensure the Locking Handle is securely locked into place.
NutriBullet Juicer Pro™ one-year limited warranty. LIMITED WARRANTY FOR NUTRIBULLET ® NutriBullet's limited warranty obligations are confined to the terms set forth below: NutriBullet, LLC and Capital Brands Distribution, LLC (together, “NutriBullet”) warrants this NutriBullet® against defects in materials and workmanship for a period of one year from the date of original retail purchase.
containing a description of the product(s), purchase date, and the appropriate NutriBullet® serial number(s). Before you send your product for limited warranty service please make sure to keep a copy of all relevant documents for your files (receipt, etc.). It is always recommended to purchase product insurance and tracking services when sending your product for service. Remember, shipping and processing fees will be incurred by you and are not covered by the one-year limited warranty.
THIS LIMITED WARRANTY AND THE REMEDIES SET FORTH ABOVE ARE EXCLUSIVE AND IN LIEU OF ALL OTHER WARRANTIES, REMEDIES AND CONDITIONS, WHETHER ORAL OR WRITTEN, EXPRESS OR IMPLIED. NUTRIBULLET SPECIFICALLY DISCLAIMS ANY AND ALL IMPLIED WARRANTIES, INCLUDING, WITHOUT LIMITATION, WARRANTIES OF MERCHANTABILITY AND FITNESS FOR A PARTICULAR PURPOSE.
Warranty registration. Please visit nutribullet.com/ warranty-registration or call 1 (800) 523-5993 to register your new NutriBullet Juicer Pro™. You will be asked to enter the Serial Number* of your product, along with the purchase date and place of purchase. The registration will enable us to contact you in the unlikely event of product safety notification.
1 (800) 523-5993 | nutribullet.com NUTRIBULLET® is the registered trademark of C APBRAN HOLDINGS, LLC Copyright © 2020 CAPBRAN HOLDINGS, LLC. Distributed by CAPITAL BRANDS DISTRIBUTION, LLC. LOS ANGELES, CA 90025 USA All Rights Reserved. MADE IN CHINA Illustrations may differ from the actual product. We are constantly striving to improve our products, therefore the specifications contained herein are subject to change without notice.