Home Beer Brewing Machine with Inner Malt Pipe and Filter Screen
READ CAREFULLY AND SAVE FOR FUTURE REFERENCE PLEASE READ AND THOROUGHLY UNDERSTAND THIS MANUAL PRIOR TO USE FOR IMPORTANT SAFETY INFORMATION! Effective Volume: 7.9 Gallons Total Volume: about 9.2 Gallons Brew your own beer. An all-in-one electric brewing system with an easy to use brew controller: Mashing – Lautering – Boling in one kettle. Can hold up to 8 Kgs of malt. SAFETY INSTRUCTIONS · Read this user manual before using the PKBRKTL200 Home Beer Brewing Machine.
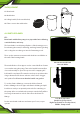
THE EQUIPMENT #1: Brew kettle #2: Malt basket #3: Lifting handle (for the malt basket) #4: Filter screen in the malt basket ALL PARTS EXPLAINED: #1: Brew kettle with built in pump, riser pipe with CamLock fitting, a mini ball valve, and a tap: The brew kettle is used during all phases of the brewing process, from heating the water (for mashing), mashing, lautering, boiling and cooling the wort that goes into the fermenting vessel.
Male and female CamLock fittings CamLock levers. CamLock fittings. CamLock closing procedure. Reverse to release. Plastic Bottom The plastic bottom are attached underneath the brew kettle, covering the electronic components and the pump. This bottom can be removed by unscrewing the screws. This will give you access to the pump for maintenance and cleaning. The feet assure a enough space to diffuse the heat from the inside of base and protect the electronic device.
Malt basket, handle and filter screen bottom When you choose to use malt basket, at first you will use PROG III, all phase will be completed in this program without suspend. Malt basket placed on the top bracket GETTING STARTED Before your first brew: Close the tap and riser pipe valve. Add about 1.3- 2.6 gallons of water to the brew kettle. • Check for any water leakage underneath the brew kettle or around any of the fittings. If any water is found, check and tighten fittings.
Switch the brew program selector to “II” and press “RUN” button on the brew controller. The display light will now illuminate. This will initiate heating of the water to 100°C or 212°F. Wait until the water is boiling. Then open the riser pipe valve before switching on the pump. Let the pump run for about 10 minutes in order to clean the equipment pipes and pump. • While the pump is running you should check for leakages around fittings and tighten the fittings if required.
The brew controller parameter can be changed, allowing you to set different values of your choice, and according to the recipe. How to change the parameters is described later in this user manual. If you want a protein rest at around 45°C/113°F, it is possible for you to set. Starch conversion in the mash occurs between 55°C/131°F and 71°C/159.8°F. For most home brewers, single step mashing should be performed in the temperature range between about 63°C/145.
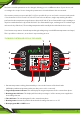
7. Program selector: Select the program I, II and III when the equipment is paused. Keeping press this key for 5 seconds, the program set and run will be recovered to default value. PROG I include the first three phase: HEAT, MASH and LAUTER. PROG II include the last phase: BOIL. PROG III include all phase: HEAT, MASH, LAUTER and BOIL. 8. Temperature °C/°F converter: To convert between centigrade and fahrenheit degree when the machine is on.
OPERATION GUIDE 1. Power ON After the machine is plugged in, the display screen and the blue backlight will be ON for 2 seconds, and the machine will be in standby mode. 2. Press "ON/OFF" to start up "ON/OFF" can be switched ON at any time after the power is connected. The blue backlight lights up, LCD screen display program I and the setting of step S, also the current actual temperature. The target temperature and time on the display are the values (memory) of last operation.
When you select program I, the machine will run all steps as the order of S - L, also can choose any step from S - L by press STEP key then the machine will start to run from this step. 1. Operation S step: The PHASE on the display screen displays "HEAT", the default power is 100%, the temperature can be self-set 30°C-100°C, the default strike temperature is 71°C. The strike temperature is the temperature at which the water is heated before the malt is put in. No timing settings.
C. The operation of the selection program III (PROG display III only) When you select program I, the machine will run all steps as the order of S - B3, also can choose any step from S - L by pressing STEP key then the machine will start to run from this step. 1. Operation S step: the PHASE on the display screen displays "HEAT", the default power is 100%, the temperature can be self-set 30°C-100°C, the default strike temperature is 71°C.
5. Step Selection When the machine in standby or pause state, every time when pressing "STEP" button, the selected STEP symbol will be blink in order on the screen, thus the power (wattage), temperature and timing corresponding to the selected STEP can be set. You can also press the "RUN/PAUSE" key to RUN the program backwards from the selected step.
11. Automatic memory saving function When the program is finished and the machine is shut down after running every time, the running program and settings will be saved automatically. When the machine is started up again next time, the running program and settings of last time will be retrieved from the memory automatically and run again. CLEANING AND MAINTENANCE Cleaning your Beer Brew Automatic after use: After use you should empty the brew kettle of any remaining trub.
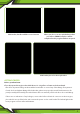
Remove the screws holding the bottom cover plate, using a Phillips screwdriver. Disconnect the power cord quick connector (#1). Loosen the two hose clamps (#2 and #3) and remove the hoses from the pump. Unscrew the screw attaching the 2 ground cables (#4), and finally, loosen the screw attaching the pump. You can now remove the pump. Magnet Capsule Front Casing Shaft Impeller Drive Magnet Rear Casing O-Ring To access the impeller you need to unscrew the screws holding the pump front casing.
FEATURES: • Circulation System with Inner Pump • Mashup to 17lbs.
Questions? Issues? We are here to help! Phone: (1) 718-535-1800 Email: support@pyleusa.