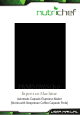
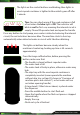
PKNESPRESO60 Espresso Machine Automatic Capsule Espresso Maker (Works with Nespresso Coffee Capsule Pods)
PLEASE READ THIS INSTRUCTION MANUAL AND SAFETY INSTRUCTIONS BEFORE OPERATING THE APPLIANCE! Content Safety precautions Notes on this operating manual Unpacking Starting up • Before using for the first time • Capsule type can be used • Overview of machine parts and controls • Filling/refilling the water tank • Flushing out the machine/internal piping Brewing coffee • Refill hydraulic circuit when water tank is out of water during brewing • Programming coffee volume.
1.5 mm2 conductor cross section), and lay the cable to avoid tripping. • Danger of scalding! Never move the machine during operation! • Never operate the machine without water • Always make sure there is water in water tank not less than minimum level. • Danger of burning! Never touch very hot parts of the machine (e.g. brew unit during operations). • Danger of scalding! Do not touch the steam or water jets.
adequately supervised by a responsible person to ensure that they can use the appliance safely, Young children should be supervised to ensure that they don’t play with the appliance . • If the supply cord is damaged, it must be replaced by the manufacturer, its service agent or similarly qualified persons in order to avoid hazard. 50 cm to hot surfaces or open flames. * Never cover the machine during operation. • Keep children away from the machine during operation. • Only use the machine in dry rooms.
Note: • Check that your home power supply voltage is the same as marked on the machine rating plate • Destroy all the plastic bags to prevent danger to children! Tip: Keep the packaging for transporting the machine (e.g. for removals, servicing, etc.) Note: You may find little water remaining in the machine. In order to ensure that this machine works perfectly, it was tested with water before leaving the factory.
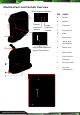
Machine Parts and Controls Overview Short espresso button A B Normal espresso button C D Lungo Espresso button E Adjustable dispenser spout (2 positions) D J K L 6 www.NutrichefKitchen.com No.
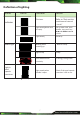
Definition of Lighting name status func�on ac�on First use. Refer to “flash out the machine and internal circuit” Light steady/Water tank is empty. Fill up water tank, open handle, then press any b � tto fill th bu�on the iinternal t l circuit. Light steady Stand-by indicator Bu�on light Light in used capsule container Blinking when warming up. Wait for ready. light steady ready Each bu�on blinks circularly. In energy saving mode. light steady when handle is open.
Fill / Refill Water Tank There are two ways to fill the water tank: Directly into the machine, by using for example a jug, or by removing the water tank. Filling without removing the tank • Raise the water tank lid • Fill the tank up to the “MAX” mark with cold fresh water (the maximum capacity is 0.8 litre), or at least the “Min” mark . • low down the lid Filling by removing the water tank • Hold the water grip at tilting angle as shown in direction 1 to remove the water tank from the machine.
The lights on the control buttons are blinking, blue lights in used-capsule container is lighted in blue which goes off after 1 minute Tips: You can check easier if the used container is full or not when the blue light is ON. The indicator will blink in red for first use, meaning the internal circuit is empty. Please fill up water tank and open the handle. Press any button to start pump, once water is detected entering the internal circuit, the red indicators becomes blue.
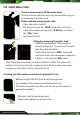
Brewing Coffee *Make sure the water tank is in place before brewing. Because there is hot cleaning water come out during heating up. CAUTION HOT WATER RISK OF SCALDING 1. Place an empty cup under the dispenser. For small cups, low down the dispensing spout. 2. Move the handle back completely 3. Insert capsule to fall straight into the compartment correctly. 4. Close the handle firmly to load the capsule . 5. Press the desired coffee button only once 6.
Programming the coffee volume. Be sure there is enough water in the tank before programming coffee volume. Make sure the water tank is in place before brewing. Because there is hot cleaning water come out during heating up. CAUTION HOT WATER RISK OF SCALDING 1. Place an empty cup under the dispenser. For small cups, low down the dispensing spout. 2. Raise the handle back completely 3. Insert capsule into the compartment gently. 4. Close the handle firmly to load the capsule. 5.
Energy saving mode. The machine enters energy saving model automatically once the machine is idle for 15 minutes. The 3 buttons will flash cyclically in energy saving mode. To access quiet energy saving mode, please press any button, appliance will start warming up with lights blinking, when the buttons are lit steadily, the machine is ready to brew coffee. Cleaning Emptying the capsule container and drip tray. The capsule container holds around 10 used capsules.
Decalcification Decalcification / Maintenance Drinking water varies according to region. The lime particles in hard drinking water are deposited as residues in the machine and can block the piping and cause damage. To prevent this, be sure to decalcify the machine at the very least after making 300 to 400 cups of coffee or in any case if the output falls significantly or after one or two months. Decalcification must be done correctly to prevent damage. So it is essential to follow these instructions.
4. Fill the water tank with water to maximum level mixed with decalcifying solution, make sure the solution is dissolved completely. 5. Press the small button to run decalcifying water as you brew coffee normally, repeat for several times to run out the entire tank water. 6. Repeat the process to run another tanks of water mixed with decalcifying solution. 7.
Steaming out / Storage / Transport Steaming Out • Prior to long periods of disuse or for storage or transport at temperatures below 41°F, it is essential to steam out the machine. This removes water from the system to prevent internal frost damage. • Turn ON the machine • Empty the water tank and place it in its position. • Put an empty cup under the coffee dispensing spout. • Press “lungo” button to start brewing. • Steaming out now commences.
TROUBLESHOOTING No coffee is brewed. The water tank is empty. Fill water in the water tank. The coffee is not hot enough. -The Cold cups / mugs. - Scale build-up in machine. - Cold machine. Preheat cup / mug. - Descale. - For cold machine, brewing a cup of water to warm up the circuit. Capsule can’t drop down -The used capsule container is full. -The capsule is deformed a�er brewing. Empty the used capsule container. - Push it down with finger, or close the handle and open it once again.
PKNESPRESO60 Espresso Machine Automatic Capsule Espresso Maker (Works with Nespresso Coffee Capsule Pods) Features: • Countertop Espresso Maker • Brew Size Selectable: Short, Normal or Lungo Espresso Cups • Compatible with Nespresso Coffee Capsule Pods • Simple Electric Plug-in Design • Quick Heat Ability, Warms in Seconds • Sleek, Modern Kitchen Style • Integrated (10) Capsule Pod Storage Tray • LED Indicator Lights • Stain-Resistant & Easy-to-Clean • Integrated Refillable Water Tank • Energy Efficient Au