INSTRUCTION MANUAL 3PCS Aluminum Fire Pit Table ArmChair Set SCD012-01
INTRODUCTION Thanks for purchasing and trusting NUUGARDEN with your home decorating plans. This product is a furniture designed and made by NUUGARDEN Corp. We are committed to R&D innovation and creating the most refined, diverse choice of outdoor collection. After unpacking and before every use, check whether the item shows any damages. In addition, check that you have all parts and hardware before assembly.
DANGER FIRE OR EXPLOSION HAZARD If you smell gas: Shut off gas to the appliance. Extinguish any open flame. If odor continues, leave the area immediately. After leaving the area, call your gas supplier or fire department. Failure to follow these instructions could result in fire or explosion, which could cause property damage, personal injury, or death. WARNING Do not store or use gasoline or other flammable vapors and liquids in the vicinity of this or any other appliance.
SAFETY INFORMATION Before you assemble or operate this unit, please carefully read this entire manual. Failure to do so WARNING • The installation of this unit must adhere to local codes or Propane Storage and Handling Code, CSA B149.2. • THIS UNIT IS INTENDED FOR OUTDOOR USE ONLY! This product shall be used outdoors, in a ventilated space and shall not be used in any enclosed area. • This unit is to be used with propane gas only! (sold separately) • Do not attach a remote gas supply to this unit.
SAFETY INFORMATION • Combustible material should not be within 60 inches of the top of the unit, or within 48 inches around the entire unit. • Keep the appliance area clear and free fr vapors and liquids. • • Do not add water into the unit. • technician to inspect the appliance and replace any part of the control system and any gas control that has been under water. • Do not disconnect any part while unit is in use. • Do not store a spare propane tank on or near this unit.
SAFETY INFORMATION Only use the regulator and hose assembly provided with this unit. Replacement parts must be supplied directly by us . Inspect the burner before use of this unit. If the burner shows any kind of damage, do not operate the appliance. For assistance with repair or replacement of the burner or any other parts, contact to us. NOTE: You must follow all steps to properly assemble this heating item. Make sure the gas valve is turned “OFF” before assembling.
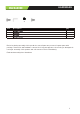
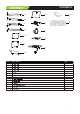
HARDWARE O Item P Q Description R Qty O 17 P Q R 1 20 4 Before beginning assembly of this product be sure all parts are present. Compare parts with package contents list and hardware contents list. If any part appears to be missing or damaged do not begin assembly of this product and call customer service immediately.
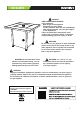
CONTENTS A H M I N B C D J E K F L G Item A Description Qty 1 B 1 C 1 D 1 E 1 F G 1 1 H 1 I 1 J K 1 1 L 1 M 1 N 1 box 7
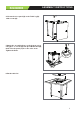
ASSEMBLY INSTRUCTIONS 1. Connect the tank holder/base (I) With table Lets(A/B/C/D) by 4pcs screws (R) and 4pcs M6 washers(Q) 2.Connect paenl (E,F,G)with table legs(A,B,C,D) by 12pcs screws (O) and 12pcs M6 washers(Q). 3. Place the table(L) upside down on a soft surface.
ASSEMBLY INSTRUCTIONS 4..Fasten the door panel (H) to the Table leg (D) with screws (O). 5.Attach the assembled base to the bottom of top using 4pcs of screws (O),and 4pcs M6 washers(Q), make sure the panel (L) faces the valve stem. Tighten the Bolts. 6.Put the table lid.
ASSEMBLY INSTRUCTIONS 6. Place propane gas tank (not included) into the metal stand (I). Make sure the gas tank sits on the metal stand (I) completely. I 7. Turn the cylinder valve on the tank clockwise to close the propane tank. Attach the preassembled regulator from the table top (B) to the cylinder valve by turning the regulator coupling nut clockwise. Make sure it is fastened securely and tighten connections by hand only.
OPERATION Before performing a leak test, be sure that no sparks can occur and you are in a spacious outdoor area. Connect the propane gas tank to the regulator and turn the valve on the unit to the “off” position. Brush a soap and water mixture on all connections. Turn the gas supply on; if bubbles occur on any connection there may be a leak. If you smell gas or a leak is discovered turn the gas valve off, disconnect propane gas tank and do not use the appliance until the leak is repaired.
MAINTENANCE • Before performing any maintenance always disconnect propane gas tank. • Store your product indoors during winter months. Avoiding extreme cold temperatures will prevent from exposure damage. • Keep the heating item free and clear from combustible materials. • Visually inspect burner for obstructions and keep tank enclosure free and clear from debris.
TROUBLESHOOTING Problem Heating unit won’t light Cause Solution Igniter pin and burner are wet Dry off with a soft cloth Igniter battery is incorrectly inserted Check which direction the battery is inserted Contact us.
Part Number A B C 1 B 1 C 1 D 1 F I J Qty.
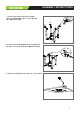
ASSEMBLY INSTRUCTIONS CAVEAT Note: Please do not tighten any bolt until all bolts have been put into right place. If you tighten one bolt, it maybe cause other bolts out of position. E ↓ F C/D ↓ B ↓ G ↓ H ↓ I ↓ J STEP 1 Attach the backrest (A) to the right armrest(C) using 1bolt(F). Attach the chair seat (B) to the right armrest(C) using 2 bolts(E), and washers and nuts(G,H,I). Do not over tighten.
ASSEMBLY INSTRUCTIONS CAVEAT Note: Please do not tighten any bolt until all bolts have been put into right place. If you tighten one bolt, it maybe cause other bolts out of position. E ↓ C/D ↓ B ↓ G ↓ H ↓ I ↓ J F STEP 2 Attach the backrest (A) to the left armrest(D) using 1 bolt(F). Attach the chair seat (B) to the left armrest(D) using 2 bolts(E), and washers and nuts(G,H,I). Do not over tighten. Upon completion of full assembly and bolted up-all screws can be tightened down. Add the protect hats (J).
CARE AND MAINTENANCE Follow the instruction for the material of your special product to make sure that it stays in the best shape for as long as possible. The information below is only intended as a general guideline. For more information, please contact us. • Only need to rinse it thoroughly with clean water to wash away dirt and grime. Never use abrasive cleansers on the furniture, since it can attack the surfaces and leave behind scratch marks.
CUSTOMER SERVICE Thanks for purchasing this NUUGARDEN furniture. We are here to help you maximize your enjoyment and appreciation of it. Please do not hesitate to contact our customer service when you have any questions regarding assembly or accessories. Add: 6366 Corley Road, Norcross, GA 30071. Tel: (800) 257-7108 Web: http://www.nuugarden.com E-mail: service@nuugarden.
NUUGARDEN USA Nuu Garden Corp. Add: 6366 Corley Road, Norcross GA 30071. Tel: (800) 257-7108 Web: http://www.nuugarden.com E-mail: service@nuugarden.