
User Manual


129
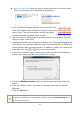
9. Choose the folder where you want to save the file.
10. Insert the file name and click the Save button.
11. Choose the export format.
12. Choose the use profile.
13. Check to export the recorded video with Audio, OSD and POS Transaction.
14. Click the OK button.
We recommend that you export to the .asf format when saving video. In exporting to
the .avi format, the frame rate will be increased when playing in the video player,
causing the video to run faster than normal.
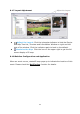
7.1.7 Save an Image
1. Open Internet Explorer and log in to the unit.
2. Click the Playback button on the top of the page.
3. Click the Open Record button.
4. The Record Display Window will show the information of the available
video clips. Select the date you want to search the record from.
5. Highlight the video clip you want to review, and then click the OK button.
6. Choose the camera display that you want to save pictures.
7. Click the Save Image button when the image you want is shown on the
screen.
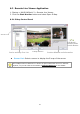
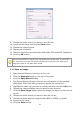
8. Choose the folder where you want to save the file at.
9. Choose the folder and the image format (BMP or JPEG) you prefer.
10. Insert the file name.
11. Click the Save button.