
Quick Start Guide


1
English
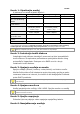
Step 1: Unpack the Unit
This package contains the following items:
1bay Package
2bay Package
8bay Package
The unit
V
V
V
Remote control, 1.5M
IR extender cable
V
V
V
Disk screws
V (for 2.5” and 3.5”
disk)
V (for 3.5” disk)
V (for 3.5” disk)
Pad and stand
[Horizontal] foot
pads; [Vertical]
Stand, foot pads and
screws
[Horizontal] foot
pads; [Vertical]
Stand, foot pads and
screws
Foot pads
Power
12V 4A 48W power
adapter, power cord
12V 5A 60W power
adapter, power cord
Power cord
Warranty card, Quick
Start Guide, CD
V
V
V
Rackmount kit,
screws
-
-
V
Key
-
-
V*
*CD content: Install Wizard, Remote Live Viewer, Playback System, Backup System, Verification
Tool and Offline License Tool application, user manual, and quick start guide
Battery spec is 1.5V, AAA, R03. Two batteries are required for a remote control
Step 2: Install Hard Drives
Refer to compatibility list and install HDDs. For optimal performance
consideration, install disks with the same model and storage capacity.
The available RAID level depends on the amount of disks installed.
Step 3: Connect the Unit and Devices within the Network
Connect the unit, cameras, and router/switch. If you need to make the
video visible over the Internet, please connect to a “router” with
Internet connection, and the unit will retrieve an IP address through
DHCP by default.
The unit processes built-in DHCP service, which takes the job of router to assign IP addresses, which is
suitable for the pure LAN environment.
Step 4: Connect the Monitor
The unit processes two display interfaces, VGA and HDMI. Connect the
monitor to the unit.
The supporting display resolutions are 1920x1080, 1280x1024, 1280x720, and 1024x768. Please confirm
that one of the resolutions is supported by your monitor.
Step 5: Connect the Power
Press the power button once connecting the power.
Step 6: Set up the Unit