ENGLISH IMPORTANT SAFETY INSTRUCTIONS Danger Exposure to extremely high noise levels may cause a permanent hearing loss. Individuals vary considerably to noise induced hearing loss but nearly everyone will lose some hearing if exposed to sufficiently intense noise for a sufficient time. The U.S. Government's Occupational Safety and Health Administration (OSHA) has specified the following permissible noise level exposures: 1. 2. 3. 4. 5. DURATION PER DAY (HOURS) 8 6 4 3 2 1 SOUND LEVEL (dB) 6. 7.
FRENCH IMPORTANTES INSTRUCTIONS DE SECURITE 1. Lire avec attention toutes les recommandations et précautions d'emploi avant d'utiliser ce produit. 2. Toutes les recommandations et précautions d'emploi doivent être conservées afin de pouvoir s'y reporter si nécessaire. 3. Lire et comprendre tous les avertissements énumérés dans les précautions d'emploi. 4. Suivre toutes les précautions d'emploi pour utiliser ce produit. 5.
Introduction Congratulations on your purchase of the NuVo Essentia System. Essentia brings the best of today's digital technology to a true wholehome audio system. Listening to multiple audio sources from independent zones throughout the home has never been easier or more affordable. The elegant keypads allow independent selection of up to six different audio sources from up to twelve zones in the home.
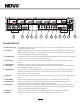
POWER STAND BY ZONE 1 ZONE 2 ZONE 3 ZONE 4 ZONE 5 ZONE 6 V.II 1 3 2 Essentia Front Panel 1. POWER Button: 2. STAND BY LED: 3. Zone Status LED's: The amplifier is designed to be turned on and remain on. The power button supplies power to the system. Each zone can then be turned on or off independently. The amplifier should be turned on before any external connections are made. This activates internal protective circuitry.
VARIABLE OUTPUT VARIABLE OUTPUT OUTPUT POWER TIP=L RING=R FIXED OUTPUT 2 4 5 20W/6OHM X2 FIXED OUTPUT ZONE 2 3 VARIABLE OUTPUT OUTPUT POWER TIP=L RING=R 20W/6OHM X2 FIXED OUTPUT ZONE 1 1 VARIABLE OUTPUT OUTPUT POWER TIP=L RING=R 20W/6OHM X2 ZONE 3 6 VARIABLE OUTPUT VARIABLE OUTPUT OUTPUT POWER TIP=L RING=R OUTPUT POWER TIP=L RING=R 20W/6OHM X2 FIXED OUTPUT FIXED OUTPUT ZONE 4 1 1 3 20W/6OHM X2 FIXED OUTPUT Essentia D V.
LRC1 Learning Remote Control 1. Setup: 1 1 4 2 7 3 2. Whole-Home Control: This section automatically performs the basic Essentia keypad functions. SOURCE 5 6 3. Transport Buttons: M WHOLE-HO E CONTROL VOL- The setup button is used to place the remote control in program/learn mode. VOL+ MUTE ON/OFF 2 The transport buttons perform basic source specific functions, such as play, stop, pause, forward and reverse. 3 4.
Installing the Essentia System in Your Home I. Prewire Gro und IR TX Gro u Con nd tr Con ol Da ta tr IR ol Da BusAct ta B us+ Gro ive u +12 nd VP ow er The Essentia System uses CAT5 cable for keypad control and either two or four-conductor 16-gauge speaker wire. All the wire is “homerun” from each zone to the location of the Essentia amplifier and Audio Source equipment.
II. Installing the Essentia Amplifier System setup works best when the amplifier is placed in the same location as the audio source equipment. This is typically in an audio rack, entertainment center or a closet dedicated to housing the home audio/video equipment. Once you have plugged the Cat-5 wires into the EZ Port, screw the EZ Port into its construction bracket using the supplied mounting screws.
Fig. 4 IV. Connecting the EZ Port to the Essentia amplifier When the EZ Port is installed in the wall the only part visible should be the faceplate and a single RJ45 jack. The supplied preterminated network cable can then be plugged into the jack on the EZ Port and into the network connection on the back of the Essentia amplifier, Fig. 4. Any CAT5 cable terminated using 568A or 568B network wiring will suffice should you need a longer connection.
Fig. 7 VII. Expanding Essentia to 12 Zones Six additional listening zones can be added to the Essentia System using the Essentia Expander package. The expansion is easily done using the Source Link and Digital Link multi-pin outputs on the Essentia main amplifier, Fig. 7.
The volume indicator LED indicates the function being set. Fig. 9 IX. Keypad Zone Settings Each Essentia keypad has the ability to set specific zone functions. These are bass and treble EQ, source grouping, all on (party mode) and volume reset. Each of these functions is accessed by pressing the MUTE and SOURCE 1-5 buttons simultaneously, fig. 9. While the keypad is in the function set mode, the appropriate source button with flash. To return to normal zone control, press the flashing source button.
Fig. 12 All On/Party Mode The lit volume LED will flash when the keypad is in Master Mode. The Essentia System has an All On feature. Any keypad within the system, which can be up to twelve zones, has the ability to become a master control for the entire house. The master keypad will control zone on, volume level, and source selection for all other zones. To place a keypad in Master Mode function, simply press the Mute and Source 4 buttons simultaneously.
X. Using the Fixed and Variable Lineouts Each zone of the Essentia amplifier has two 3.5mm mini stereo outputs. These are fixed and variable lineouts used for adding additional amplification when necessary for each zone. A distinct advantage to the NuVo equipment is the ability to use the amplified output, variable and fixed lineouts all simultaneously on all zones. The Essentia amplifier has zone trigger outputs that provide a 12V trigger for additional amplification.
Zone Fixed Lineout In some zone applications, it is more advantageous to have a separate volume control on the additional speakers being driven by an additional amplifier. This is common with outdoor zones. The fixed lineout offers the capability to add amplification, but the audio signal is not affected by the zone keypad volume level. Therefore, it requires a separate volume control for those speakers, fig. 16. Fig.
XI. The NV-LRC1 IR Remote Control The Essentia System comes with the NV-LRC1 Learning Remote Control. This remote allows wireless control of all keypad functions, as well as the functions of the audio source equipment. Each NuVo zone keypad has an IR receiver that captures the specific source commands from any remote control and in turn sends the command ultimately to the appropriate source equipment. Embedded IR code libraries makes use of the LRC1 with a large variety of audio and video equipment easy.
XIII. NV-LSA40 Local Source Amplifier The LSA40 is 40 watt accessary amplifier that allows any line-level audio signal local to a zone to be amplified through that zone’s speakers. It is designed to be used universally in a variety of applications, but as shown in fig. 18, it can be triggered on and off by any zone keypad. When connected to the keypad, the user will listen to the NuVo audio system when the zone is turned on.
XIV. NV-LSA40PD Local Source Amplifier Power Distribution Hub The LSA40PD is a great device for distributing the necessary DC power to up to 4 individual LSA40 amplifiers. This allows the LSA40 components to be remotely located without the need for an external power supply in the zone, fig. 19. The LSA40PD is typically located where the Essentia amplifier is installed. The power from the head end to each of LSA40 locations is sent over standard 16 gauge speaker wire. Fig.
XV. NV-LSI12 Local Source Interrupt A lower cost alternative to the LSA40 is the LSI12. This is a non-amplified local source interrupt. It is installed in the same way the LSA40 is installed, but the incoming local signal must be amplified, fig 20. This is a useful accessory where a local amplified signal is already present. Fig. 20 The connection from the LSI12 is done with the provided two prong plug.
XVI. NV-P2100 200 Watt Auxiliary Amplifier Fig. 21 The P2100 is specifically designed for use with the NuVo Systems' lineouts. It can be used with either the fixed or variable lineouts on the Essentia with either a 1/8” (3.5mm) to 1/8” stereo patch cable or a 1/8” stereo to RCA patch cable, Fig 21. NV-P2100 Amplifier AUDIO CONTROL CONTROL L SENSITIVITY OdBV = 1.
Troubleshooting Symptom Probable Cause Remedy When the keypad is plugged in there is a loud pop through the speakers and the keypad does not work. Improperly wired CAT5 cable. Check that you are using the 568A or B wiring standard (see section I: Crimping CAT5 wire). The best way to know is to use a CAT5 tester. When the keypad is plugged in, it just flashes and has no functionality. Assigning duplicate addresses to multiple keypads.
Specifications Zones 1-6 Power Amplifier Outputs Continuous Average Output Power Two channels driven 30-20kHz @1% THD Rated Distortion (1/2 power) Rated Impedance Damping Factor Frequency Response (20-20kHz) Zones 1-6 Preamplifier Outputs Variable output Fixed output Impedance Source Inputs 1-6 input Impedance Input Sensitivity for rated power Input Overload Emitter Outputs Source Outputs Sum Outputs Output Drive Current Output Drive Voltage Compatible with single and dual emitters System System On External
Addendum Control Interface Description Document for the Nuvo E6D Main Unit Revision E (for Nuvo E6D Mark II systems only) June 8, 2006 DB9M PORT PINOUTS: Nuvo Transmit to System Controller on pin 2. Nuvo Receive from System Controller on pin 3. Ground on pin 5. SERIAL PORT PARAMETERS: RS232, RTS/CTS or software flow control (XON/XOFF) NOT required, 9600 baud, 8N1 protocol. RULES OF PROTOCOL: (1) For alpha ASCII characters, always use UPPER CASE.
NOTE: the Main Unit ships with the carrier frequency DEFAULT setting of 38 KHz for all six sources. ********************************************************************************* COMMAND: *IRSETDF Restores DEFAULT SOURCE IR carrier frequency settings (38 KHz for all six sources). RESPONSE: Same response as for #IRSETSR ********************************************************************************* COMMAND: *SxIR56SET - sets SOURCE x to 56 KHz IR repeat carrier (x is 1 to 6).
MUTE input, however, will always override other volume response values with the “XM” response. ********************************************************************************* COMMAND: *ZxxSETSR ZoneSet STATUS REQUEST where xx is zone # from 1 to 12. RESPONSE: #ZxxORp,BASSyy,TREByy,GRPq,VRSTu -p = 1 if at least one of the permanent values have been overridden* by an RS232 command. -yy = EQ level, dB, 12 to +0 (flat) to +12 in 2 dB increments if set by RS232, -8, -6,-4, 0, +4, +6, +8 if set on keypad.
Command to determine when the desired volume point has been reached. Note that ramps in different zones may start at different levels and will all ramp at the same rate. ********************************************************************************* COMMAND: *ALLV- Ramp ALL zones DOWN at a 10 dB/second rate in 1 dB steps. RESPONSE: #ALLV- The ramp action will be cancelled when all zones reach MINIMUM (OFF) volume, or when an *ALLHLD Command is received.
********************************************************************************* COMMAND: *ZxxMTOFF zone xx MUTE OFF (returns zone output to currently connected source at previous volume setting). RESPONSE: Same response as for *ZxxCONSR ********************************************************************************* COMMAND: *ZxxBASSyyy zone xx BASS EQ with yyy = EQ level, dB, 12 to +0 (flat) to +12 in 2 dB increments. USE LEAD “0” IN TENS PLACE FOR VALUE LESS THAN 10.
********************************************************************************* COMMAND: RESPONSE: *ZxxLKOFF zone xx KEYPAD LOCK ON This will RESTORE ALL keypad control input on the zone (useful as Parental lock control) . This is the same as deactivating the Parental lock control at a keypad by holding down a SOURCE key for three seconds). #ZxxLKOFF ********************************************************************************* COMMAND: *VER Firmware version query.
ESS513 0706