
User's Manual


January 2010 - 10 -
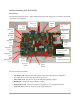
1) Display connection. One of the following display devices should be connected. For
best results, do not connect more than one of these options at a time unless directed to
do so by a particular operating system pack. Be sure to check the documentation for
your selected OS support pack, as some OSes may not support all of these display
connections:
a. Analog “VGA” display (LCD or CRT monitor) connected via the devkit’s VGA
15-pin D-sub connector.
b. HDMI display (LCD screen or compatible television) via the devkit’s HDMI port
and an HDMI cable. Note that on many OS images, using HDMI as the display
connection will route audio to the HDMI port as well, disabling the headphone
jack.
c. Digital DVI-D display connected via the devkit’s HDMI port and an HDMI-to-
DVI cable or cable-adapter pair.
2) “Recovery” (or flashing) USB connection. A USB cable must connect the USB-mini jack
on the left-rear corner of the devkit to a USB jack on the host PC. The OS that the host
PC must be running will depend on the OS being installed on the devkit, and will be
documented in the platform pack for that particular OS.
3) Power. The supplied 15V power supply should be connected to the power jack on the
rear edge of the devkit main board. Depending on the setting of the “ACOK” switch
described previously, applying power to the board may cause it to switch on
automatically. Earlier Tegra devkits used a 12V power supply with a similar connector:
this 12V power supply is not compatible with the Tegra 250 devkit and must not be
used.
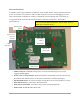
Additional items that should be connected to the devkit for general post-install interaction with
the devkit include
1) Powered USB hub. As a mobile development kit, the devkit is not designed to provide
large amounts of power to external devices. Thus, external devices other than the most
basic mice and keyboards should be connected to a powered USB hub. This powered
hub should be connected to one of the two stacked USB jacks on the left-front edge of
the devkit main board.
2) USB keyboard and mouse: both of these should be connected to the powered USB hub.
If required, a basic USB keyboard and mouse pair can be connected to the two stacked
USB jacks, but if possible, a powered hub is recommended.
3) WiFi Antenna. The threaded end of the WiFi antenna should be firmly screwed onto
the WiFi antenna connector on the rear edge of the devkit main board.