
User Guide


Jetson TX2 Developer Kit
User Guide
Jetson | DA-07498-001v01 | Copyright © 2014 NVIDIA Corporation. All rights reserved. Page 3 of 25
Introduction
The NVIDIA® Jetson TX2 Developer Kit is a full-featured development platform for visual computing. It
is ideal for applications requiring high computational performance in a low power envelope. The Jetson
TX2 Developer kit is designed to get you up and running quickly: It comes pre-flashed with a Linux
environment, includes support for many common APIs, and is supported by NVIDIAs complete
development tool chain. The board exposes many standard hardware interfaces, enabling a highly
flexible and extensible platform.
Go to http://developer.nvidia.com/embedded-computing for access to software updates and the
developer SDK supporting the OS image and host development platform that you want to use. The SDK
includes an OS image that you will load onto your device, developer tools, supporting documentation,
and code samples to help you get started.
Getting Started
Individual development efforts will vary and may result in modifications to the system configuration. It
is recommended that you begin with the basic system configuration (as shipped) to ensure proper
system operation prior to any further development.
Assumptions
> You have a Jetson TX2 Tegra Developer System, equipped with the NVIDIA
®
Tegra
®
TX1
processor.
> Your developer system should be cabled as follows:
Serial cable plugged into the serial port on the target connected to your Linux host directly
or through a serial-to-USB converter. (To setup serial console on the Linux host.)
(Not included in the developer kit) To connect USB peripherals such as keyboard, mouse, and
[optional] USB/Ethernet adapter (for network connection), a USB hub should be connected to
the working USB port on the Jetson TX2 system.
An HDMI cable plugged into the target which is connected to an external HDMI display.
An Ethernet cable plugged into the on board Ethernet port.
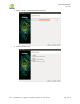
Powering Up the Tegra Device
1. Connect a USB keyboard to the USB Type A connector of your device.
2. Connect an HDMI-compatible display to the HDMI connector on your device.
3. Connect the AC adapter supplied in your kit to the power connector of your device. Use the
supplied AC adapter since it is appropriately rated for your kit.
4. Plug the power adapter into an appropriately rated electrical outlet.
5. They system should power on. If not, press and release the power button on the device.