® BUILT-IN OUTDOOR GRILLS MODEL: 740-3006-B! Liquid Propane / Natural Gas Stainless Steel Grill Installation and User Care Guide IMPORTANT: Save for electrical Inspector's use. perinatal: Leave nationalistic instructions with the homeowner, Homeowner: Keep installation instructions for future reference.
TABLE OF CONTENTS OUTDOOR GRILL 3 ILLUSTRIOUSNESS. i" INSTALLATION REQUIREMENT! 5 UsingYourOutdcorGril.. a7 Tools and Parts 5 UsingYourRotisserieBumner. 19 Location Requirements 5 RotisserieCookingTips.. 18 Product Dimensions... 8 TIPSFORGUTDOORGRILLING.. 20 Built-In Outdoor Grill Enclosures... 8 Methodicalness. 20 Cabinet Cutout Dimensions... 7 Grilling Chart. 2 Light Instructions... 8 OUTDOORGRILLGARE. 23 GasSupplyRequirements. ReplacingthelgniterBattery.. 23 General Cleaning. ‘GasConnectionRequirements.
‘allure to comply with these Instructions could result In a fire or explosion that could cause serious bodily Injury, death, property damage. ‘ou can be Killed or seriously Injured If you don't follow Instructions.
IMPORTANT SAFETY INSTRUCTIONS WARNING: To reduce the risk of fire, electrical shock, injury to persons, or damage when using the outdoor cooking gas appliance, follow basic precautions, Including the following: = Do not install built-in outdoor cooking gas appliances recreational vehicle, portable trailer, boat or In any other moving Installation. = Always maintain minimum clearances from combustible construction, see “Location Requirements” section.
INSTALLATION REQUIREMENTS Tools and Parts Gather the required tools and parts before starting Installation. Read and follow the Instructions provided with any tools listed here. Tools Needed = Tape measure = Pipe wrench = Small, flat-blade screwdriver Scissors or cutting pliers «#2 and £3 Phillips screwdriver {to remove tie-downs) «Level » Noncorrosive leak-detection = Wrench or pliers solution Parts Supplied = Gas pressure regulator/hose assembly set for 11" WCP LP gas.
Built-In Outdoor Grill Enclosure not Install wn — combustible materials » without an Insulated Jacket. « Doing so can result In death or fire. Fire Hazard This builtin outdoor grill is only for installation in a builtin Bono install gal on of near combustible materials enclosure constructed only of noncombustible materials. Non without an insulated blanket combustible materials could be brick, firewall or steal. Do not uss H wood or other combustible materials for built-in enclosure.
Cabinet Cutout Dimensions The illustration below includes cutout dimensions and minimum spacing requirements. The illustration is for reference. The design of your cabinet layout can be personalized, but the dimensions for the cutouts and minimum spacing must be followed. Center or support surfaces must be level. Built-in Outdoor Grill Enclosure Ventilation Requirements (see picture 1) Any enclosure Is fo ba ventilated by openings at both the top and lower levels of the enclosure.
Light Instructions Light Operation Instructions (see picture 1} Make sure light's power switch on the control panel is in the "OFF" position. Insert and turn the light plug to connect the adapter. Connect adapter to properly grounded outlet. Turn the light's power switch to *ON® WARNING Keep any electrical supply cord away from any heated surface. Fix the adapter on the cabinet with 4 picture 2} Picture 2 Bulb Replacement 1.
Light Instructions 2, Use a screwdriver to loosen the screw securing the light ag. 3. Remove light and light casing ere 4. Remove the glass cover from the light compartment. mp. 5.Use a screwdriver to loosen the two screws locking the bulb. Pull out the light bulb and replace with a new bulb. > 6. Reverse the instructions from steps 5-1 for installation. Cleaning Method Follow steps 1-4 above for glass cover removal. Use a damp towel to clean the surface of glass cover.
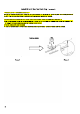
Install 20 Ib LP Gas Fuel Tank Tray (see picture 3) Pictures of gas tank is for frustration purpose only.) The tank tray should be secured to a fixed location that can be gaily accessed and will allow the gas pressure regulator] hose assembly to connect to the 20 1b LP gas fuel tank without Kinking or putting strain on the gas pressure regulator hose assembly: 1, Place the dank tray in a location that can bs secured using 4 resews {suppliant) fought the espadrille holes.
LP Gas Connection Gas Pressure Regulator The ges pressure regulator supplied with this grill must be used. Replacement gas pressure regulator/ hose assembly specific fo your model, is available from your outdoor grill dealer. The inlet (supply) pressure to the regulator should be as follows for proper operation: LP Gas: Operating pressure: 117 (27.8 cm) WCP Inlet {supply} pressure: 11" (27.
Grill INSTALLATION INSTRUCTIONS Unpack Grill Unpack Grill 1. Remove all packaging materials and remove grill from the shipping base. 2 Move grill close to desired outdoor location. 3. Open the grill hood. 4. Check all the parts are well packaged and kept in the right place, then remove foam block and wrap from Inside the box. 5. Replace the flame tamers, grill grates and warming rack. 6. Place all the parts to the correct location as picture. below 3 TEE. 7.
Gas Leakage Testing After install the gas supply system, and the Gill is well fixed to the enclosure: 1, Before lighting the girl, test all connections by brushing on an approved non-corrosive leak-detection solution. Bubbles will show a leak. 2. Leakiness found, tum the tank valve off and do not use the grill. Contact a qualified gas technician to make repairs. Install The Battery 1. The ignite battery is not factory installed.
NG GAS CONVERSIONS Natural gas adapter, hose and regulator ara not included in this grill. instruction and pictures are for illustration only in case needed, PORTENT: The Natural gas Commission Kit supplied with this girl mist be used. If you want fo convert to local NG gas supply, contact your local gas company for specific instructions. Conversion must ba Installed by a qualified gas technician.
STEP FOUR: Change the Rotisserie/Infrared Buber Orifice 1. Using a Phillips screw driver, remove the 3 screws and remove the rotlsserie/infrared boomer wind baffle. Remove the wind baffle 3. Remove LP orifice, then install the Rotisserie Buber NG Orifice (NG part 2), (¢ 168mm) . A: NG Outflows for Rotisserie Buber( NG pert 2} B: LP office 4. IMPORTANT: Check that the orifice is properly installed the put on the base nut and install the wind baffle.
STEP SIX: Leakage Checking and adjusting 1. Open the manual shutoff valve In the gas supply line. The valve Is open when the handle Is parallel to the gas pipe. 2 Test all connections by brushing on an approved noncorrosive leak-detraction solution. Bubbles will show a leak. If a leak is found, tum the NG gas valve off and do not uss the grill. Contact a qualified gas technician to make repairs. Check and Adjust the Burners The boomers are tested and factory-get for most efficient operation.
OUTDOOR GRILL USE The grill you have purchased may have some or all of the features listed. The locations and appearances of the features shown hers may not match those of your model. Control Panel satirical ignition control knob D. Right center grit boomer control knob B. Left grit boomer courtroom knob E Rotisserie burner control knob C. sift canter grill burner control knob F. Right grit burner corolla knob G.
Prepare the Gas Supply 1. ‘Open the hood completely. Da not light boomers with the hood: closed. 2... Make suns control knobs are. muted to. OFF. The drip tray. must be in place and pushed ell the way to the Back: A Drip tray’ Tum the Gas Supply On 1. For outdoor grills using gas: fuel antic Slowly open the tank valve. NOTE: If flow limiting device activates, your grill may not light If your grill doa light; the flames will be low and will not heat property.
5. Push the pulse Ignite module and push In and tum the control knob to : to car IGNITE/ON, Hold this ~~ Using Your Rotisserie Burner knob in for 15 seconds after the boomer is it. You will hear the To avoid damage to the warming rack, remove from grill when “snapping” sound of the spark until after the knob Is released. using the rotisserie burner. Do not use the main burners when the rotisserie boomer is in use. Lighting the Rotisserie Buber 1. Do not lean over the grill. 2 Push the pulse ignition module.
Cleaning Method: = Loan the exterior of the bummer with a wits brush. n. Clear any clogged boomer ports with a straightened paper dip. «Do not use a toothpick as it may break off and clog the port. » Chicane clean venturesomeness tubes. 1. Remove girl parables and flame tamers. 2. Ra move the 2 screws that hold the boomer I place. Remove gas bloomer from the gill, A. 2 sorrows 3. Usa a flashlight to Inspect Into the imbiber through the burner inlet fo entire thees Is no blockage.
Neither dealers nor the retail establishment selling this product has any authority to make any additional warranties or to promise remedies in addition to or inconsistent with those stated above. Manufacturer's maximum liability, in any event, shall not exceed the documented purchase price of the product paid by the original consumer. This warranty only applies to units purchased from an authorized retailer and or reseller.