® MODEL: 740-LS 30BI Liquid Propane / Natural Gas Stainless Steel Grill
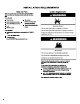
-4 OUTDOOR GRILL USE...........................................18-19 Using Your Rotisserie Burner.....................................20 Rotisserire Cooking Tips..............................................21 Tips for Outdoor grilling...........................................22-23 Outdoor grill Care..........................................................24 -9 TROUBLE SHOOTING................................................26 PART LIST...................................................................
Light Instructions 1114 MADE IN CHINA O/P OUTPUT: 12VAC 1670mA 20W I/P Picture 1 light plug MADE IN CHINA I/P O/P 1114 Halogan lights ON/OFF switch OUTPUT: 12VAC 1670mA 20W INPUT:120VAC 60Hz MODEL NO :E50-0000017ULZ main burner LED knob ON/OFF switch INPUT:120VAC 60Hz MODEL NO :E50-0000017ULZ insert and turn adaptor Light Operation Instructions (see picture 1) Make sure light’s power switch on the control panel is in the “OFF” position.
Light Instructions 2. Use a screwdriver to loosen the screw securing the light 3. Remove light and light casing 4. Remove the glass cover from the light compartment. 5.Use a screwdriver to loosen the two screws locking the bulb. Pull out the light bulb and replace with a new bulb. 6. Reverse the instructions from steps 5-1 for installation. Cleaning Method Follow steps 1-4 above for glass cover removal. Use a damp towel to clean the surface of glass cover.
5.
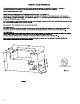
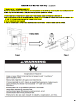
1. Remove the grates and flame tamers. 2. Remove the 1 screw that hold the burner in place. Set the screws aside. Remove the burner from the grill by lifting the burner out. 740-LS 30BI Remove the main burner screw 3. Use a 6 mm socket and wrench or 6 mm nut driver to remove thebrassorificefromtheendofgasvalve.AndplacetheNGorifice the main burner orifice is 1.51mm (NG part1). A A: install the main burn orifice( NG part 1) 740-LS 24SB 4.
STEP FOUR: Change the Rotisserie/Infrared Burner Orifice UsingaPhillipsscrewdriver,removethe3screwsand 1. remove the rotisserie/infrared burner wind baffle. Remove the wind baffle 2. Use wrench remove the nut on the orifice base. 3. Remove LP orifice, then install the Rotisserie Burner NG Orifice (NG part 2), (¢1.68mm) . A: NG Orifice for Rotisserie Burner( NG part 2) B: LP orifice 4. IMPORTANT: Check that the orifice is properly installed the put on the base nut and install the wind baffle.
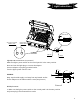
STEP FOUR: Connecting the NG hose 16 13
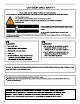
Warning: The outdoor cooking gas appliance and its individual shutoff valve must STEP SIX: Leakage Checking and adjusting be disconnected from the gas supply piping system during any pressure testing of that system at test pressures in excess of 0.5 psi 1. Open the manual shutoff valve in the gas supply line. The valve is open when the handle is parallel to the gas pipe. (3.5 kPa).
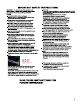
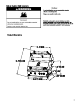
OUTDOOR GRILL USE The grill you have purchased may have some or all of the features listed. The locations and appearances of the features shown here may not match those of your model. Control Panel G H B A C A. electric ignition control knob B. Left grill burner control knob C. left center grill burner control knob D E F D. Right center grill burner control knob E. Rotisserie burner control knob F. Right grill burner control knob G. LED lighting Switch H.
Prepare the Gas Supply 1. 2. Manually Lighting the Main Grill Open the hood completely. Do not light burners with the hood closed. Make sure control knobs are turned to OFF. The drip tray must be in place and pushed all the way to the back. 1. Do not lean over the grill. 2. Remove the manual lighting extension (see following illustration) and attach a match to the split ring. 3. 4. Strike the match to light it. Guide the lit match under the grill grate. A A. Drip tray Turn the Gas Supply On 1.
Using Your Rotisserie Burner To avoid damage to the warming rack, remove from grill when using the rotisserie burner. 5. Push the pulse ignitor module and push in and turn the control knob to IGNITE/ON. Hold this knob in for 15 seconds after the burner is lit. You will hear the “snapping” sound of the spark until after the knob is released. Do not use the main burners when the rotisserie burner is in use. Lighting the Rotisserie Burner 1. Do not lean over the grill. 2. Push the pulse ignitor module.
ROTISSERIE CHART ■ Shorten the preheat time when grilling high-fat cuts of meat or poultry, such as chicken thighs. This will help reduce flare-ups. ■ Lightly oil the grill grates or the food when cooking low-fat cuts of meat, fish or poultry, such as lean hamburger patties, shrimp or skinless chicken breasts. ■ Using too much oil can cause gray ash to deposit on food. ■ Trim excess fat from meats prior to cooking to reduce flare-ups. ■ Make vertical cuts at 2” (5.
Grilling Chart ■ Knobs have High, Medium and Low settings for flame adjustment. ■ Heat settings indicated are approximate. ■ Grilling times are affected by weather conditions. FOOD ■ When 2 temperatures are listed, for example: Medium to Medium-Low, start with the first and adjust based on cooking progress. ■ Cooking times may vary from chart times depending on the type of fuel, Natural or LP gas. COOKING METHOD/ BURNER SETTING INTERNAL TEMP.
FOOD COOKING METHOD/ BURNER SETTING INTERNAL TEMP. TIME (total minutes) SPECIAL INSTRUCTIONS Grill, turning once. Brush grill with oil to keep fish from sticking. Remove when inside is opaque and flaky with skin easily removed. Fish and Seafood Fillets, Steaks, Chunks Halibut, Salmon, Swordfish, 8 oz (0.25 kg) DIRECT Medium 4-6 per ½” (1.3 cm) thickness of fish Whole, Catfish, Rainbow Trout, 8-11 oz (0.250.
OUTDOOR GRILL CARE GRILL GRATES Replacing the Igniter Battery If igniters stop sparking, the battery should be replaced. 1. Unscrew igniter button cap counterclockwise to remove. IMPORTANT: To avoid damage to grill grates, do not use a steel or fiber scraper. Immediately after you are finished cooking, loosen food soil with a brass bristle brush. Turn all burners to HI for 10-15 minutes with the hood closed to burn off food soil. Turn off all burners, raise the hood and let grates cool.
BURNERS ROTISSIERE BURNER Cleaning Method: Cleaning Method: ■ Clean the exterior of the burner with a wire brush. 1. ■ Clear any clogged burner ports with a straightened paper clip. 2. Close the grill hood. Do not use a toothpick as it may break off and clog the port. 3. Leave the burner on high for approximately 30 minutes. 4. Turn knob to OFF and let cool completely. 5. Brush off ash particles from the rotisserie burner. ■ ■ Check and clean burner/venturi tubes. 1. 2.
TROUBLESHOOTING Excessive flare-ups ■ Grill will not light ■ Is the 20 lb LP gas fuel tank valve turned off? Turn the 20 lb LP gas fuel tank on. ■ Is the grill properly connected to the gas supply? Contact a trained repair specialist or see Installation Instructions. ■ Is there gas in the 20 lb LP gas fuel tank? Check the gas level. ■ Is the igniter working? Check that the igniter battery is properly installed or check to see if the battery needs to be replaced.
PART LIST 27
Part Number Part (description) Quantity Part Number Part (description) Quantity 01 Temperature gauge 1 29 Voltage changer 1 02 NXR Logo 1 30 NG Conversion kit 1 Main lid 31 NG regulator 1 03 1 Main lid inner panel 32 LP regulator 1 04 1 1 1 Lid left handle seat 33 Rear burner ignitor wire 05 34 Rear burner thermocouple 1 06 Main lid handle tube 35 thermocouple support frame 1 36 Rear burner shield 1 37 Lamp cover 38 Halogen Lamp 1 07 Lid right handle seat
LIMITED WARRANTY DURO warrants to the original consumer-purchaser only that this product (Model #740-3003-BI) shall be free from defects in workmanship and materials after correct assembly and under normal and reasonable home use for the periods indicated below beginning on the date of purchase. The manufacturer reserves the right to require photographic evidence of damage, or that defective parts be returned, postage and or freight pre-paid by the consumer, for review and examination.
Neither dealers nor the retail establishment selling this product has any authority to make any additional warranties or to promise remedies in addition to or inconsistent with those stated above. Manufacturer’s maximum liability, in any event, shall not exceed the documented purchase price of the product paid by the original consumer. This warranty only applies to units purchased from an authorized retailer and or re-seller.