ARIES™ HOME+ (NAVS502) INSTRUCTION MANUAL WIRELESS HD TRANSMITTER
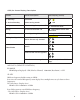
CONTENT What's Included......................................................................................................................3 Overview...................................................................................................................................3 Installation................................................................................................................................5 LED Description......................................................................
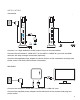
WHAT'S INCLUDED Remote Control IR Blaster cable Transmitter HDMI cable Receiver Anchors x2 Quick Installation Guide DC Power Adapter Mini USB Power Adapter OVERVIEW Power Button USB IN Source Button Source LEDs HDMI OUT Main Unit Back Panel SERVICE IR OUT Front Panel Buttons and LEDs HDMI OUT HDMI HDMI OUT IR Blaster Extender Jack HDMI Source LEDs HDMI IN Power Button DC IN Main Unit Back Panel Source Button Front Panel Buttons and LEDs 3
Remote A POWER BUTTON IR A B SOURCE INPUT Press the power button on either the TX or RX to power on both TX and RX automatically INFO C B IR BUTTON D Press to switch the IR Blaster frequency to meet the source device’s requirement. It can switch the IR blaster’s frequency to 47k/56k/36k respectively. C INFO. BUTTON Press this button to display On Screen Display (OSD) for related system information D SOURCE BUTTON Press to switch the audio/video sources input connected to transmitter directly.
INSTALLATION Transmitter SERVICE HDMI HDMI HDMI OUT IR OUT SERVICE HDMI HDMI HDMI OUT IR OUT s HDMI HDMI DEVICE 1 DEVICE 2 Connect 1 or 2 high-definition audio/video sources to the transmitter Connect the transmitter’s “HDMI OUT” to the HDTV’s “HDMI IN” port with an HDMI cable for the loop-through connection (optional). Connect the supplied power adapter to the DC IN jack of the transmitter and plug into power outlet. The white LED indicator will appear.
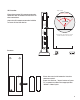
IR Extender Top view/vue de dessus Plug the external IR remote extender lead into the IR socket on the back of the transmitter DEVICE / APPAREIL 30°3 place the IR remote extender bubble in front of the HD device 0° SERVICE IR sensor must be in front of IR window of device. HDMI HDMI HDMI OUT IR OUT 5-10cm Remote DEVICE 1 DEVICE 2 Place the two AAA batteries into the remote control. Press the Source / Input button of your TV’s remote to select the appropriate “HDMI” video input.
POWER After the power cords are plugged into the power supply, the transmitter and receiver will be turned on automatically. If it is in Standby mode (Both POWER LED of transmitter and receiver are lit in red), press the POWER button either on transmitter or receiver to turn on the transmitter and the receiver. During the warm-up, the POWER LED will blink until connection between the TRANSMITTER and the RECEIVER is established. It will take 15 - 20 seconds for the system boot up successfully.
LED DESCRIPTION Receiver Item / Mode Status Description Power LED MODE POWER LED SOURCE LED STANDBY SEARCHING FOR CONNECTION SOLID RED FLASHING WHITE OFF FLASHING WHITE Status Description Power LED MODE POWER LED SOURCE LED STANDBY SEARCHING FOR CONNECTION SOLID RED FLASHING WHITE N/A N/A Transmitter Item / Mode 8
OSD (On Screen Display) Description Mode Status Description OSD Display (on RX) Rx: Standby Solid RED Tx: Active-Standby Power saving mode. Pairing RX searching for unpaired TX Please Activate Registration on Transmitter Unit RX cannot find new TX New WHDI source was not found Pairing Pairing manually pairing RX and TX Waiting for Signal Link After 80 seconds, can’t establish link on any channel.
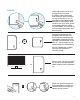
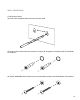
WALL MOUNTING: (1) Drill pilot holes. (2) Insert the supplied two Anchors into the wall. (3) Insert two screws into the anchors. Leave 1/8” length for mounting the Transmitter or receiver.
TROUBLESHOOTING: No Video - Check the status of the Link LEDs, and check if the HD device is working normally. - Check the HDMI lead is undamaged and is plugged into the correct socket. - Check that the correct HDMI output has been selected from the HD device’s menu and that the HDMI lead is plugged into the correct output socket. - Check that the correct HDMI input has been selected from the TV menu and that the HDMI lead is plugged into the input socket selected.
FAQ Thank you for your purchase of the Nyrius Aries Home/Home +. If you require any assistance please review the below Frequently Asked Questions. 1. What does the status of the LEDs mean? SOLID WHITE LINKED FLASHING WHITE/BLUE SEARCHING SOLID RED STANDBY Transmitter/Receiver is linked. Transmitter/Receiver not in range. No HDMI Input connected. Transmitter/Receiver in power saving mode. 2. What is the maximum transmission range? The maximum range is 100 feet line of sight.
TX/RX WILL NOW BE PAIRED : 1. RX (Receiver) : Remove mini USB power adapter, make sure RX is without power. 2. Press Power button and then plug-in mini USB power adapter. (continue holding power button) 3. Release Power button, RX’s Power button LED will now flash purple. After the 3 steps above , you will see the following OSD : 1. TX (Transmitter): Remove TX 5V DC power adapter, make sure TX is without power. 2. Press Power button and then plug-in 5V DC power adapter. (continue holding power button) 3.
SUPPORTED RESOLUTIONS: 2D VIDEO FORMAT RESOLUTION SUPPORT 640x480p @ 59.94 / 60Hz 480p YES 720x480p @ 59.94Hz 480p YES 720x480p @ 60Hz 576p YES 720x576p @ 50Hz 720p YES 1280x720p @ 50Hz 720p YES 1280x720p @ 59.94 / 60Hz 1080i YES 1920x1080i @ 50Hz 1080i YES 1920x1080i @ 59.94 / 60Hz 1920x1080p @ 50Hz 1080p / 60 1080p / 60 YES YES 1920x1080p @ 59.94 / 60Hz 1080p / 24 YES 1920x1080p @ 25Hz 1920x1080p @ 29.97 / 30Hz 1080p / 24 1080p / 24 YES YES 640x480 @ 59.94 / 72.
AUDIO BIT RATE: Digital Audio from HDMI inputs: Up to 6Mbit/s bit-rate support. Support AC3 and DTS. 2-channel PCM: 16~24 bits audio sample with 32~96KHz sampling rate as below: 2channel PCM 16 bits 24 bits 32KHz YES YES 44.
FCC STATEMENT This device complies with part 15 of the FCC rules. Operation is subject to the following two conditions: 1. This device may not cause harmful interference, and 2. This device must accept any interference received, including interference that may cause undesired operation. This class B digital apparatus complies with Canadian ICES-003. WARNING: This equipment has been tested and is found to comply with the limits for a Class B digital device, pursuant to Part 15 of the FCC Rules.
SAFETY INFORMATION Read all instructions. Keep these instructions. Heed all warnings. Follow all instructions. Do not use this apparatus near water. Clean only with a dry cloth. Do not block any ventilation openings. Install in accordance with the manufacturer’s instructions. Do not install near any heat sources such as radiators, heat registers, stoves, or other apparatus (including amplifiers) that produce heat. Do not defeat the safety purpose of the polarized or grounding-type plug.
WARRANTY Thank you for choosing NYRIUS® Consumer Electronics Products! NYRIUS gives the following express warranty to the original consumer purchaser or gift recipient for this NYRIUS product, when shipped in its original container and sold or distributed by NYRIUS or by an Authorized NYRIUS Dealer: NYRIUS warrants that this product is free, under normal use and maintenance, from any defects in material and workmanship.