
Instructions / Assembly


11
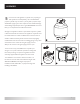
OPERATING INSTRUCTIONS
1. Smell all around the unit area for gas. Be sure to smell near the floor,
because gas is heavier than air and will settle to the lowest point. If you
smell gas, shut off the gas to the appliance, extinguish any open flame,
and if odor persists, call your gas supplier or the fire department.
2. Fire pit should be thoroughly inspected before each use, and by a
qualified service person at least annually. If relighting a hot fire pit,
always wait at least 5 minutes.
3. Inspect hose assembly for evidence of excessive abrasion, cuts, or
wear. Suspect areas should be leak tested. If the hose leaks, it must
be replaced prior to operation. Only use the replacement hose
assembly specified by manufacturer.
DANGER!
FOR OUTDOOR USE ONLY
CARBON MONOXIDE HAZARD
Never use this fire pit inside a house or
other unventilated or enclosed areas.
This fire pit consumes air (oxygen). Do
not use in unventilated or enclosed
areas to avoid endangering your life.
WHEN FIRE PIT IS ON:
Burner will display tongues of blue and yellow
flame. These flames should not produce thick
black smoke, indicating an obstruction of
airflow through the burners. If excessive flame
is detected, turn off fire pit and consult the
Troubleshooting section of this manual.
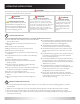
LIGHTING
:
NOTE: Use only your hand to depress or turn the gas control knob. Never use tools. If the knob will not depress or turn
by hand, DO NOT try to repair it. Call a qualified professional service technician. Force or attempted repair may
result in fire or explosion and will void the warranty.
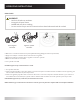
1. Turn the control knob to “OFF” position (Fig. A).
2. Fully open LP cylinder valve. Note: For initial start or after any cylinder change, hold Control Knob IN for 2 minutes to
purge air from gas lines before proceeding.
3. Push in and turn the control knob counterclockwise to HIGH (Fig. B).
4. While holding control knob in, push the Electronic Ignition button to ignite the main burner. (The ignition will produce
a soft snapping/crackling sound. If the fire pit does not light and there is no snapping sound, replace the battery.)
5. After fire pit lights, wait 45 seconds, then release control knob.
6. Observe the flame height when lit. Flame should reach between 3 and 13 inches in height. Overly short or tall flame
can indicate a problem.
7. To decrease the flame, turn the control knob clockwise to LOW (Fig. C). To increase the flame, turn the control knob
counterclockwise to HIGH (Fig. B).
NOTE: If burner fails to remain lit, close all valves and wait at least 5 minutes before attempting to light.
LOW
HIGH
Figure BFigure A
NOTE: This model has an Electronic Igniter and
requires
one AAA battery. Unscrew IGNITER
BUTTON
to install
.
Electronic igniter
requires
AAA battery
BEFORE LIGHTING
:
SHUT DOWN:
1. To extinguish burner depress control knob and turn it
clockwise to OFF.
2. Turn cylinder valve clockwise to OFF and disconnect
regulator when fire pit is not in use.
AFTER-OPERATION CHECKLIST:
1. Gas control knob is in OFF position.
2. Gas tank valve is OFF.
3. Gas line is disconnected.
Figure C